2018 Nissan Altima Serpentine Belt Diagram
Hey there, fellow gearheads! Today, we're diving deep into the heart of the 2018 Nissan Altima's engine bay to dissect the serpentine belt system. Think of this article as your comprehensive guide to understanding the serpentine belt diagram for your Altima. Whether you're planning a preventative maintenance check, diagnosing a squealing belt, or even attempting a complete engine overhaul, knowing this layout is absolutely crucial. I've got the diagram you can download after reading this, but let's make sure you know how to read it first.
Purpose: Why This Diagram Matters
Let's get straight to the point: the serpentine belt diagram isn't just a pretty picture. It's your roadmap to understanding the drive belt system. This diagram is absolutely essential for several key tasks:
- Repair & Replacement: If your belt snaps (a catastrophic event, I assure you), you'll need to know the correct routing to install a new one. An incorrectly routed belt can cause serious damage to your accessories.
- Troubleshooting: Squealing noises, power steering failures, or charging issues can often be traced back to a worn or misaligned serpentine belt. The diagram helps you identify potential problem areas.
- Preventative Maintenance: Regular inspections of the belt and its components, using the diagram as a guide, can help you catch issues before they lead to expensive repairs.
- Learning and Modification: Even if you're just curious about how your engine works, understanding the serpentine belt system is a great way to deepen your automotive knowledge. Planning on installing a supercharger? You need to know how the belt system will be affected.
Key Specs and Main Parts
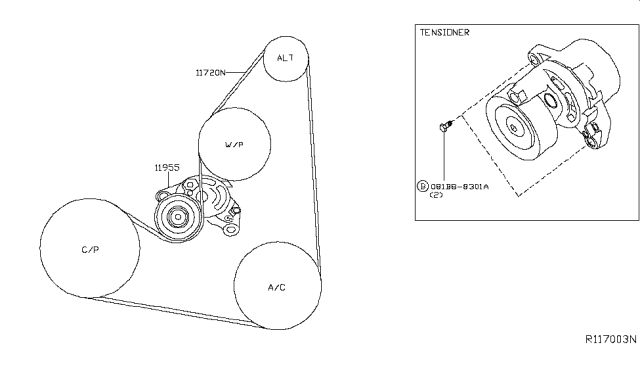
The 2018 Nissan Altima, depending on the engine, will have slightly different serpentine belt layouts. Primarily, you'll find two engine options:
- 2.5L QR25DE Inline-4: This is the more common engine. Its serpentine belt drives the alternator, power steering pump, air conditioning compressor, and water pump.
- 3.5L VQ35DE V6: The V6 engine has a similar setup, driving the same accessories, but the layout is different due to the engine's configuration.
Regardless of the engine, the key components in the serpentine belt system are:
- Serpentine Belt: This is the long, rubber belt that snakes around all the pulleys. It's usually made of a reinforced elastomer material to withstand high temperatures and stress.
- Crankshaft Pulley (Harmonic Balancer): Located at the bottom of the engine, this pulley is driven directly by the crankshaft and provides the rotational force to drive the belt.
- Alternator Pulley: The alternator generates electricity to power the car's electrical system and charge the battery.
- Power Steering Pump Pulley: This pulley drives the power steering pump, which provides hydraulic assistance to the steering system.
- Air Conditioning Compressor Pulley: This pulley drives the A/C compressor, which circulates refrigerant to cool the cabin.
- Water Pump Pulley: The water pump circulates coolant through the engine to prevent overheating.
- Tensioner Pulley: This spring-loaded pulley maintains the correct tension on the serpentine belt, preventing slippage and premature wear. It typically has a tensioner arm.
- Idler Pulley: Some systems may include one or more idler pulleys. These pulleys don't drive any accessories but help guide the belt and increase its wrap angle around other pulleys.
Symbols: Deciphering the Diagram
Serpentine belt diagrams aren't complex, but understanding the symbols is essential:
- Solid Lines: These represent the path of the serpentine belt itself. Follow the line to see how the belt is routed around each pulley.
- Arrows: Arrows indicate the direction of rotation for each pulley. This is crucial for ensuring the belt is installed correctly. A reversed belt will not function properly.
- Circles/Pulleys: Each circle represents a pulley. The diagram will usually label each pulley with its corresponding component (e.g., "ALT" for alternator, "P/S" for power steering).
- Tensioner Symbol: The tensioner pulley is often represented by a slightly different symbol, sometimes with a spring icon, to indicate its adjustable nature.
- Routing Direction: The diagram shows the exact order of how the belt wraps around each pulley.
How It Works
The serpentine belt system is a brilliantly simple mechanism. The crankshaft, driven by the engine's combustion process, spins the crankshaft pulley. This pulley, in turn, drives the serpentine belt, which transfers rotational force to all the other pulleys connected to the accessories. The tensioner pulley ensures that the belt remains tight, preventing slippage and maximizing the efficiency of the system.
Think of it like a chain reaction: the crankshaft starts the motion, and the belt acts as the messenger, delivering that motion to each accessory. If the belt is loose, worn, or incorrectly routed, the accessories won't function properly, leading to various problems like a dead battery, loss of power steering, or a non-functioning A/C system.
Real-World Use: Basic Troubleshooting Tips
Let's talk about some common issues and how the serpentine belt diagram can help you diagnose them:
- Squealing Noise: A squealing noise, especially when the engine is first started or when accelerating, often indicates a slipping serpentine belt. Check the belt for wear, cracks, or glazing. Also, inspect the tensioner pulley to ensure it's applying adequate pressure. The diagram helps you quickly locate and inspect these components.
- Accessory Failure: If your alternator, power steering, or A/C suddenly stops working, the serpentine belt is a prime suspect. Use the diagram to visually inspect the belt's condition and routing. If the belt is broken or missing, you'll need to replace it.
- Belt Wear: Regularly inspect your serpentine belt for signs of wear, such as cracks, fraying, or missing chunks. The diagram helps you identify the belt's path and access it for inspection. A worn belt is a ticking time bomb, so replace it before it fails completely.
Troubleshooting Checklist:
- Visual Inspection: Use the diagram to guide you as you visually inspect the belt and pulleys.
- Tension Check: Check the tensioner pulley's functionality. It should move freely but provide firm tension.
- Alignment Check: Ensure all pulleys are properly aligned. Misalignment can cause premature belt wear and noise. A straight edge can help with this.
- Pulley Condition: Inspect the pulleys for damage or excessive wear.
Safety: Proceed with Caution!
Working around a running engine can be extremely dangerous. Here are some critical safety precautions:
- Never work on the serpentine belt system while the engine is running.
- Disconnect the Negative Battery Terminal: This prevents accidental starting of the engine.
- Hot Surfaces: Be extremely careful when working around the engine, as many components can be very hot, especially after the engine has been running. Give the car ample time to cool down before attempting to work on it.
- Moving Parts: Keep your hands, hair, and clothing away from the serpentine belt and pulleys. These components can cause serious injury if they catch on something.
- Eye Protection: Wear safety glasses to protect your eyes from debris.
A specific area to watch out for is the tensioner. The spring is under significant pressure. When relieving the tension to remove the belt, make sure you have a good grip on your wrench and follow the correct procedure. Releasing it unexpectedly can cause injury and damage to surrounding components.
Always double-check your work against the diagram before starting the engine. An incorrectly routed belt can cause catastrophic engine damage.
Remember, if you're not comfortable working on your car, it's always best to consult a qualified mechanic. They have the expertise and tools to perform the job safely and correctly. You may find that for you the cost of paying a professional is worth the peace of mind.
Okay, that's the overview of the 2018 Nissan Altima Serpentine Belt Diagram. You should now be able to properly inspect, remove, and replace the belt. As I mentioned, I have the serpentine belt diagram available for download, just look for the link provided.