
2018 Nissan Frontier Fuse Box Diagram
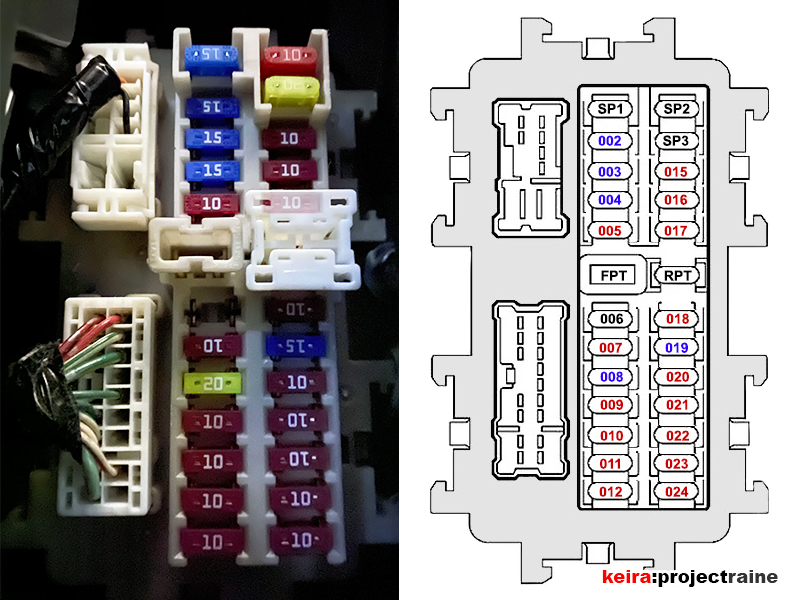
Alright, let's dive into the 2018 Nissan Frontier's fuse box diagram. Understanding this is crucial, whether you're tackling a minor electrical gremlin, installing aftermarket accessories, or just want a better grasp of your truck's electrical system. We're going to break down the diagram, explain its components, and give you some practical tips for using it safely and effectively.
Purpose of the Fuse Box Diagram
Why bother with a fuse box diagram? The main reason is troubleshooting. When an electrical component fails – say, your headlights, radio, or power windows – the fuse is the first place you should check. The diagram tells you exactly which fuse protects which circuit. It's also indispensable for aftermarket installations. If you're adding a new stereo, lights, or anything that draws power, you need to know where to safely tap into the electrical system and which fuse rating is appropriate. Without this knowledge, you risk damaging your truck's electrical system or even causing a fire.
Key Specs and Main Parts
The 2018 Frontier actually has *two* primary fuse boxes. One is located in the cabin, typically on the driver's side, near the footwell. This box primarily houses fuses for interior components and accessories. The second fuse box is under the hood, usually near the battery. This one contains fuses for engine management, headlights, and other critical vehicle systems.
Main Components You'll See on the Diagram:
- Fuses: These are the sacrificial links in the circuit. They're designed to blow (interrupt the circuit) when the current exceeds a safe level, protecting the more expensive components. Fuses are rated in Amperes (amps or A), which indicates the amount of current they can handle before blowing.
- Relays: These are electrically operated switches. They allow a low-current circuit to control a high-current circuit. For example, your headlight switch might control a relay that actually provides power to the headlights. Relays are crucial for protecting switches from high current loads.
- Circuit Breakers: Similar to fuses, but resettable. Instead of blowing and needing replacement, a circuit breaker trips open when overloaded, and can be manually reset once the overload is removed.
- Fuse Box Housing: The physical box that holds all the fuses and relays.
- Ground Points: While not *in* the fuse box, the diagram often references ground points. A solid ground connection is essential for any electrical circuit to function correctly. A poor ground can cause all sorts of strange electrical issues.
Understanding Fuse Box Symbols
Fuse box diagrams use a variety of symbols, colors, and line styles to convey information efficiently. It's crucial to understand these symbols to interpret the diagram correctly.
Common Symbols:
- Solid Line: Represents a direct electrical connection.
- Dashed Line: Usually indicates a shielded wire or a special type of connection, possibly with reduced voltage or signal integrity considerations.
- Fuse Symbol: Often resembles a squiggly line inside a rectangle or a simple rectangle with the amperage rating printed on it.
- Relay Symbol: Typically shows a coil (representing the electromagnet) and a switch (representing the contacts).
- Ground Symbol: Looks like a series of lines getting shorter, resembling an upside-down tree.
Color Coding:
While not universally standardized, some diagrams might use color coding to indicate the wire gauge (thickness) or the function of the circuit. For example:
- Red: Often used for circuits directly connected to the battery (unswitched power).
- Yellow: May indicate a circuit that is hot only when the ignition is on.
- Black: Usually indicates ground.
Important Note: Always refer to the specific diagram for your 2018 Frontier. Color coding can vary between models and even production runs.
How It Works: The Electrical Circuit
Think of an electrical circuit like a loop. It starts at the battery, flows through a wire to the component (like a headlight), does its job, and then returns to the battery through another wire (typically the ground). The fuse is placed strategically within this loop. If something goes wrong – for example, a short circuit causes excessive current flow – the fuse heats up and melts, breaking the circuit and preventing further damage.
Relays act as intermediaries. A low-current signal from a switch activates the relay's coil, which then closes the contacts, allowing high current to flow through the main circuit. This protects the switch from being overloaded. Without relays, switches handling high-current loads would quickly burn out.
Real-World Use: Basic Troubleshooting
Here's how you'd use the fuse box diagram to troubleshoot a problem:
- Identify the Problem: Determine which component isn't working (e.g., the left headlight).
- Consult the Diagram: Locate the fuse that protects the circuit for the left headlight in both the interior and under-hood fuse boxes. Double check both; sometimes circuits are split.
- Inspect the Fuse: Physically examine the fuse. A blown fuse will have a broken filament (the thin wire inside). You can also use a multimeter to check for continuity (whether electricity can flow through the fuse). If you're using a multimeter, set it to continuity mode (it usually has a beeping sound). Place the probes on either end of the fuse. A beep indicates continuity (the fuse is good); no beep means the fuse is blown.
- Replace the Fuse: Replace the blown fuse with one of the exact same amperage rating. Never use a fuse with a higher amperage rating, as this can bypass the protection and lead to a fire.
- Test the Component: Turn on the component to see if it works.
- If the Fuse Blows Again: If the new fuse blows immediately or shortly after replacement, there's a more serious problem in the circuit, such as a short circuit. You'll need to investigate further, potentially using a wiring diagram and a multimeter to trace the circuit and find the short. This might require professional help.
Safety Precautions
Working with electrical systems can be dangerous. Here are some crucial safety precautions:
- Disconnect the Battery: Before working on any electrical component, disconnect the negative (black) terminal of the battery. This prevents accidental shorts and electric shocks.
- Use the Correct Tools: Use insulated tools designed for electrical work.
- Never Bypass Fuses: Never bypass a fuse by using a wire or a higher amperage fuse. This is a serious fire hazard.
- Be Aware of Airbags: Airbag circuits are often located near the fuse box. Be extremely careful not to accidentally trigger an airbag, as this can cause serious injury. Refer to your vehicle's service manual for specific instructions on disabling the airbag system before working in this area.
- High-Current Relays: Some relays, especially those controlling major components like the starter motor, carry very high current. Be extremely cautious when working around these relays.
Disclaimer: Electrical troubleshooting can be complex and dangerous. If you're not comfortable working with electrical systems, it's best to consult a qualified mechanic.
We have the complete 2018 Nissan Frontier fuse box diagram available for download. It includes detailed information for both the interior and under-hood fuse boxes. Just click the link below to access the file. Remember to always consult your vehicle's owner's manual for the most accurate information specific to your truck's configuration.