2018 Nissan Sentra Fuse Box Diagram
Alright, let's dive into the 2018 Nissan Sentra fuse box diagram. If you're a DIYer, a modder, or just an experienced car owner, understanding this diagram is absolutely crucial. We're not just talking about replacing a blown fuse; knowing your way around the fuse boxes empowers you to diagnose electrical issues, install aftermarket accessories safely, and generally become more self-reliant when it comes to your Sentra's electrical system. Consider this your roadmap to the electrical heart of your car. And just so you know, we've got the full diagram available for download so you can reference it easily.
Purpose of the Fuse Box Diagram
Why bother learning about this diagram? The main reasons boil down to:
- Troubleshooting Electrical Problems: When something electrical malfunctions (headlights out, radio not working, etc.), the fuse box is one of the first places you should check. The diagram pinpoints which fuse protects that specific circuit.
- Installing Aftermarket Accessories: Adding a new stereo, lights, or other electrical gadgets requires tapping into the car's electrical system. The diagram helps you identify safe and appropriate power sources and circuits.
- Understanding Vehicle Systems: Even if you don't plan on doing major work, understanding the fuse box and its related systems gives you a better overall understanding of how your car functions.
- Preventing Further Damage: Ignoring a blown fuse or replacing it with the wrong amperage can lead to more serious electrical problems, potentially damaging components or even causing a fire. Prevention is key.
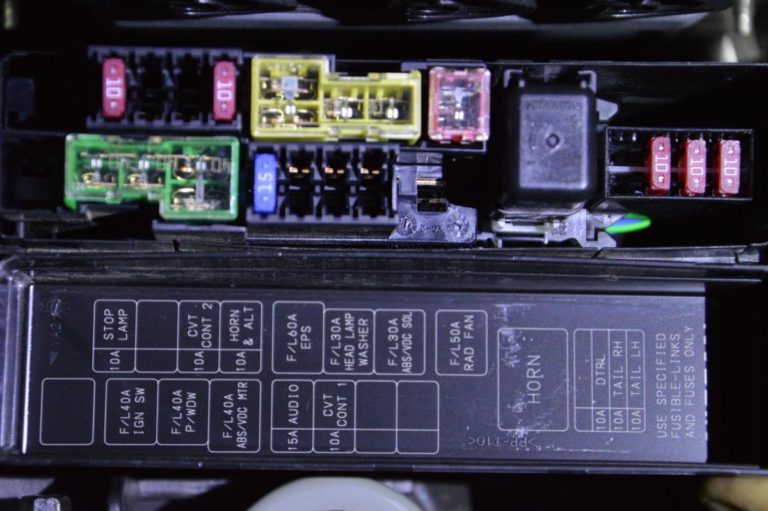
Key Specs and Main Parts
The 2018 Sentra, like most modern cars, actually has two main fuse boxes. Knowing where they are is half the battle:
- Interior Fuse Box: Usually located under the dashboard on the driver's side. You'll often find it behind a small access panel. This box typically houses fuses for interior components like the radio, lights, power windows, and climate control.
- Engine Compartment Fuse Box: Located in the engine bay, often near the battery. This box contains fuses and relays for critical engine components, headlights, ABS, and other heavy-duty systems.
Each fuse box contains various components:
- Fuses: These are the sacrificial links in the electrical circuits. They're designed to blow and break the circuit if the current exceeds a safe level, protecting the wiring and components. Fuses are rated in amperes (amps or A), which indicate how much current they can handle before blowing.
- Relays: Relays are electrically operated switches. They allow a low-current circuit to control a high-current circuit. For example, the headlight switch uses a relay to control the high-current headlights.
- Circuit Breakers: Similar to fuses, but they can be reset after tripping. They're not as common as fuses in these boxes.
Understanding the Symbols
The fuse box diagram itself uses a standardized set of symbols to represent different components and circuits. Here's a breakdown of common symbols:
- Lines: Solid lines represent electrical wires or connections. Dashed lines might indicate a ground connection or a less critical connection.
- Rectangles: Typically represent fuses. The number inside the rectangle indicates the fuse amperage (e.g., "10" means a 10-amp fuse).
- Squares or Circles: Often represent relays. The diagram may indicate the type of relay or the component it controls.
- Icons: Small icons next to the fuse/relay designation indicate what the circuit controls. You might see a headlight icon, a radio icon, a wiper icon, etc. Consult the legend provided with the diagram (which, remember, you can download!) to understand all the icons.
- Colors: Wire colors are often noted on the diagram. This can be extremely helpful when tracing wires in the car.
It's important to understand that diagrams may vary slightly depending on the Sentra's trim level and optional features. Always refer to the diagram specific to your model year and trim. This is why having a copy of the diagram for your exact vehicle is invaluable.
How It Works: A Simplified Explanation
Think of the electrical system like a network of roads. The battery is the power source, supplying electricity (the cars) to various components (the destinations). The wiring is the roads, and the fuses are like checkpoints. If too many "cars" (current) try to flow through a road (wire), the checkpoint (fuse) shuts down the road to prevent damage to the road itself or the "destinations" it leads to.
When a fuse blows, it means that too much current flowed through that particular circuit. This could be caused by a short circuit (a direct connection between a positive wire and ground), an overloaded circuit (too many devices drawing power from the same circuit), or a faulty component.
The fuse box diagram tells you which fuse protects which circuit. So, if your radio stops working, you can use the diagram to identify the fuse for the radio. If that fuse is blown, replacing it *should* restore power to the radio. However, simply replacing the fuse without addressing the underlying cause of the blown fuse is like patching a pothole without fixing the road's foundation – the problem will likely reoccur.
Real-World Use: Basic Troubleshooting Tips
Here's a basic troubleshooting scenario:
- Problem: Your windshield wipers aren't working.
- Step 1: Consult the fuse box diagram (download yours now!). Locate the fuse labeled for the windshield wipers.
- Step 2: Visually inspect the fuse. A blown fuse will usually have a broken filament inside the clear plastic housing.
- Step 3: If the fuse is blown, replace it with a new fuse of the same amperage. Never use a fuse with a higher amperage rating.
- Step 4: Test the wipers. If they work, you've solved the problem.
- Step 5: If the new fuse blows immediately, there's a short circuit or overload in the wiper circuit. Further diagnosis (checking wiring, the wiper motor itself) is required. This is where you might need to consult a professional.
Safety Precautions
Working with electrical systems can be dangerous. Keep these safety tips in mind:
- Disconnect the Battery: Before working on the fuse box or any electrical components, disconnect the negative (-) terminal of the battery. This prevents accidental short circuits and potential shocks.
- Use Proper Tools: Use insulated tools designed for automotive electrical work.
- Never Replace a Fuse with a Higher Amperage Fuse: This can overload the circuit and cause a fire.
- Be Careful Around Airbags: Airbag systems have their own fuses and circuits. Mishandling these can accidentally deploy the airbags, causing serious injury. Consider having airbag-related work done by a professional.
- Double-Check Your Work: Before reconnecting the battery, double-check all connections and ensure that everything is properly installed.
- If in Doubt, Consult a Professional: Don't attempt repairs beyond your skill level. Electrical problems can be complex and potentially dangerous.
Understanding the 2018 Nissan Sentra fuse box diagram is a valuable skill for any car owner. It empowers you to diagnose and fix basic electrical problems, install accessories safely, and generally become more knowledgeable about your vehicle. Remember to always prioritize safety and consult a professional if you're unsure about any aspect of the electrical system. And don't forget, we have the file ready for you to download, so you have easy access to the complete diagram whenever you need it!