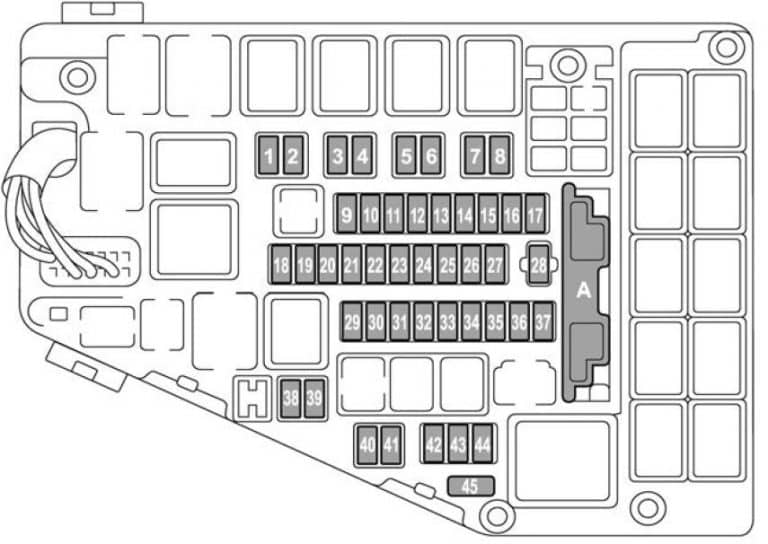
2018 Subaru Outback Fuse Box Diagram
Alright, let's dive into the 2018 Subaru Outback fuse box diagram. Understanding this schematic is absolutely crucial, whether you're tackling a minor electrical issue, planning to install aftermarket accessories, or just expanding your automotive knowledge. A clear understanding of your Outback's fuse layout is a huge asset when diagnosing electrical problems, potentially saving you time and money on repairs.
Purpose of the Fuse Box Diagram
The fuse box diagram serves as a detailed roadmap of your Outback's electrical protection system. It identifies the location and function of each fuse and relay, explaining which circuit it protects. This diagram is indispensable for:
- Troubleshooting Electrical Problems: Quickly pinpointing the blown fuse responsible for a malfunctioning component (e.g., headlights, radio, power windows).
- Installing Aftermarket Accessories: Safely tapping into existing circuits for new devices (e.g., auxiliary lights, dash cams), ensuring you're using the correct amperage and not overloading any circuits.
- Preventive Maintenance: Regularly inspecting fuses to identify potential problems before they lead to major electrical failures.
- General Automotive Knowledge: Gaining a deeper understanding of your vehicle's electrical system and how its components interact.
Key Specs and Main Parts of the 2018 Subaru Outback Fuse Box
The 2018 Subaru Outback typically has three main fuse box locations:
- Engine Compartment Fuse Box: Located under the hood, near the battery. This box houses fuses and relays that protect critical engine components like the fuel pump, ignition system, and cooling fan.
- Interior Fuse Box (Driver's Side): Usually found behind a small panel on the driver's side dashboard, near the steering wheel. This box protects circuits for interior components such as the radio, power windows, lights, and climate control system.
- Interior Fuse Box (Passenger's Side): On some models there is a second interior fuse box located in the passenger footwell area.
Key components within these fuse boxes include:
- Fuses: The most common component. They are sacrificial devices designed to break an electrical circuit when the current exceeds a safe level. They come in various amperage ratings (e.g., 5A, 10A, 15A, 20A, 25A, 30A), indicated by a number printed on the fuse. The amperage rating corresponds to the maximum current the fuse can handle before blowing. Standard blade fuses are most common, but mini-fuses may also be used.
- Relays: Electrically operated switches that control high-current circuits using a low-current signal. They allow components like headlights and starter motors to be controlled by smaller switches in the dashboard.
- Circuit Breakers: Resettable protection devices that interrupt the current flow in a circuit overload situation. They can be manually reset or will automatically reset after cooling down, unlike fuses which need to be replaced after blowing.
- Fuse Puller: A small plastic tool often included in the fuse box to safely remove fuses without damaging them.
Understanding Fuse Box Diagram Symbols
Fuse box diagrams use symbols and abbreviations to represent different components and circuits. Here's a breakdown of common elements:
- Lines: Indicate electrical wires or connections between components. Thicker lines might indicate a larger wire gauge capable of carrying more current.
- Colors: Wires are color-coded to distinguish different circuits. The diagram *should* include a color legend, but common colors include red (power), black (ground), and various colors for signal wires.
- Numbers/Letters: Each fuse and relay location is typically labeled with a number or a combination of letters and numbers (e.g., F1, R2, E10). These correspond to the labels on the diagram to help you identify the correct component.
- Icons: Small icons represent the component protected by a particular fuse (e.g., a headlight icon for the headlight fuse, a radio icon for the radio fuse).
- Amperage Rating (A): Indicated next to the fuse symbol (e.g., 10A, 20A), specifying the maximum current the fuse can handle.
Important Note: Always refer to the specific diagram for your 2018 Subaru Outback model and trim level. While general layouts are similar, fuse assignments and amperage ratings can vary.
How the Fuse Box Works
The fuse box is the central hub for distributing electrical power throughout your vehicle. Power from the battery flows to the fuse box, and from there, it's routed to various components through individual circuits. Each circuit is protected by a fuse of the appropriate amperage rating. When an overload occurs (e.g., a short circuit or excessive current draw), the fuse's internal element melts, breaking the circuit and preventing damage to the component and wiring. Relays act as remotely controlled switches, enabling low-current signals to control high-current devices.
Think of each fuse as a gatekeeper for a specific electrical circuit. If the current exceeds the fuse's rating, the gate slams shut, preventing further flow and protecting the connected device from damage. The amperage rating of the fuse is crucial; using a fuse with a higher amperage than specified can bypass the protection mechanism and potentially cause a fire or damage to expensive components.
Real-World Use: Basic Troubleshooting Tips
Here are some basic troubleshooting steps using the fuse box diagram:
- Identify the Problem: Determine which component is malfunctioning (e.g., the radio isn't working, the headlights are dim).
- Consult the Diagram: Locate the fuse associated with the malfunctioning component in the fuse box diagram.
- Inspect the Fuse: Visually inspect the fuse. A blown fuse will typically have a broken filament or a dark, burned appearance.
- Test the Fuse: Use a multimeter to test the fuse for continuity. A good fuse will have continuity (a reading of 0 ohms), while a blown fuse will have no continuity (an open circuit).
- Replace the Fuse: If the fuse is blown, replace it with a new fuse of the exact same amperage rating.
- Test the Component: After replacing the fuse, test the component to see if it's working properly.
- If the Fuse Blows Again: If the new fuse blows immediately, there's likely a short circuit or other underlying problem in the circuit. Further diagnosis is required, potentially involving checking wiring, connectors, and the component itself. Do not keep replacing the fuse with a higher amperage rated fuse to try and resolve the issue.
Safety Considerations
Working with electrical systems can be dangerous. Here are some important safety precautions:
- Disconnect the Battery: Before working on any electrical components, disconnect the negative (-) battery terminal to prevent accidental shorts and electrical shocks.
- Use Proper Tools: Use insulated tools designed for electrical work.
- Never Replace a Fuse with a Higher Amperage Rating: This can bypass the protection mechanism and lead to overheating, fire, and damage to components.
- Be Careful Around High-Voltage Components: Some components, such as the ignition system, operate at high voltage and can deliver a dangerous electrical shock. If you are uncomfortable working with these components, consult a qualified mechanic.
- Avoid Working in Wet Conditions: Water conducts electricity, increasing the risk of electrical shock.
Highly risky components to be cautious around include anything related to the SRS (Supplemental Restraint System - airbags), ABS (Anti-lock Braking System), and the ECU (Engine Control Unit). Improper handling or modification of these systems can lead to serious injury or damage.
Remember, while this guide provides a general overview, it's essential to consult the specific fuse box diagram for your 2018 Subaru Outback model.
We have the complete 2018 Subaru Outback Fuse Box Diagram file available for download. It includes detailed layouts, fuse assignments, and amperage ratings for all three fuse box locations. This resource will be invaluable for any electrical troubleshooting or modification project you undertake.