2018 Toyota Corolla Serpentine Belt Diagram
Understanding the serpentine belt system in your 2018 Toyota Corolla is crucial for maintaining its performance and avoiding costly repairs. This article provides a detailed explanation of the serpentine belt diagram, covering its purpose, key components, how it works, and basic troubleshooting tips. Whether you're a seasoned DIY mechanic or a car owner looking to deepen your understanding, this guide will help you navigate the intricacies of this vital system.
Purpose of the Serpentine Belt Diagram
The serpentine belt diagram is a visual representation of the belt's routing around various engine components. It serves several essential purposes:
- Repair and Replacement: The diagram is invaluable when replacing a worn or broken serpentine belt. It ensures that the new belt is routed correctly, preventing damage to engine components and ensuring proper operation.
- Troubleshooting: By referring to the diagram, you can identify potential issues like misalignment, worn pulleys, or incorrect belt tension.
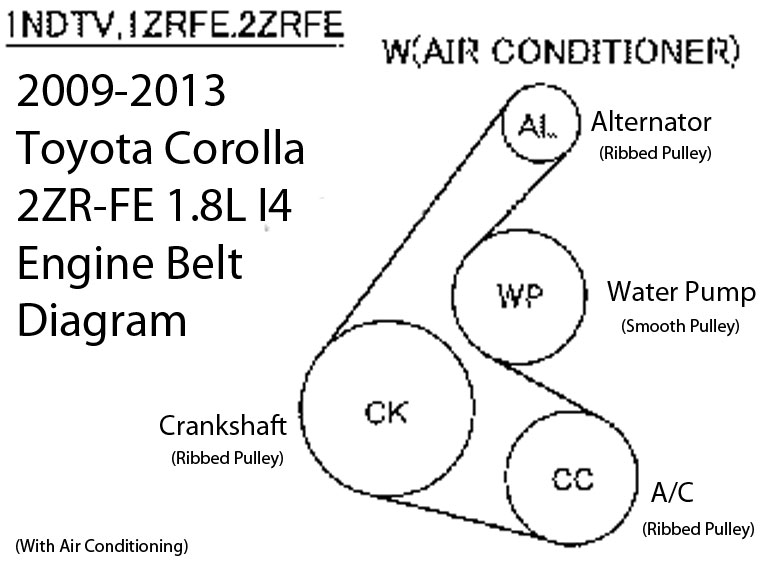
- Understanding System Function: The diagram helps you understand how different engine components are driven by the serpentine belt, such as the alternator, power steering pump, air conditioning compressor, and water pump.
- Preventative Maintenance: Regularly inspecting the belt and pulleys, guided by the diagram, can help you identify and address potential problems before they lead to breakdowns.
Key Specs and Main Parts of the 2018 Corolla Serpentine Belt System
The 2018 Toyota Corolla typically uses a single serpentine belt to drive multiple accessories. Here's a breakdown of the main components:
- Serpentine Belt: A single, continuous belt made of reinforced rubber, designed to withstand high temperatures and constant tension.
- Crankshaft Pulley (or Harmonic Balancer): Located at the bottom of the engine, this pulley is driven directly by the engine's crankshaft and provides the rotational force for the serpentine belt.
- Alternator Pulley: The alternator converts mechanical energy into electrical energy to charge the battery and power the car's electrical system.
- Power Steering Pump Pulley: The power steering pump provides hydraulic assistance to make steering easier.
- Air Conditioning (A/C) Compressor Pulley: The A/C compressor circulates refrigerant to cool the car's interior.
- Water Pump Pulley: The water pump circulates coolant through the engine to regulate its temperature.
- Tensioner Pulley: This spring-loaded pulley maintains proper tension on the serpentine belt. It's crucial for preventing slippage and ensuring the accessories operate efficiently. A failed tensioner is a common cause of serpentine belt issues.
- Idler Pulley(s): These pulleys provide guidance and support to the serpentine belt, especially in configurations where the belt needs to change direction or wrap around other pulleys.
Specific belt length varies slightly depending on the engine and options. Always consult the vehicle's repair manual or a reputable parts supplier (like Gates or Dayco) to confirm the correct belt part number for your specific 2018 Corolla.
Understanding the Symbols in the Serpentine Belt Diagram
Serpentine belt diagrams use various symbols to represent components and belt routing. Understanding these symbols is essential for interpreting the diagram correctly:
- Solid Lines: Indicate the direct path of the serpentine belt. The thickness of the line may vary, but generally, a thicker line indicates the main belt path.
- Arrows: Show the direction of belt rotation around each pulley. This is crucial for ensuring the belt is routed correctly.
- Pulley Symbols: Different pulleys are represented by circles with varying sizes and markings. The diagram usually labels each pulley (e.g., ALT for alternator, P/S for power steering).
- Tensioner Symbol: The tensioner pulley is often shown with a spring symbol or an arrow indicating the direction of its tensioning force.
- Idler Pulley Symbol: Idler pulleys are typically represented by a plain circle, often labeled "IDLER."
- Component Labels: Each component driven by the serpentine belt is clearly labeled with abbreviations or full names.
Color coding is not typically used in basic serpentine belt diagrams, but some advanced diagrams might use colors to highlight specific sections or indicate the belt's front and back sides where it contacts the pulleys.
How the Serpentine Belt System Works
The serpentine belt system is a relatively simple yet vital system. The engine's crankshaft rotates, which in turn rotates the crankshaft pulley. The serpentine belt wraps around this pulley and transfers the rotational force to all the other pulleys connected to various engine accessories.
The tensioner pulley plays a critical role in maintaining the correct belt tension. As the belt stretches over time, the tensioner automatically adjusts to compensate, preventing slippage and ensuring that all accessories are driven efficiently. Without proper tension, the alternator might not charge the battery effectively, the power steering might become difficult, the A/C might not cool properly, and the engine could overheat due to insufficient water pump operation.
The idler pulleys guide the belt and ensure proper wrap around each accessory pulley, maximizing the contact area and preventing slippage. Correct routing is critical; incorrect routing can lead to premature belt wear, accessory failure, and even engine damage.
Real-World Use: Basic Troubleshooting Tips
Here are some common issues you might encounter with your 2018 Corolla's serpentine belt system and how the diagram can help:
- Squealing Noise: A squealing noise, especially when the engine is first started or when accessories are heavily loaded (e.g., turning the steering wheel fully or turning on the A/C), is often a sign of a loose or worn serpentine belt. Use the diagram to visually inspect the belt for cracks, fraying, or glazing. Check the tensioner pulley to ensure it's functioning correctly.
- Cracked or Frayed Belt: Visually inspect the belt for signs of damage. Cracks and fraying indicate that the belt is nearing the end of its service life and needs to be replaced. The diagram helps you identify the entire belt path for a complete inspection.
- Accessory Malfunctions: If an accessory like the alternator, power steering, or A/C isn't working correctly, it could be due to a slipping or broken serpentine belt. The diagram helps you quickly identify which accessories are driven by the belt and whether they are turning.
- Belt Slippage: Black dust near the pulleys is often a sign of belt slippage. This can be caused by a loose belt, a worn pulley, or oil contamination. The diagram allows you to inspect the alignment of the pulleys and identify any potential issues.
- Tensioner Issues: A wobbling or noisy tensioner pulley indicates a problem with the tensioner itself. The diagram helps you locate and inspect the tensioner for proper movement and spring tension.
If you suspect a problem with your serpentine belt system, do not drive the car for extended periods. Continuing to drive with a damaged or slipping belt can lead to further damage to the engine and accessories.
Safety Considerations
Working on the serpentine belt system involves some inherent risks:
- Moving Parts: The engine must be off when working on the serpentine belt. Accidental contact with a running engine can cause serious injury. Never put your hands near moving parts.
- Hot Engine Components: The engine and its components can be extremely hot, especially after running. Allow the engine to cool completely before working on the serpentine belt system.
- Spring Tension: The tensioner pulley is spring-loaded and can snap back with considerable force if not handled correctly. Always use the proper tools to relieve the tension before removing or installing the belt.
- Battery Disconnect: Disconnecting the negative battery terminal before working on the system is a good safety practice, particularly when working near the alternator.
Always wear safety glasses and gloves when working on the serpentine belt system.
We have access to the 2018 Toyota Corolla serpentine belt diagram. Contact us, and we'll provide you with a downloadable file for your convenience.