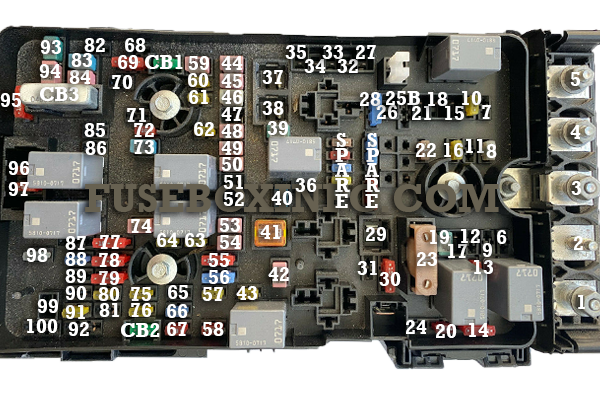
2019 Jeep Cherokee Interior Fuse Box Diagram
The 2019 Jeep Cherokee is a popular SUV, known for its reliability and off-road capabilities. A critical aspect of maintaining or modifying any vehicle, especially one with as much electronic control as the Cherokee, is understanding its electrical system. Central to this is the interior fuse box, and having a detailed diagram can be a lifesaver. This article will provide a comprehensive overview of the 2019 Jeep Cherokee's interior fuse box diagram, its purpose, components, and how to effectively use it for troubleshooting and repairs.
Purpose of the Interior Fuse Box Diagram
The interior fuse box diagram serves several important purposes:
- Troubleshooting Electrical Problems: Quickly identify and locate the fuse associated with a malfunctioning component, such as a faulty window, cigarette lighter, or infotainment system.
- Performing Repairs: Knowing which fuse corresponds to which circuit allows you to safely disconnect power during repairs, preventing electrical shock or damage to sensitive electronics.
- Adding Accessories: When installing aftermarket accessories like dash cams, auxiliary lighting, or upgraded audio systems, the fuse box diagram helps identify suitable power sources and ensures proper circuit protection.
- Preventive Maintenance: Periodically checking fuses can help identify potential issues before they escalate into major problems. A blown fuse indicates an overload or short circuit that needs investigation.
In essence, the diagram is a roadmap to your vehicle's electrical system, empowering you to diagnose, repair, and modify your Cherokee with confidence.
Key Specs and Main Parts of the Interior Fuse Box
The interior fuse box in the 2019 Jeep Cherokee is typically located under the dashboard, usually on the driver's side. It's a plastic enclosure containing an array of fuses and relays. While exact fuse ratings and assignments can vary slightly depending on the specific trim level and options package of your Cherokee, the general layout and purpose of the components remain consistent. Key specs and parts include:
- Fuse Box Housing: The protective plastic case that houses all the fuses and relays.
- Fuses: These are sacrificial safety devices designed to protect electrical circuits from overcurrent. They contain a thin wire or filament that melts and breaks the circuit if the current exceeds a predetermined level. Fuses are rated in amperes (amps or A), indicating the maximum current they can safely handle. Common fuse ratings in the Cherokee's interior fuse box include 5A, 10A, 15A, 20A, 25A, and 30A.
- Relays: These are electromechanical switches that control high-current circuits using a low-current signal. Relays are often used to control components like headlights, power windows, and the fuel pump. They consist of a coil, a movable armature, and a set of contacts.
- Terminals: The metal connectors that provide electrical connections for the fuses and relays.
- Fuse Puller: A small plastic tool often included in the fuse box to safely remove fuses without damaging them.
- Diagnostic Port(OBDII): Although not part of the fuse box itself, the On-Board Diagnostics II (OBDII) port is often located nearby and is essential for diagnosing electrical problems. It allows you to connect a scan tool and retrieve trouble codes related to the vehicle's systems.
Understanding the Symbols and Markings on the Diagram
The interior fuse box diagram uses a variety of symbols and markings to identify each fuse and relay and its associated circuit. Here's a breakdown of common symbols:
- Solid Lines: Represent electrical wiring.
- Dashed Lines: Often indicate a ground connection or a control signal.
- Fuse Symbol: A zig-zag line or a rectangle with a zig-zag line inside. The amperage rating is usually indicated next to the symbol (e.g., 10A).
- Relay Symbol: A rectangle with a coil symbol inside, along with the contact arrangement (normally open or normally closed).
- Ground Symbol: A series of descending horizontal lines.
- Component Icons: Small icons representing the component protected by the fuse (e.g., a light bulb for headlights, a window for power windows, a radio for the infotainment system).
- Color Coding: While not always present on the diagram itself, the wires connected to the fuses and relays are often color-coded. A wiring diagram (separate from the fuse box diagram) will provide detailed information on wire colors and their functions.
It's crucial to carefully examine the diagram legend to understand the specific symbols used in your 2019 Jeep Cherokee's fuse box diagram. The legend will typically be located on the diagram itself or in the vehicle's owner's manual.
How the Fuse Box Works
The fuse box acts as a central distribution point for electrical power in your Jeep Cherokee. Power from the battery flows through the main power distribution center (usually located in the engine compartment) to the interior fuse box. From there, the power is distributed to various electrical circuits, each protected by a fuse. When an electrical circuit experiences an overcurrent (e.g., due to a short circuit or a malfunctioning component), the fuse blows, interrupting the flow of electricity and preventing damage to the wiring and other components. The relay on the other hand acts like a switch. By providing the fuse box these elements, the car's electrical circuit can be protected and functions can be better maintained.
Relays, as previously mentioned, are used to control high-current circuits. A low-current signal from a switch or control module activates the relay coil, which in turn closes the relay contacts and allows high current to flow to the controlled component. This arrangement allows switches and control modules to control high-power devices without having to handle the full current load directly.
Real-World Use: Basic Troubleshooting Tips
Here are some basic troubleshooting tips using the interior fuse box diagram:
- Identify the Problem: Determine which component is not working (e.g., the cigarette lighter, power windows, radio).
- Locate the Fuse: Consult the fuse box diagram to identify the fuse associated with the malfunctioning component. The diagram should be located inside the fuse box cover or in the owner's manual.
- Inspect the Fuse: Visually inspect the fuse. A blown fuse will have a broken filament or a dark discoloration. You can also use a multimeter to check for continuity across the fuse. If there is no continuity, the fuse is blown.
- Replace the Fuse: Replace the blown fuse with a new fuse of the same amperage rating. Using a fuse with a higher amperage rating can damage the circuit.
- Test the Component: After replacing the fuse, test the component to see if it is working properly.
- Investigate Further if the Fuse Blows Again: If the new fuse blows immediately or shortly after being replaced, there is likely a short circuit or overload in the circuit. Further investigation is required to identify and repair the underlying problem. This might involve checking wiring for damage, testing the component itself, or consulting a qualified mechanic.
Safety Precautions
Working with automotive electrical systems can be dangerous. Here are some essential safety precautions:
- Disconnect the Battery: Before working on the fuse box or any electrical component, disconnect the negative (-) battery terminal to prevent electrical shock and accidental short circuits.
- Use the Correct Fuse Rating: Always replace a blown fuse with a new fuse of the same amperage rating. Using a fuse with a higher amperage rating can overload the circuit and cause a fire.
- Avoid Working on Live Circuits: Never attempt to repair or modify electrical circuits while the vehicle is running or the battery is connected.
- Be Careful Around High-Voltage Components: Some components, such as the airbag system and the anti-lock braking system (ABS), contain high-voltage circuits. Exercise extreme caution when working near these components. It's often best to leave repairs involving these systems to a qualified mechanic.
- Wear Safety Glasses: Protect your eyes from sparks and debris when working with electrical circuits.
Specifically, the airbag system and anti-lock braking systems (ABS) have high-voltage circuits that can seriously injure you. Unless you have experience and certifications, it's recommended to leave this work to a professional.
By understanding the purpose, components, and symbols of the 2019 Jeep Cherokee interior fuse box diagram, you can confidently troubleshoot electrical problems, perform repairs, and add accessories to your vehicle. Remember to always prioritize safety and consult a qualified mechanic if you are unsure about any aspect of the electrical system.
We have the 2019 Jeep Cherokee Interior Fuse Box Diagram file available for download. This detailed diagram will provide you with a visual guide to the fuse locations and their corresponding circuits, making your troubleshooting and repair efforts more efficient and accurate.