2019 Nissan Altima Fuse Box Diagram
Alright, let's dive into the fuse box diagram for the 2019 Nissan Altima. Whether you're dealing with a malfunctioning component, planning an electrical modification, or just trying to better understand your vehicle's electrical system, this diagram is your roadmap. It's essentially the key to diagnosing and fixing electrical problems without blindly poking around and potentially causing more damage.
Purpose of the Fuse Box Diagram
Why is this diagram so crucial? Think of your car's electrical system as a complex network of roads and wires. Fuses are the traffic lights, preventing surges of electricity from damaging sensitive components. The diagram tells you exactly which "traffic light" controls which "road." More specifically:
- Troubleshooting: Identify blown fuses linked to specific systems (e.g., headlights, radio, power windows).
- Repair: Locate the correct fuse for replacement after identifying the culprit.
- Modification: Safely tap into power sources for adding accessories (e.g., aftermarket lighting, dash cams) without overloading the circuit. The diagram helps you choose an appropriate circuit to tap into.
- Understanding: Gain a better grasp of your Altima's electrical architecture and how different systems are interconnected.
Key Specs and Main Parts
The 2019 Altima, depending on the trim level and options, usually has two main fuse box locations:
- Interior Fuse Box: Located inside the cabin, typically under the dashboard on the driver's side or behind the glove compartment. This box usually houses fuses for interior components like the infotainment system, power windows, and interior lights.
- Engine Compartment Fuse Box: Situated in the engine bay, usually near the battery. This box contains fuses for critical engine components such as the fuel pump, ignition system, and cooling fans.
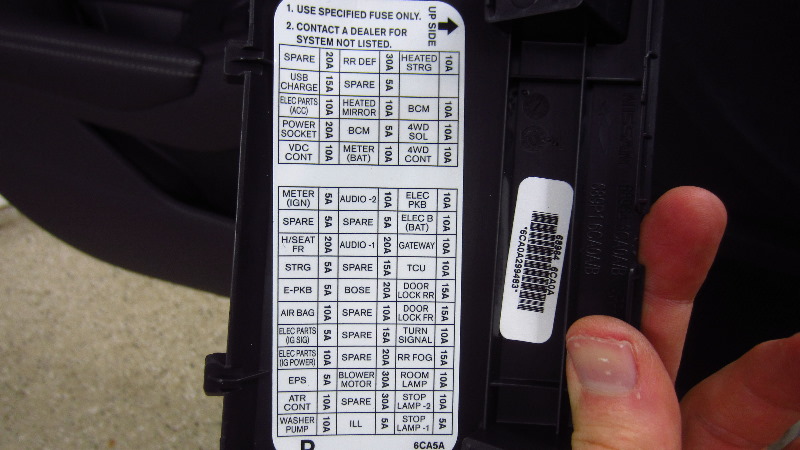
A typical fuse box diagram, which you can download at the end of this article, will show the following:
- Fuse Number: Each fuse has a unique number for identification.
- Amperage Rating: This indicates the maximum current (measured in Amperes, or Amps) the fuse can handle before blowing. Common ratings include 5A, 7.5A, 10A, 15A, 20A, 25A, and 30A. Never replace a fuse with a higher amperage rating than specified, as this can lead to serious damage and even fire.
- Circuit Description: A brief description of the component or system the fuse protects (e.g., "Headlight (Right)," "Power Window (Left Rear)").
- Fuse Type: Most likely you will encounter ATO/ATC blade fuses (the standard automotive fuse). Mini blade fuses may also be present.
- Relays: While not fuses, relays often share the same box and are critical for switching high-current circuits using a low-current signal. The diagram will identify relay locations and functions.
Symbols and Notation
Understanding the symbols on the diagram is essential for proper interpretation. Here's a breakdown of common notations:
- Lines: Represent electrical wires connecting the fuse to the component it protects.
- Colors: While not always consistent, color-coding of wires can be included in some diagrams. Refer to the wiring diagram for your specific model for accurate color coding.
- Icons: Symbols represent specific components. For instance:
- A headlight icon represents the headlight circuit.
- A window icon indicates the power window circuit.
- A fan icon represents the radiator fan circuit.
- Numbers: As mentioned, identify fuse number, amperage, wire gauge (thickness).
It's worth noting that Nissan, like other manufacturers, might update fuse box layouts slightly between model years or even within the same year based on trim levels or options packages. Always cross-reference the diagram with the label inside the fuse box cover. This physical label is your definitive guide.
How It Works: A Simple Example
Let's say your Altima's radio suddenly stops working. The first thing you should do is consult the fuse box diagram. Locate the fuse associated with the radio (e.g., "Radio/Audio System - 15A").
- Locate the Fuse Box: Open the interior fuse box (usually near the driver's side footwell).
- Identify the Fuse: Find the fuse labeled "Radio" or "Audio System" on the diagram and physically locate that fuse in the fuse box.
- Inspect the Fuse: Remove the fuse using a fuse puller (usually included in the fuse box) and visually inspect it. A blown fuse will have a broken filament inside the glass or plastic housing.
- Replace the Fuse: If the fuse is blown, replace it with a new fuse of the same amperage rating (in this case, 15A).
- Test the System: Turn on the radio to see if it now works.
Real-World Use: Basic Troubleshooting Tips
Here are some practical troubleshooting tips using the fuse box diagram:
- Consistent Fuse Blowing: If a fuse blows repeatedly, it indicates a problem in the circuit it protects. Do not keep replacing the fuse with a higher amperage one. There is an underlying issue, such as a short circuit or an overloaded circuit, that needs to be diagnosed by a qualified mechanic.
- Check Related Systems: If one system fails, check the fuses for related systems. For example, if the power windows and power locks stop working simultaneously, check the fuse for the power door lock module as well as individual window fuses.
- Use a Multimeter: For more advanced troubleshooting, a multimeter can be used to test for voltage and continuity at the fuse terminals. This can help determine if the fuse is receiving power and if the circuit is complete.
- Consult a Wiring Diagram: The fuse box diagram is a good starting point, but for complex issues, you may need a full wiring diagram to trace circuits and identify potential faults.
Safety Precautions
Working with electrical systems can be dangerous. Observe the following safety precautions:
- Disconnect the Battery: Before working on any electrical component, disconnect the negative terminal of the battery to prevent accidental short circuits and electrical shocks.
- Use Insulated Tools: Use tools with insulated handles to minimize the risk of electric shock.
- Avoid Working in Wet Conditions: Never work on electrical systems in wet or damp environments.
- Identify High-Risk Components: Components like the airbag system and antilock braking system (ABS) are particularly sensitive and can be dangerous if mishandled. If you suspect a problem with these systems, consult a qualified technician.
- Do Not Modify Fuses: Never wrap a blown fuse with foil or wire. This bypasses the safety mechanism and can cause a fire.
- Proper Fuse Replacement: Always replace a blown fuse with one of the same amperage and type. Using the wrong fuse can lead to equipment damage or even a fire.
Remember, if you're uncomfortable working on your car's electrical system, it's always best to consult a qualified mechanic. A wrong move can cause serious damage and could void your warranty.
We have the 2019 Nissan Altima fuse box diagram file available for download. This diagram provides a detailed overview of fuse locations, amperage ratings, and circuit descriptions, making it an invaluable resource for diagnosing and resolving electrical issues in your vehicle. Download it now for quick and easy access to this essential information.