2019 Nissan Sentra Fuse Box Diagram
Welcome, gearheads and shade-tree mechanics! Let's dive into the often-overlooked but crucial world of the 2019 Nissan Sentra's fuse box diagram. Whether you're tackling a blown tail light, installing a new sound system, or just trying to understand your car's electrical nervous system, this diagram is your key to success. It's far more useful than blindly poking around with a test light, and it can save you from costly mistakes.
Purpose: Your Electrical Troubleshooting Blueprint
The primary purpose of a fuse box diagram is to provide a clear and organized representation of the vehicle's electrical circuits and their corresponding protection. Think of it as the electrical equivalent of a road map. Without it, you're driving blind. Specifically, the 2019 Nissan Sentra fuse box diagram is invaluable for:
- Troubleshooting Electrical Issues: Identifying which fuse controls a specific circuit (e.g., headlights, wipers, radio) allows you to pinpoint the source of a problem quickly.
- Performing Electrical Repairs: Before attempting any electrical repairs, consulting the diagram ensures you're working with the correct circuit and avoiding accidental shorts or damage.
- Installing Aftermarket Accessories: When adding electrical components like amplifiers, alarms, or auxiliary lights, the diagram helps you identify suitable power sources and ensure proper fuse protection.
- Understanding Vehicle Systems: Even if you're not currently experiencing any issues, studying the diagram can deepen your understanding of how your Sentra's electrical system is organized and functions.
Key Specs and Main Parts
The 2019 Nissan Sentra has multiple fuse boxes, typically located in the following areas:
- Inside the Cabin (Instrument Panel): Usually on the driver's side, behind a small access panel. This box typically houses fuses for interior components like the radio, lights, and power windows.
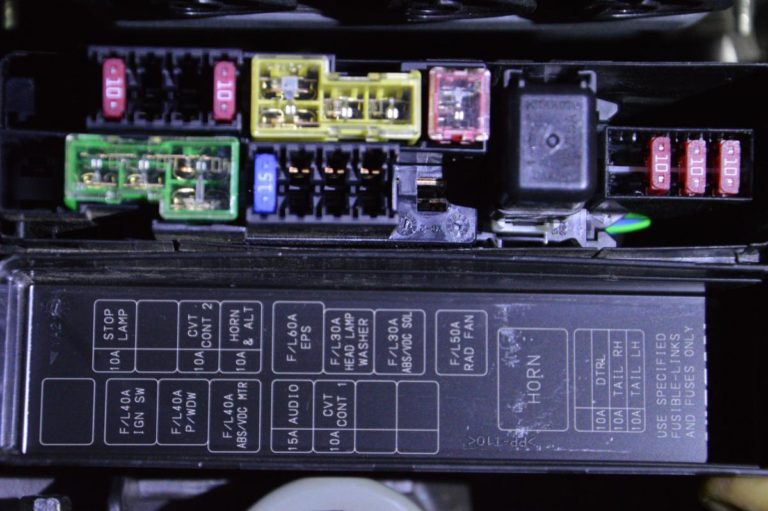
- Engine Compartment: Near the battery, often in a sealed enclosure. This box contains fuses for critical engine components, headlights, and other essential systems.
Key components you'll encounter within the fuse boxes include:
- Fuses: These are the sacrificial components designed to protect circuits from overcurrent. They come in various amperage ratings (e.g., 5A, 10A, 15A, 20A, 30A), each designed to break the circuit at a specific current level.
- Relays: These are electromechanical switches that allow a low-current circuit to control a high-current circuit. For example, the headlight relay allows a small switch on the dashboard to control the powerful headlights without directly handling the high current.
- Circuit Breakers: Similar to fuses, but resettable. They automatically interrupt a circuit in response to an overcurrent condition but can be manually reset once the fault is resolved. While less common in fuse boxes, they may be present for certain high-demand circuits.
- Wiring Harnesses: These bundles of wires connect the fuse box to various components throughout the vehicle.
- Grounding Points: These provide a return path for electrical current and are crucial for proper circuit operation.
Symbols: Deciphering the Diagram
Understanding the symbols used in the fuse box diagram is essential for accurate interpretation. Here's a breakdown of common symbols:
- Lines: Solid lines represent wires connecting various components. Dashed lines may indicate shielded wires or specific types of connections.
- Colors: Wires are color-coded to aid in identification. The diagram will usually include a color code legend. For example, a blue wire with a white stripe might be designated as "L/W."
- Fuses: Typically represented as a rectangular box with the amperage rating inside (e.g., "10A").
- Relays: Usually shown as a square or rectangle with internal contacts and a coil. The diagram indicates which terminals are the control circuit and which are the power circuit.
- Ground Symbols: Represented by a series of downward-pointing lines, indicating the connection to the vehicle's chassis (ground).
- Component Symbols: The diagram will also include symbols for various components, such as headlights, motors, and sensors. These symbols are often simplified representations of the actual components.
Important Notes:
It's crucial to use the correct diagram for your specific vehicle year and trim level. Minor variations can exist, and using the wrong diagram can lead to misdiagnosis and potential damage.
How It Works: Circuit Protection in Action
The fuse box serves as the central hub for electrical circuit protection. Each circuit is connected to the power source through a fuse. The fuse contains a thin wire designed to melt and break the circuit if the current exceeds the fuse's amperage rating. This prevents excessive current from flowing through the circuit, which could damage components, start a fire, or cause other serious problems.
When a component fails or a short circuit occurs, the current in that circuit increases dramatically. This high current causes the fuse's wire to heat up rapidly and melt, interrupting the flow of electricity. Replacing the blown fuse restores the circuit, but it's essential to identify and correct the underlying cause of the overcurrent before simply replacing the fuse. Otherwise, it will likely blow again.
Real-World Use: Basic Troubleshooting Tips
Here's a step-by-step guide to using the fuse box diagram for basic troubleshooting:
- Identify the Problem: Determine which component or system is not functioning correctly (e.g., the radio is not working).
- Locate the Fuse Box: Consult your owner's manual to find the location of the relevant fuse box (either inside the cabin or in the engine compartment).
- Consult the Diagram: Using the 2019 Nissan Sentra fuse box diagram, identify the fuse that corresponds to the malfunctioning component.
- Inspect the Fuse: Remove the fuse using a fuse puller (typically located in the fuse box). Visually inspect the fuse. If the wire inside the fuse is broken or blackened, the fuse is blown.
- Test the Fuse: Even if the fuse appears intact, it's a good idea to test it with a multimeter in continuity mode to confirm it's functioning correctly.
- Replace the Fuse: If the fuse is blown, replace it with a new fuse of the same amperage rating. Never use a fuse with a higher amperage rating, as this could damage the circuit or cause a fire.
- Test the System: After replacing the fuse, test the affected component to see if it's working correctly.
- Troubleshoot Further (If Necessary): If the fuse blows again immediately or the component still doesn't work, there's likely a more serious underlying problem that requires further diagnosis and repair. This might involve checking wiring, connectors, and components for shorts or open circuits.
Safety: Handle with Care
Working with electrical systems can be dangerous if proper precautions are not taken. Always follow these safety guidelines:
- Disconnect the Battery: Before working on any electrical circuits, disconnect the negative (-) terminal of the battery to prevent accidental shorts or shocks.
- Use Proper Tools: Use insulated tools designed for electrical work.
- Avoid Water: Never work on electrical systems in wet or damp conditions.
- Identify Risky Components: Be especially cautious when working with high-voltage components, such as the ignition system and charging system.
- Properly Ground Yourself: Static electricity can damage sensitive electronic components. Ground yourself by touching a metal part of the vehicle before handling any electronic components.
Special Note: The airbag system is particularly sensitive. Never tamper with the airbag system unless you are a trained technician. Improper handling can cause the airbags to deploy, resulting in serious injury.
By understanding the 2019 Nissan Sentra's fuse box diagram, you can confidently tackle a wide range of electrical troubleshooting and repair tasks. Remember to always prioritize safety and consult the diagram before making any changes to your vehicle's electrical system. We have the detailed diagram available for download, which will greatly assist in your repairs!