2020 Nissan Sentra Fuse Box Diagram
The 2020 Nissan Sentra fuse box diagram is an essential resource for anyone performing electrical repairs, modifications, or even just trying to understand their vehicle's electrical system. Without a clear understanding of the fuse layout and the circuits they protect, you're essentially troubleshooting in the dark. This guide will provide a detailed explanation of the 2020 Sentra fuse box, its components, and how to use the diagram effectively. We'll cover everything from the basic purpose of the diagram to practical troubleshooting tips, ensuring you're equipped to handle common electrical issues. And remember, we have the complete fuse box diagram available for download.
Why Understanding the Fuse Box Diagram Matters
Think of your car's electrical system as a complex network of roads. Fuses are like traffic lights – they regulate the flow of electricity and prevent overloads that could damage sensitive components. A blown fuse is a safety mechanism; it's designed to sacrifice itself to protect more expensive and critical parts of your car. The fuse box diagram is your roadmap to this electrical network. It allows you to:
- Identify the specific fuse responsible for a malfunctioning component (e.g., headlights, radio, power windows).
- Quickly diagnose electrical issues, saving time and money on unnecessary repairs.
- Safely replace blown fuses with the correct amperage rating.
- Understand the electrical circuits associated with specific systems, which is invaluable for modifications or upgrades (e.g., installing aftermarket accessories).
- Prevent further damage by addressing the underlying cause of a blown fuse, rather than just replacing it repeatedly.
Key Specs and Main Parts of the 2020 Sentra Fuse Box
The 2020 Nissan Sentra actually has multiple fuse boxes, each serving a specific purpose. The two most important are:
- Interior Fuse Box (Inside the Cabin): Typically located under the dashboard, often on the driver's side. This box houses fuses for interior components like the radio, lights, power windows, and climate control.
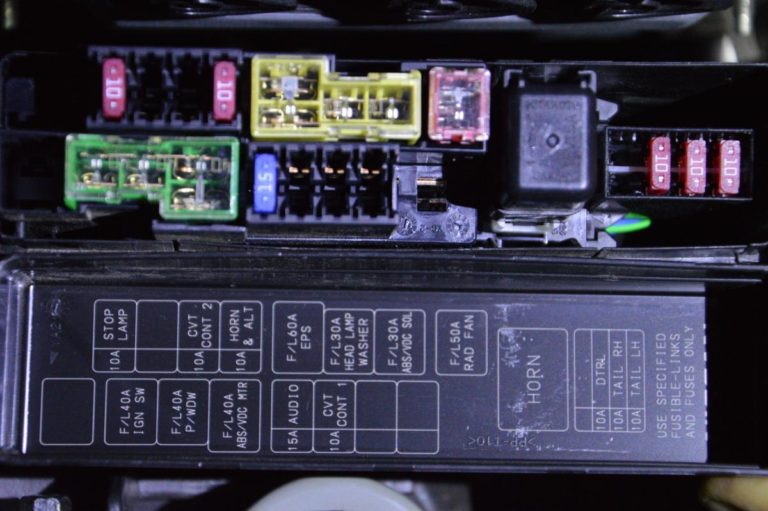
- Engine Compartment Fuse Box: Located in the engine bay, this box contains fuses and relays for critical engine functions, headlights, horn, ABS (Anti-lock Braking System), and other essential systems.
Key Specs: The fuse amperage ratings are critical. They range from small fuses like 5A (Amperes) or 7.5A to larger ones like 30A or even higher for some engine components. Using a fuse with a higher amperage rating than specified can bypass the circuit protection and lead to serious electrical damage or even a fire. Always replace a blown fuse with one of the same amperage rating.
Main Parts:
- Fuses: These are the sacrificial components containing a thin wire that melts when overloaded. They come in various types (blade, cartridge, etc.), but the 2020 Sentra primarily uses blade-type fuses.
- Relays: Electrically operated switches that control high-current circuits with a low-current signal. They are used for components like headlights, fuel pump, and starter motor.
- Fuse Puller: A small plastic tool (often included in the fuse box) used to safely remove fuses without damaging them.
- Fuse Box Cover: Protects the fuses from dirt, moisture, and physical damage. The diagram is usually printed on the inside of the cover.
Understanding Fuse Box Diagram Symbols
The fuse box diagram uses symbols and abbreviations to represent different components and circuits. Understanding these symbols is crucial for accurate troubleshooting.
- Lines: Represent electrical wires and circuits. Thicker lines may indicate higher current carrying capacity.
- Colors: While not always present on the diagram itself, the wiring connected to the fuses often uses color-coding. A separate wiring diagram is needed to decipher these colors.
- Icons/Abbreviations: These represent the components protected by each fuse. Common examples include:
- HEAD: Headlights
- STOP: Brake lights
- IGN: Ignition system
- FUEL PUMP: Fuel pump
- A/C: Air conditioning
- PWR WDO: Power windows
- CIGAR: Cigarette lighter (or auxiliary power outlet)
- ABS: Anti-lock Braking System
- ECU: Engine Control Unit (or PCM - Powertrain Control Module)
The diagram typically lists the fuse number, amperage rating, and the component it protects. For example, "Fuse #15, 10A, HEAD" indicates that fuse number 15, rated at 10 Amperes, protects the headlight circuit.
How It Works: The Circuit Protection Mechanism
Each fuse protects a specific circuit. When the current flowing through that circuit exceeds the fuse's amperage rating (due to a short circuit, overload, or malfunction), the thin wire inside the fuse heats up and melts, breaking the circuit. This prevents excessive current from reaching and damaging the component connected to that circuit. The relay, which is also sometimes in fuse box, will use a lower current rated circuit to complete a higher current rated circuit.
Consider the headlight circuit. If there's a short circuit in the headlight wiring, the current will surge. The fuse protecting the headlight circuit will blow, cutting off the power supply and preventing damage to the headlights, wiring harness, and other electrical components. If a fuse keeps blowing, it's a sign that there's an underlying problem in the circuit that needs to be addressed. Simply replacing the fuse repeatedly won't solve the problem; it will only mask the symptom and could lead to more serious damage. Do not keep replacing the fuse without diagnosing the root cause!
Real-World Use: Basic Troubleshooting Tips
Here's a basic troubleshooting process using the fuse box diagram:
- Identify the Malfunctioning Component: Determine which component is not working (e.g., the radio, headlights, power windows).
- Consult the Fuse Box Diagram: Locate the fuse associated with the malfunctioning component in the fuse box diagram. Refer to both the interior and engine compartment fuse boxes.
- Inspect the Fuse: Visually inspect the fuse. If the wire inside is broken or blackened, the fuse is blown. Use the fuse puller to remove the fuse safely.
- Test the Fuse (Optional): Use a multimeter set to continuity mode to test the fuse. A good fuse will show continuity (a beep or a reading of 0 ohms). A blown fuse will show no continuity (an open circuit).
- Replace the Fuse: Replace the blown fuse with a new fuse of the exact same amperage rating.
- Test the Component: Turn on the component to see if it now works.
- If the Fuse Blows Again: If the new fuse blows immediately or shortly after replacement, there's a problem in the circuit. This could be a short circuit, a faulty component, or damaged wiring. Further diagnosis is required.
Example: Your car radio suddenly stops working. You consult the fuse box diagram and find that fuse #20 (15A) in the interior fuse box protects the radio circuit. You inspect the fuse and see that the wire inside is broken. You replace it with a new 15A fuse, and the radio starts working again. However, if the new fuse blows again shortly after, you know there's a problem in the radio circuit that needs further investigation.
Safety Precautions
Working with automotive electrical systems can be dangerous. Follow these safety precautions:
- Disconnect the Negative Battery Terminal: Before working on any electrical components, disconnect the negative (-) battery terminal to prevent accidental shorts and electrical shocks.
- Use the Correct Fuse Rating: Never replace a fuse with a higher amperage rating than specified. This can bypass the circuit protection and lead to serious electrical damage or a fire.
- Avoid Working in Wet Conditions: Water can conduct electricity and create a shock hazard.
- Be Careful with High-Current Circuits: Circuits like the starter motor and alternator carry high currents. Exercise extreme caution when working around these components.
- When in doubt, consult a professional. If you're unsure about any aspect of the electrical system, it's always best to seek the assistance of a qualified mechanic.
- Relays can get hot If a relay stops functioning properly, let it cool down completely before attempting to remove it.
Remember, this guide provides general information. Always refer to the specific fuse box diagram for your 2020 Nissan Sentra model, as there may be variations depending on the trim level and options. Don't forget, we have the complete fuse box diagram available for download, providing you with a detailed and accurate resource for all your electrical troubleshooting needs. Use it responsibly and safely!