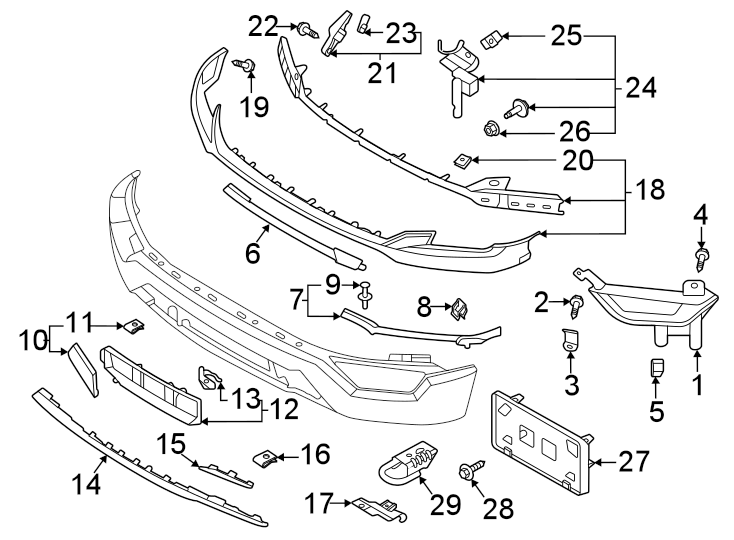
2021 Ford F150 Front Bumper Parts Diagram
Alright, let's dive into the 2021 Ford F-150 front bumper parts diagram. Whether you're tackling a minor repair after a run-in with a rogue shopping cart, upgrading to an aftermarket bumper, or simply curious about the anatomy of your truck's face, understanding this diagram is invaluable. This article is aimed at those with some mechanical experience who want to confidently navigate the intricacies of their F-150's front end.
Purpose of the Diagram
Think of the parts diagram as your roadmap. It provides a detailed visual representation of all the components that make up the front bumper assembly. This isn't just a pretty picture; it serves several critical purposes:
- Repair Guidance: Identifying damaged parts and their precise location is crucial for efficient repairs. Forget guesswork; the diagram pinpoint the exact part number and placement.
- Parts Ordering: When ordering replacement parts, accuracy is paramount. The diagram eliminates ambiguity, ensuring you get the correct component every time. Using the part number listed on the diagram when ordering is a best practice.
- Modification Planning: Planning an aftermarket bumper installation or adding accessories like a winch? The diagram reveals the mounting points and structural elements you'll need to work with.
- Educational Tool: Simply understanding how the bumper is assembled and the relationships between different components can deepen your understanding of automotive engineering.
Key Specs and Main Parts
The 2021 F-150 front bumper is a complex assembly designed for both aesthetics and crash protection. Let's break down the major players:
Main Bumper Components:
- Bumper Cover: This is the visible, often painted, outer shell of the bumper. It's typically made of plastic or composite material.
- Bumper Reinforcement Bar: Positioned behind the bumper cover, this is a crucial structural component, usually made of steel or aluminum. It's designed to absorb impact energy in a collision.
- Energy Absorber: Often made of foam or a similar energy-absorbing material, it sits between the bumper cover and the reinforcement bar, providing additional cushioning during low-speed impacts.
- Fog Lights (if equipped): These auxiliary lights are integrated into the bumper, typically low and wide, to improve visibility in foggy conditions.
- Parking Sensors (if equipped): These sensors are embedded in the bumper cover and detect obstacles during parking maneuvers.
- Tow Hooks (if equipped): Robust hooks mounted on the bumper frame, used for towing or recovery operations.
- Bumper Brackets: These brackets attach the bumper assembly to the vehicle's frame. They're crucial for secure mounting and load distribution.
- Lower Valance/Air Dam: A plastic or composite piece located beneath the bumper, designed to improve aerodynamics and direct airflow.
Key Specs to Note: While the diagram itself won't list specific dimensions, understanding the *trim level* of your F-150 is critical when referencing the diagram. Different trims (XL, XLT, Lariat, etc.) may have variations in bumper design, fog light configurations, and sensor placement. Identifying your truck's trim is the first step in correctly interpreting the diagram.
Understanding the Symbols
The diagram utilizes a standardized system of lines, colors, and icons to convey information. Here's a breakdown:
- Solid Lines: Generally represent visible edges and outlines of parts.
- Dashed Lines: Often indicate hidden parts or features, such as internal structures or mounting points behind the bumper cover.
- Arrows: Show the direction of assembly or disassembly. They might indicate how a part slides into place or the direction to loosen a bolt.
- Callout Numbers: Each part in the diagram is assigned a unique number, which corresponds to a parts list accompanying the diagram. This is how you identify and order specific components.
- Exploded View: The diagram often uses an "exploded" view, where parts are shown separated from each other but in their relative positions. This helps visualize the order of assembly.
Some diagrams may use color-coding to distinguish between different materials or sub-assemblies. Always refer to the diagram's legend for specific color interpretations.
How It Works: Assembly and Disassembly
The 2021 F-150 front bumper is typically attached to the vehicle's frame using bumper brackets and bolts. Disassembly usually involves the following steps (always consult the specific service manual for your truck):
- Disconnect any electrical connectors: This includes fog lights, parking sensors, and any other wiring connected to the bumper.
- Remove the lower valance: This is often held in place by screws, clips, or a combination of both.
- Remove the bumper cover: This is typically attached to the reinforcement bar with clips or screws. Be careful not to damage the cover during removal.
- Remove the bumper reinforcement bar: This is bolted to the bumper brackets, which are in turn bolted to the frame.
Assembly is the reverse of disassembly. It’s imperative to use the correct torque specifications when tightening bolts. Over-tightening can damage components or strip threads, while under-tightening can lead to loose connections and potential failure.
Real-World Use: Basic Troubleshooting
Here are a few common troubleshooting scenarios where the parts diagram proves invaluable:
- Loose Bumper: A loose bumper is often caused by damaged or missing bumper brackets or bolts. The diagram helps you identify the correct brackets and bolts to replace. Check for rust or corrosion around the mounting points, which can weaken the connections.
- Fog Light Malfunction: If a fog light isn't working, the diagram helps you locate the wiring harness and connectors. Use a multimeter to check for voltage at the connector and trace the wiring back to the source. The diagram also helps you identify the correct fog light bulb type.
- Parking Sensor Issues: If a parking sensor is malfunctioning, the diagram helps you locate the sensor's position in the bumper. Check for physical damage to the sensor or the wiring harness. A diagnostic scan tool can often pinpoint the faulty sensor.
- Bumper Cover Damage: The diagram allows you to determine if the bumper cover can be repaired or if it needs to be replaced. It also helps you identify the correct part number for a replacement cover, ensuring a proper fit.
Safety Considerations
Working on the front bumper can involve potential hazards. Keep these points in mind:
- Airbag Sensors: Some F-150 models have airbag sensors located in or near the front bumper. Always disconnect the battery before working on the bumper to prevent accidental airbag deployment. Accidental airbag deployment can cause serious injury.
- Sharp Edges: The bumper reinforcement bar and brackets can have sharp edges. Wear gloves to protect your hands from cuts and scrapes.
- Weight: The bumper assembly can be heavy. Use proper lifting techniques or seek assistance to avoid back injuries.
- Electrical Components: When working with electrical components like fog lights and parking sensors, ensure the vehicle is turned off and the battery is disconnected to prevent electrical shock.
- Torque Specifications: Always use the correct torque specifications when tightening bolts. Under-tightening or over-tightening can compromise the structural integrity of the bumper and potentially affect crash safety.
Finally, a reminder: if you are not comfortable performing any of these procedures, it is always best to consult a qualified mechanic.
We have a detailed parts diagram available for download. This diagram will give you a more complete and interactive way to evaluate your Ford F-150's bumper system.