2022 Nissan Sentra Fuse Box Diagram
The 2022 Nissan Sentra, while a reliable vehicle, isn't immune to electrical gremlins. When electrical issues arise, the first place a seasoned DIY mechanic should look is the fuse box. Having a clear understanding of the fuse box diagram is crucial for troubleshooting, repair, and even simple modifications. This article provides a comprehensive guide to the 2022 Nissan Sentra fuse box diagram, equipping you with the knowledge to confidently diagnose and address electrical problems.
Purpose of the Fuse Box Diagram
Why bother with a fuse box diagram? Simply put, it's your roadmap to your car's electrical system. Knowing which fuse protects which circuit allows you to:
- Diagnose electrical problems: If a component isn't working, the fuse is the prime suspect.
- Replace blown fuses: A blown fuse is a common occurrence, and replacing it with the correct amperage is essential.
- Perform electrical modifications: Adding aftermarket accessories requires tapping into the electrical system safely, and the diagram shows you where.
- Understand your vehicle's electrical architecture: For the mechanically inclined, learning the layout provides a deeper understanding of your car.
Without the diagram, you're essentially flying blind, increasing the risk of further damage or incorrect repairs.
Key Specs and Main Parts
The 2022 Nissan Sentra typically has two main fuse box locations:
- Engine Compartment Fuse Box: Located under the hood, usually near the battery or firewall. This box primarily houses fuses and relays for high-current components such as the engine control module (ECM), anti-lock braking system (ABS), headlights, and cooling fan. Expect to find heavier-duty fuses here.
- Interior Fuse Box: Located inside the passenger compartment, often under the dashboard or in the glove compartment. This box contains fuses for lower-current components like the radio, interior lights, power windows, and door locks.
Key Components:
- Fuses: These are sacrificial devices designed to protect circuits from overcurrent. They consist of a thin wire that melts and breaks the circuit when the current exceeds a safe level. Fuses are rated in amperes (amps or A), indicating the maximum current they can handle.
- Relays: These are electromechanical switches that allow a low-current circuit to control a high-current circuit. They're used to switch on components like headlights, starters, and fuel pumps. Relays typically have a coil, contacts, and a spring.
- Jumpers: Some fuse boxes may contain jumpers. These are simply wire connectors used to complete a circuit. They may be used for testing or configuration purposes.
Understanding Fuse Box Symbols and Layout
Fuse box diagrams aren't always intuitive. Here's a breakdown of common symbols and their meanings:
- Lines: Lines represent electrical circuits or wires.
- Fuse Symbol: A squiggly line inside a rectangle typically represents a fuse. Sometimes, it might look like a small resistor symbol.
- Relay Symbol: A rectangle with a coil symbol inside represents a relay. The coil symbol is usually a series of loops.
- Color Coding: While the diagram itself might be black and white, the actual wires connected to the fuse box are often color-coded. Refer to your vehicle's wiring diagram (which is *different* from the fuse box diagram) for wire color information. Common colors include red (power), black (ground), and various other colors to identify specific circuits.
- Icons: Small icons often indicate the component that the fuse protects. These might include a headlight symbol, a radio symbol, a window symbol, or an engine symbol.
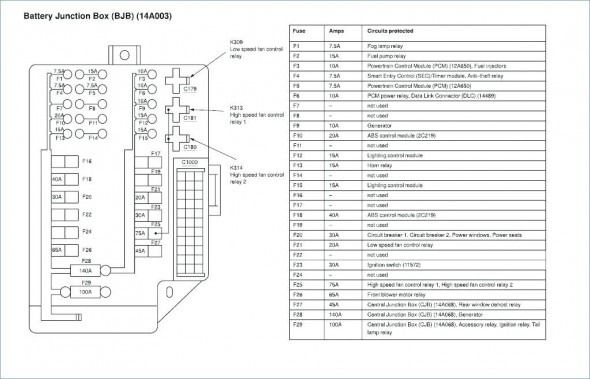
The fuse box diagram will typically list the fuses and relays in a table format, specifying the amperage of each fuse and the component it protects. It's crucial to match the correct fuse amperage when replacing a blown fuse. Using a fuse with a higher amperage can overload the circuit and cause damage, while using a fuse with a lower amperage may cause it to blow prematurely.
How It Works: The Electrical Circuit
To truly understand the fuse box, you need a basic grasp of electrical circuits. A circuit is a closed loop that allows electricity to flow from a power source (the battery) through a component (like a headlight) and back to the power source (ground). The fuse is placed in this circuit to protect it from overcurrent. If the current exceeds the fuse's rating, the fuse blows, breaking the circuit and preventing damage to the component or wiring. Think of it as a safety valve.
Relays allow a low-current signal (e.g., from a switch on the dashboard) to activate a high-current circuit (e.g., the headlights). The low-current signal energizes the relay coil, which pulls the contacts together, completing the high-current circuit.
Real-World Use: Basic Troubleshooting Tips
Here's how to use the fuse box diagram for basic troubleshooting:
- Identify the Problem: Determine which component isn't working.
- Consult the Diagram: Locate the fuse that protects the affected component using the fuse box diagram.
- Inspect the Fuse: Visually inspect the fuse. A blown fuse will typically have a broken filament or a blackened appearance.
- Test the Fuse: Use a multimeter to test the fuse for continuity. A good fuse will have continuity, while a blown fuse will not. Set your multimeter to the continuity setting (often indicated by a diode symbol or a sound wave symbol). Place one probe on each end of the fuse. If the multimeter beeps or displays a low resistance value, the fuse is good.
- Replace the Fuse: If the fuse is blown, replace it with a new fuse of the exact same amperage.
- Test the Component: After replacing the fuse, test the component to see if it's working.
- If the Fuse Blows Again: If the new fuse blows immediately, there's a short circuit in the circuit. This requires further investigation and may involve checking the wiring for damage or a faulty component. Don't just keep replacing fuses!
Safety Precautions
Working with electrical systems can be dangerous. Here are some essential safety precautions:
- Disconnect the Battery: Before working on the fuse box, disconnect the negative terminal of the battery to prevent accidental shorts or shocks. This is especially important when working on high-current circuits.
- Use Insulated Tools: Use tools with insulated handles to prevent electric shock.
- Never Replace a Fuse with a Higher Amperage: Doing so can overload the circuit and cause a fire.
- Be Careful Around High-Voltage Components: Some components, such as the ignition system, operate at high voltages and can be dangerous. Avoid touching these components.
- Work in a Well-Lit Area: Ensure you have adequate lighting to see what you're doing.
- Consult a Professional: If you're not comfortable working with electrical systems, consult a qualified mechanic.
High-Risk Components: Be extra cautious when working with circuits related to the airbag system (SRS), ABS, and ECM. These systems are critical for safety and require specialized knowledge.
Remember, this article provides general guidance. Always consult your vehicle's repair manual for specific instructions and diagrams. We have the complete 2022 Nissan Sentra fuse box diagram file available for download. This detailed resource will provide the specific locations, amperages, and circuit assignments for your vehicle. It's an invaluable tool for any DIY mechanic working on the 2022 Sentra's electrical system.