2022 Toyota Corolla Fuse Box Diagram
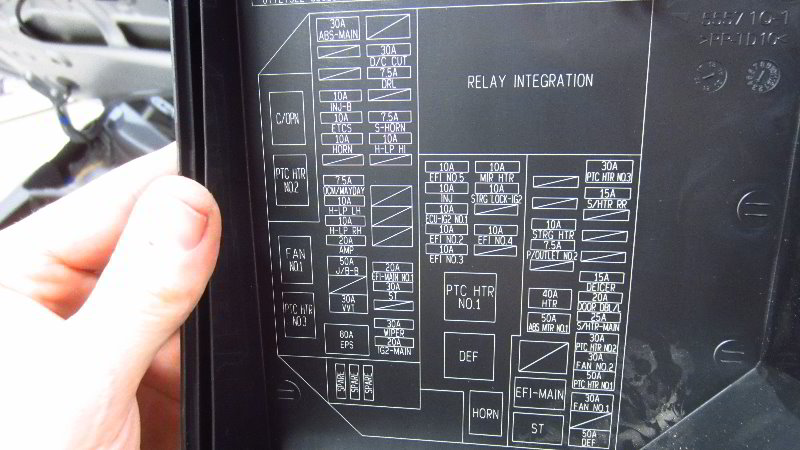
The 2022 Toyota Corolla fuse box diagram is an absolutely essential piece of information for any Corolla owner who likes to tinker, repair, or modify their vehicle. Understanding its layout and function can save you significant time and money, preventing costly trips to the mechanic for simple electrical issues. This article will provide a detailed breakdown of the 2022 Corolla's fuse box diagram, covering its purpose, key components, symbols, operation, and real-world applications. We'll also emphasize safety precautions to prevent damage to your vehicle or personal injury.
Why You Need This Diagram
The fuse box diagram is your roadmap to the car's electrical system. Without it, diagnosing electrical problems becomes a frustrating guessing game. Here's why it's so important:
- Troubleshooting Electrical Issues: A blown fuse is often the culprit behind malfunctioning lights, power windows, the radio, or even a car that won't start. The diagram lets you quickly identify and replace the correct fuse.
- Identifying Circuits: Whether you're installing aftermarket accessories like a new stereo, dashcam, or auxiliary lighting, the diagram helps you locate the appropriate circuit to tap into, ensuring proper power supply and preventing damage to other systems.
- Preventing Further Damage: Continuously replacing blown fuses without understanding the underlying cause can lead to more severe electrical problems. The diagram, combined with basic diagnostic skills, can help you pinpoint shorts or overloads before they cause significant damage.
- Learning About Your Car: Even if you're not experiencing any issues, studying the diagram can provide valuable insight into the complexity and design of your car's electrical architecture.
Key Specs and Main Parts
The 2022 Toyota Corolla typically has two fuse box locations:
- Under the Hood (Engine Compartment): This box houses fuses and relays for critical systems like the engine control unit (ECU), starter motor, headlights, and various other powertrain components.
- Inside the Cabin (Usually under the dashboard or in the driver's side footwell): This box contains fuses for interior accessories like the radio, power windows, cigarette lighter (if equipped), and interior lighting.
Key components you'll find in these fuse boxes include:
- Fuses: These are sacrificial devices designed to protect electrical circuits from overcurrent. They consist of a thin wire or strip that melts and breaks the circuit when the current exceeds a specified amperage. Fuses are rated in amps (A) and come in various sizes and shapes, such as blade-type, mini-blade, and low-profile mini-blade.
- Relays: Relays are electrically operated switches that allow a low-current circuit to control a high-current circuit. They're commonly used to switch on headlights, the starter motor, and other high-power devices.
- Circuit Breakers: Unlike fuses, circuit breakers are resettable. They trip (open the circuit) when an overcurrent condition is detected and can be manually reset after the fault is corrected. While less common in modern fuse boxes for all circuits, they're sometimes used for specific high-demand systems.
- Fuse Puller: A small plastic tool designed to safely remove fuses without damaging them or the fuse box.
Understanding the Symbols and Diagram Layout
The fuse box diagram is essentially a map. It identifies each fuse and relay, specifying its function and amperage rating. Here's how to interpret the diagram:
- Fuse Numbers/Labels: Each fuse location is typically assigned a unique number or label (e.g., F1, F2, ACC, IG). The diagram will correlate this number/label to the specific circuit it protects.
- Amperage Rating (A): This indicates the maximum current the fuse can handle before blowing. It's crucial to replace a blown fuse with one of the exact same amperage rating. Using a higher amperage fuse can allow excessive current to flow, potentially damaging wiring and components.
- Symbols & Icons: Diagrams may use symbols to represent the components or systems protected by each fuse. Examples include:
- Headlight symbol: Indicates a fuse for the headlights.
- Radio symbol: Indicates a fuse for the radio.
- Window symbol: Indicates a fuse for the power windows.
- Engine symbol: Indicates a fuse related to the engine management system.
- Line Drawings: Diagrams are often a schematic representation. The way the fuses are physically laid out in the box will correlate to how they appear on the diagram. Pay attention to fuse orientation.
- Color Coding: Fuses are color-coded to indicate their amperage rating. This is an industry-standard practice, making it easy to quickly identify the correct fuse value (e.g., yellow = 20A, blue = 15A, red = 10A).
How It Works: Circuit Protection
The fundamental principle behind fuse box operation is overcurrent protection. Each circuit in your car is designed to handle a specific amount of current. When a fault occurs, such as a short circuit (where a wire accidentally connects to ground), the current flow increases dramatically. This excessive current generates heat, which can melt the insulation on wires, causing fires or damaging sensitive electronic components.
The fuse, being the weakest link in the circuit, is designed to blow (melt its internal element) before any other component is damaged. This breaks the circuit, stopping the flow of current and preventing further damage. Relays provide a safe method of switching higher voltage circuits (like headlights) with lower voltage triggers controlled from inside the vehicle. They prevent the need to run high voltage wiring into the car's cabin.
Real-World Use: Basic Troubleshooting
Let's say your car's radio suddenly stops working. Here's how you can use the fuse box diagram to troubleshoot the problem:
- Consult the Diagram: Locate the fuse box diagram for the cabin fuse box (usually inside the owner's manual or accessible online). Find the fuse labeled "Radio" or "Audio."
- Locate the Fuse: Using the diagram as a guide, find the corresponding fuse in the fuse box.
- Inspect the Fuse: Carefully remove the fuse using a fuse puller. Examine the thin wire inside the fuse. If the wire is broken or blackened, the fuse is blown.
- Replace the Fuse: Replace the blown fuse with a new fuse of the exact same amperage rating.
- Test the System: Turn on the radio to see if it now works. If the fuse blows again immediately, there's likely a short circuit in the radio or its wiring. Further diagnosis is required.
Safety First: Risky Components & Precautions
Working with electrical systems can be dangerous. Here are some important safety precautions:
- Disconnect the Battery: Before working on any electrical component, disconnect the negative (-) terminal of the battery to prevent accidental shorts or shocks.
- Never Use a Higher Amperage Fuse: Replacing a blown fuse with one of a higher amperage rating can overload the circuit and cause a fire. Always use the specified amperage rating.
- Avoid Working in Wet Conditions: Water conducts electricity, so avoid working on the electrical system in wet conditions.
- Proper Tools: Use insulated tools to prevent electrical shocks.
- Don't Modify the Fuse Box: Never attempt to bypass or modify the fuse box in any way. This can create a serious fire hazard.
- Be Careful Around Relays: Relays control higher voltage circuits. While relatively safe, avoid touching the terminals of relays when the ignition is on.
- If in Doubt, Consult a Professional: If you're not comfortable working with electrical systems, it's best to consult a qualified mechanic.
Understanding the 2022 Toyota Corolla fuse box diagram is a valuable skill for any car owner. It empowers you to diagnose and fix simple electrical problems, saving time and money. Remember to always prioritize safety and consult a professional if you're unsure about any procedure.
We have a downloadable PDF file of the 2022 Toyota Corolla fuse box diagram for your convenience. Feel free to download it for easy access during your repairs and modifications.