2023 Nissan Frontier Fuse Box Diagram
Alright, let's dive into the fuse box diagram for the 2023 Nissan Frontier. Knowing your way around the fuse box is absolutely critical, whether you're tackling a minor electrical glitch, installing aftermarket accessories, or just trying to understand how your truck's electrical system is structured. This isn’t about just replacing a blown fuse; it's about understanding the circuit and preventing future problems.
Purpose of the 2023 Nissan Frontier Fuse Box Diagram
So, why bother with a fuse box diagram? Simply put, it's your roadmap to the Frontier's electrical system. Its main functions are:
- Troubleshooting Electrical Issues: When something electrical malfunctions (lights, radio, power windows, etc.), the first place to check is often the fuse box. The diagram identifies which fuse protects which circuit.
- Safe Installation of Accessories: Adding aftermarket equipment like auxiliary lights or a sound system requires tapping into the electrical system. The diagram helps you identify appropriate, unfused circuits and safely fuse your new additions.
- Preventing Further Damage: Replacing a blown fuse with the wrong amperage can cause serious damage to the electrical components and even start a fire. The diagram ensures you're using the correct fuse for each circuit.
- General Understanding: Even if you don't plan on doing any electrical work yourself, understanding the fuse box diagram gives you a better overall understanding of your vehicle.
Key Specs and Main Parts
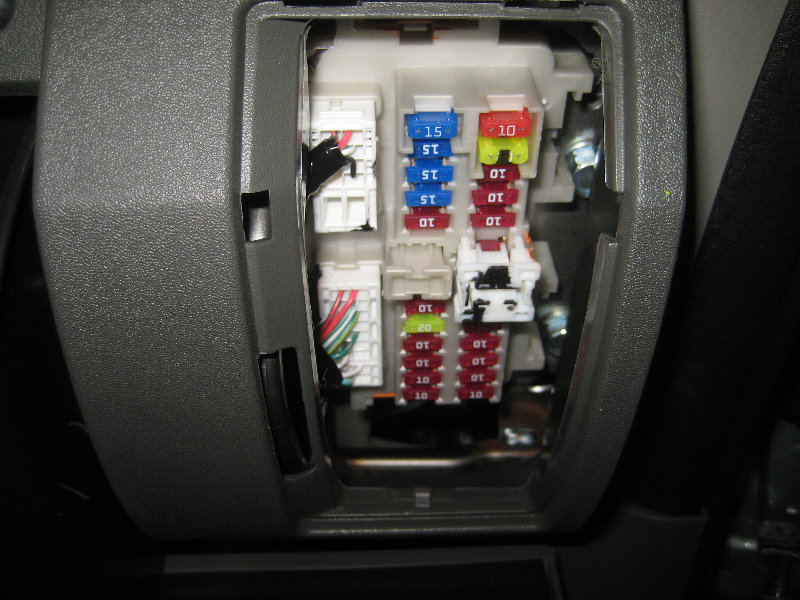
The 2023 Frontier, like most modern vehicles, actually has multiple fuse boxes. We'll focus primarily on the two most commonly accessed: the Interior Fuse Box and the Engine Compartment Fuse Box.
- Interior Fuse Box: Typically located under the dashboard, often on the driver's side. This box houses fuses for interior components like lights, radio, power windows, and the accessory power outlets.
- Engine Compartment Fuse Box: Found under the hood, usually near the battery or on a fender well. This box protects critical engine components like the fuel pump, ignition system, ECU (Engine Control Unit), and various sensors.
Key Components within the Fuse Box:
- Fuses: These are the sacrificial links that protect the circuit. They are designed to melt (open the circuit) when the current exceeds a safe level, preventing damage to other components. Different amperage ratings are color-coded (more on that later).
- Relays: Relays are electromechanical switches that allow a low-current circuit to control a high-current circuit. They're used to switch on things like headlights, the starter motor, and other high-draw components.
- Circuit Breakers: Some circuits may use circuit breakers instead of fuses. These are resettable overload protection devices. If tripped, they can be reset manually. (Less common in modern fuse boxes compared to blade fuses).
- Fuse Puller: A small plastic tool designed to safely remove fuses without damaging them or yourself. It's usually located inside one of the fuse box covers.
Understanding the Symbols: Lines, Colors, and Icons
The fuse box diagram isn't just a list of fuse numbers; it uses symbols to represent what each fuse protects. Understanding these symbols is vital.
- Lines: Represent electrical wires or circuits. A solid line typically indicates a direct connection, while a dashed line might indicate a connection through a switch or relay.
- Colors: Fuse colors indicate their amperage rating. This is *extremely* important. Never replace a fuse with a different amperage fuse. Using the incorrect amperage can damage components or cause a fire! The common color-coding is as follows, but always confirm with the diagram:
- Yellow: 20A
- Blue: 15A
- Red: 10A
- Brown: 7.5A
- Orange: 5A
- Icons: These represent the components protected by the fuse. Here are a few common examples:
- Lightbulb: Headlights, tail lights, interior lights
- Radio: Audio system
- Window: Power windows
- Horn: Horn
- Engine: Engine management system (ECU, fuel pump, etc.)
- ABS: Anti-lock braking system
The diagram will typically label each fuse with a number (e.g., Fuse #12) and a short description (e.g., "Headlight - Left"). It is critical to identify the fuse by both its number and description to ensure the correct fuse is located.
How It Works: A Simplified Circuit
To understand the fuse box, let's consider a simplified circuit. Imagine the circuit for your Frontier's right headlight. It generally works like this:
- Power Source: The battery provides the power (12V DC).
- Switch: The headlight switch in the cabin controls whether the circuit is open or closed. When you turn on the headlights, you close the switch.
- Fuse: A fuse (e.g., a 10A fuse) is placed in the circuit, usually close to the power source.
- Headlight: The electrical current flows through the headlight bulb, causing it to illuminate.
- Ground: The circuit is completed by connecting the headlight back to the negative terminal of the battery (ground).
If there's a short circuit (e.g., a wire chafes against the chassis and creates a direct path to ground), the current will spike. This excessive current will melt the fuse's internal wire, breaking the circuit and preventing damage to the headlight and other components.
Real-World Use: Basic Troubleshooting Tips
Let's say your Frontier's radio suddenly stops working.
- Consult the Diagram: Find the fuse box diagram (usually in the owner's manual or accessible online). Identify the fuse that protects the radio.
- Locate the Fuse: Find the corresponding fuse in the interior fuse box.
- Inspect the Fuse: Visually inspect the fuse. If the wire inside the fuse is broken or the fuse is blackened, it's blown.
- Replace the Fuse: Use the fuse puller to remove the blown fuse. Replace it with a *new* fuse of the *exact same amperage rating* and color.
- Test: Turn on the radio. If it works, you've solved the problem.
- If the Fuse Blows Again: If the new fuse immediately blows, you have a more serious problem, likely a short circuit in the wiring or the radio itself. Further diagnosis is needed, and it may require the assistance of a qualified technician.
Important Troubleshooting Notes:
- Never replace a blown fuse with a higher amperage fuse. This bypasses the protection and can cause serious damage.
- A repeatedly blown fuse indicates a problem in the circuit. Don't just keep replacing the fuse without investigating the underlying issue.
- If you're unsure about anything, consult a qualified mechanic. Electrical problems can be complex and dangerous.
Safety: Highlight Risky Components
Working with electricity always carries risk. Here are a few key safety points:
- Disconnect the Battery: Before working on any electrical system, it's always a good idea to disconnect the negative terminal of the battery. This eliminates the risk of accidental shorts.
- High-Current Circuits: Be particularly careful around circuits protected by high-amperage fuses (e.g., those for the starter motor or alternator). These circuits can deliver a significant shock.
- Airbag Circuits: Never tamper with the fuses or wiring related to the airbag system unless you are a trained professional. Improper handling can cause the airbags to deploy, resulting in serious injury. These are usually clearly marked.
- ECU/PCM Fuses: The Engine Control Unit (ECU) or Powertrain Control Module (PCM) is the brain of your engine. Mishandling fuses related to the ECU/PCM can lead to serious performance issues or even brick the module.
Working with electrical components demands respect for the potential hazards. If you're uncertain, seek professional help.
We have the complete 2023 Nissan Frontier Fuse Box Diagram available for download. This detailed diagram includes high-resolution images and specific information for all fuse locations, amperages, and associated components. With this resource, you can confidently troubleshoot electrical issues and perform modifications with safety and accuracy.