
3 Ton Hydraulic Floor Jack Parts Diagram
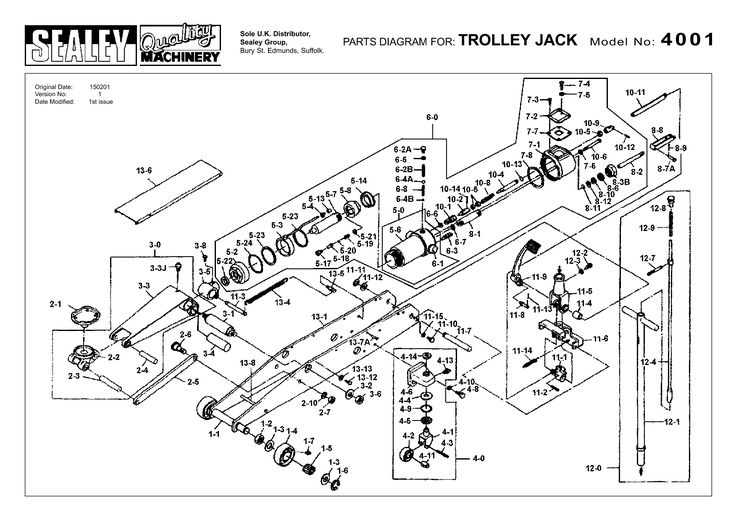
So, you're diving into the guts of your 3-ton hydraulic floor jack? Good on ya! Whether you're facing a leaky seal, a jack that won't lift, or just want to understand how the thing actually works, a parts diagram is your best friend. We're talking about a visual roadmap that takes a complex piece of equipment and breaks it down into manageable, understandable chunks. This isn’t just about fixing your jack; it's about understanding the fundamental principles of hydraulics and mechanics.
Purpose: Why You Need a Parts Diagram
Why bother with a parts diagram? Several reasons:
- Troubleshooting and Repair: The most obvious reason. A diagram helps you identify the specific part that's causing the problem, making diagnosis much faster and more accurate. No more guessing!
- Parts Identification: Finding the correct replacement part is crucial. A diagram provides part names and, often, part numbers, so you can be sure you're ordering the right thing.
- Preventative Maintenance: Understanding the jack's components allows you to perform better maintenance. You’ll know which parts need lubrication, inspection, or occasional replacement.
- Educational Tool: Learning how a hydraulic jack works gives you a deeper understanding of hydraulics in general. It's a great way to expand your mechanical knowledge.
- DIY Projects & Modification: If you're feeling ambitious, you might want to modify your jack. A diagram is essential for planning and executing such projects safely and effectively.
Key Specs and Main Parts
Let's talk about the core of a typical 3-ton hydraulic floor jack and its key specs. A "3-ton" jack is rated to lift up to 6,000 pounds (3 tons x 2000 lbs/ton). However, never exceed the rated capacity. Overloading a jack is extremely dangerous.
Here’s a breakdown of the main components:
- Frame: The structural backbone of the jack. It supports all other components and bears the load. Typically made of heavy-duty steel.
- Lifting Arm (or Saddle): The part that makes contact with the vehicle's lifting point. Often has a rubber pad to prevent damage.
- Hydraulic Cylinder: The heart of the hydraulic system. This cylinder contains the hydraulic fluid and the piston.
- Piston: A cylindrical component that moves within the hydraulic cylinder. It's pushed up by hydraulic pressure, raising the lifting arm.
- Reservoir: Holds the hydraulic fluid.
- Pump Piston and Cylinder: This smaller piston and cylinder system is what *you* operate with the jack handle. Each pump stroke forces fluid into the main hydraulic cylinder.
- Release Valve: Controls the flow of hydraulic fluid back into the reservoir, lowering the jack. Usually a screw-type valve.
- Check Valves (Ball Valves): These are *critical* components that allow fluid to flow in only one direction. They prevent the fluid from flowing back into the reservoir when the pump handle is raised, maintaining pressure in the main cylinder. A common source of jack failure is a stuck or leaky check valve.
- Safety Valve (Overload Valve): A pressure relief valve that prevents the jack from being overloaded. It will release pressure if the load exceeds the jack's rated capacity.
- Handle: The lever used to operate the pump piston.
- Wheels/Casters: Allow for easy positioning of the jack.
- Extension Screw (if equipped): A screw that extends from the lifting pad to provide additional lift height.
Symbols and Diagram Conventions
Understanding the symbols used in the parts diagram is just as important as identifying the parts themselves. Here are some common conventions:
- Lines: Solid lines typically represent physical connections or the outline of a component. Dashed lines might indicate hidden parts or internal passages.
- Arrows: Indicate the direction of movement or flow (especially hydraulic fluid).
- Colors: While less common in basic diagrams, colors might be used to differentiate components or highlight specific areas. For example, blue might represent hydraulic fluid, and red might indicate a high-stress area.
- Exploded View: Most diagrams use an exploded view, which shows the components separated from each other but aligned in their relative positions. This makes it easier to see how the parts fit together.
- Part Numbers: Each part is typically labeled with a unique number. This number corresponds to a parts list, which provides the part's name, description, and manufacturer's part number.
How It Works: The Hydraulics Explained
The magic behind a hydraulic jack is Pascal's Law. This law states that pressure applied to a confined fluid is transmitted equally in all directions throughout the fluid. Here's how it applies to your jack:
- When you pump the handle, you're moving the pump piston.
- This piston pushes hydraulic fluid from the reservoir, through a check valve (preventing backflow), and into the main hydraulic cylinder.
- Because the main piston has a larger surface area than the pump piston, the pressure is multiplied. This is the key to the jack's lifting power. A small force applied to the pump piston generates a much larger force on the main piston.
- The force on the main piston pushes it upwards, raising the lifting arm and lifting the load.
- To lower the jack, you open the release valve. This allows the hydraulic fluid to flow back from the main cylinder to the reservoir, relieving the pressure and allowing the lifting arm to descend.
The Check Valves are Key: These are the silent workhorses. They prevent the fluid from flowing backward during the pumping action, ensuring that each stroke adds to the pressure in the main cylinder.
Real-World Use: Basic Troubleshooting
Let's say your jack isn't working correctly. Here's how a parts diagram can help you troubleshoot:
- Jack Won't Lift:
- Possible Causes: Low hydraulic fluid, air in the system, leaky check valves, or a damaged pump piston.
- Using the Diagram: Locate the reservoir to check the fluid level. Identify the pump piston and check valves. If you suspect a leak in a valve, you may need to disassemble it for inspection (requires careful cleaning and reassembly).
- Jack Lifts Slowly or Jerkily:
- Possible Causes: Air in the system, partially blocked passages, or a worn pump piston.
- Using the Diagram: Trace the hydraulic fluid flow path to identify potential obstructions. Consider bleeding the system to remove air (refer to your jack's manual).
- Jack Won't Hold Pressure:
- Possible Causes: Leaky check valves, a leaking main piston seal, or a leaking release valve.
- Using the Diagram: Focus on the check valves and the main piston seal. Disassembly and inspection are often necessary.
- Jack Leaks Fluid:
- Possible Causes: Damaged seals or O-rings.
- Using the Diagram: Identify the location of the leak on the diagram. This will help you pinpoint the specific seal that needs replacement.
Remember: Always consult your jack's specific manual for detailed troubleshooting steps and recommended repair procedures.
Safety: Know the Risky Components
Working with hydraulic jacks involves inherent risks. Pay close attention to these components:
- Hydraulic Fluid Under Pressure: The hydraulic system operates under high pressure. Never disassemble any hydraulic components while the jack is under load. Releasing the pressure suddenly can cause serious injury.
- Check Valves: Malfunctioning check valves can cause the jack to fail unexpectedly. Replace them immediately if you suspect they are damaged.
- Safety Valve (Overload Valve): Never tamper with the safety valve. It's designed to protect the jack and prevent overloading.
- Seals and O-Rings: Leaking seals can indicate a serious problem. Replace them promptly to prevent sudden failure.
- The Load: Always ensure the load is properly supported before working under a vehicle. Use jack stands! The jack is only for lifting, not for supporting the weight of the vehicle during maintenance or repair.
Crucially Important: Always use safety stands after raising a vehicle with a jack. Jacks are for lifting; stands are for *supporting* the weight of the car while you work. Never trust a jack alone!
Disassembling hydraulic components requires careful cleaning and precise reassembly. Keep your work area clean to prevent contamination of the hydraulic system. Always use the correct type of hydraulic fluid. Using the wrong fluid can damage the seals and internal components.
By understanding the parts of your hydraulic floor jack and how they work together, you're much better equipped to maintain it, troubleshoot problems, and perform repairs safely. Remember to consult the specific diagram for your jack model, and always prioritize safety.
We have the file of a typical 3-ton hydraulic floor jack parts diagram ready for you to download. Having a high-resolution copy will greatly assist you in your repairs and understanding of the tool. Download it to your computer or print it out for your garage. Safe wrenching!