3 Wire Toyota Denso Alternator Wiring Diagram
Understanding the 3-wire Denso alternator wiring diagram in your Toyota is crucial for various reasons, whether you're diagnosing electrical issues, performing alternator upgrades, or simply expanding your automotive knowledge. This isn't just about replacing a part; it's about grasping the fundamental principles of how your charging system functions. This guide provides a detailed explanation of this common configuration, geared towards the experienced DIY enthusiast.
Purpose of Understanding the Wiring Diagram
A 3-wire Denso alternator diagram allows you to:
- Diagnose charging system failures: Accurately pinpoint whether the alternator, wiring, or other components are at fault.
- Perform alternator upgrades: Safely and correctly install a higher-output alternator.
- Troubleshoot wiring problems: Identify shorts, opens, or high-resistance connections within the charging circuit.
- Customize your electrical system: Integrate aftermarket components that rely on the alternator's output.
- Understand the electrical architecture: Gain a deeper comprehension of your vehicle's electrical system as a whole.
Key Specifications and Main Parts
Before diving into the diagram, let's outline the key components involved:
- Alternator: The heart of the charging system, responsible for converting mechanical energy (engine rotation) into electrical energy (DC voltage). The 3-wire Denso alternator is a self-exciting type, meaning it generates its own initial magnetic field once it starts spinning.
- Battery: Stores electrical energy and provides power to the vehicle's electrical system when the engine isn't running or the alternator isn't producing enough output.
- Voltage Regulator: Internal to the alternator in modern Denso units, it maintains a stable output voltage (typically around 13.8-14.4V) regardless of engine speed or electrical load. Prevents overcharging.
- Ignition Switch: Controls power flow to various circuits, including the alternator's excitation circuit.
- Fuses: Protect circuits from overcurrent conditions. Crucial for safety.
- Wiring Harness: Contains all the necessary wires and connectors to link the various electrical components.
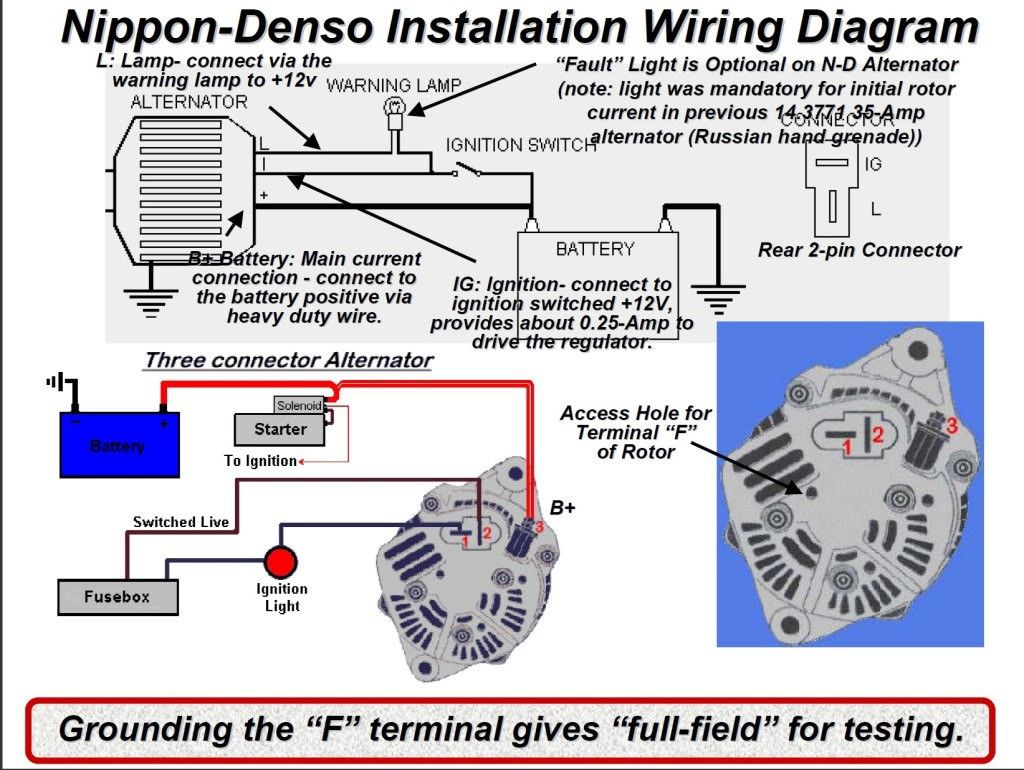
The 3 wires in question are typically designated as follows:
- Battery Sense Wire (Sometimes labelled "S"): This wire connects directly to the positive terminal of the battery (or a point very close to it). It allows the voltage regulator *inside* the alternator to monitor the battery's voltage directly. This is crucial for accurate voltage regulation, as it compensates for voltage drops along the wiring harness due to resistance.
- Ignition/Exciter Wire (Sometimes labelled "IG" or "L"): This wire receives power from the ignition switch when the key is in the "ON" position. It provides the initial excitation current to the alternator to start the charging process. It also typically connects to the charging system warning lamp in the instrument cluster.
- Battery Output Wire (B+ Terminal): This is the main output of the alternator, a thick gauge wire connected directly to the positive terminal of the battery (usually via a fuse or fusible link). This carries the bulk of the charging current.
Symbols and Conventions
Understanding the symbols used in a wiring diagram is essential for proper interpretation.
- Solid Lines: Represent wires. Thicker lines indicate larger gauge wires, typically used for carrying higher current.
- Dashed Lines: May indicate shielding or ground connections.
- Color Codes: Wires are color-coded for easy identification. Common Toyota color codes include (but aren't limited to):
- White (W): Often associated with grounds.
- Black (B): Typically used for grounds.
- Red (R): Generally indicates power.
- Blue (L): Can be used for signal or control wires.
- Green (G): Sometimes used for signal wires or grounds.
- Yellow (Y): Various uses, including lighting circuits.
Always refer to the specific wiring diagram for your vehicle to confirm color codes.
- Icons: Represent components such as alternators, batteries, fuses, switches, and lights. Denso alternators are generally represented by a stylized "D" or a more generic alternator symbol.
- Ground Symbol: Usually represented by a series of horizontal lines or a triangle pointing downwards. Indicates a connection to the vehicle's chassis, providing a common reference point for voltage.
How It Works: The Charging Process
Here's a simplified explanation of how the 3-wire Denso alternator charging system works:
- Ignition ON: When you turn the ignition key to the "ON" position, power is supplied to the Ignition/Exciter wire ("IG" or "L"). This sends a small current to the alternator's voltage regulator.
- Initial Excitation: This initial current energizes the alternator's field winding, creating a magnetic field.
- Engine Starts: As the engine starts and the alternator begins to rotate, the magnetic field induces a voltage in the alternator's stator windings.
- Charging Begins: The alternator starts producing AC voltage, which is then rectified to DC voltage by the internal diodes.
- Voltage Regulation: The voltage regulator monitors the battery voltage via the Battery Sense wire ("S"). It adjusts the current flowing through the field winding to maintain the desired output voltage (e.g., 14.2V). If the battery voltage is low, the regulator increases the field current to boost the alternator's output. If the battery voltage is high, the regulator reduces the field current to prevent overcharging.
- Battery Charging: The alternator's output voltage is higher than the battery's resting voltage, causing current to flow from the alternator to the battery, charging it.
- Charging System Indicator: The Ignition/Exciter circuit is also connected to the charging system warning lamp in the instrument cluster. When the ignition is on and the alternator is *not* charging, the lamp provides a ground path for the bulb. Once the alternator starts charging, the voltage on both sides of the bulb become the same, and the lamp turns off. A lit charging system warning lamp *while the engine is running* indicates a problem with the charging system.
Real-World Use: Basic Troubleshooting
Here are some basic troubleshooting tips when working with a 3-wire Denso alternator:
- No Charging (Battery Light On):
- Check the B+ terminal connection. Ensure it's clean, tight, and properly fused.
- Check the Ignition/Exciter wire ("IG" or "L"). Ensure it's receiving power when the ignition is ON. A test light or multimeter can be used.
- Check the Battery Sense wire ("S"). Ensure it's properly connected to the battery positive terminal (or a point very close to it). A broken or disconnected sense wire can cause the alternator to undercharge or overcharge.
- Test the alternator output voltage with a multimeter. It should be around 13.8-14.4V with the engine running.
- Overcharging (High Voltage):
- The most likely cause is a faulty voltage regulator *inside* the alternator. Replacement or alternator replacement is usually required.
- Check the Battery Sense wire ("S"). A poor connection here can trick the voltage regulator into thinking the battery voltage is lower than it actually is, causing it to overcharge.
- Battery Draining Overnight:
- A faulty diode inside the alternator can cause a parasitic draw on the battery. Disconnect the alternator B+ wire and see if the drain disappears.
Safety Precautions
Working with automotive electrical systems can be dangerous. Here are some important safety precautions:
- Disconnect the Battery: Always disconnect the negative battery terminal before working on the electrical system to prevent shorts and electrical shocks.
- Avoid Short Circuits: Be careful not to short any wires to ground. This can damage components and even start a fire.
- Use Proper Tools: Use insulated tools to prevent accidental shorts.
- Protective Gear: Wear safety glasses to protect your eyes.
- High Current: The B+ terminal of the alternator carries high current. Avoid touching it with bare hands when the engine is running.
- Capacitors: Some electrical components, like the alternator, may contain capacitors that can store a charge even after the battery is disconnected. Discharge these components properly before handling them.
Important Note: Incorrect wiring can damage the alternator, the vehicle's electrical system, and even cause a fire. If you are unsure about any aspect of the wiring, consult a qualified automotive electrician.
We have a detailed wiring diagram available for download to assist you further. Please contact us for the file.