3.5 L 2010 Chevy Impala 3.5 Serpentine Belt Diagram
Let's dive into the serpentine belt system of your 2010 Chevy Impala with the 3.5L engine. This guide will provide you with the knowledge to confidently diagnose, troubleshoot, and even replace your serpentine belt. We'll cover the diagram, its purpose, how it all works, and crucial safety considerations. Consider this your go-to resource, presented in a way that's both technically accurate and easy to understand. We understand you're an experienced DIYer, so we won't talk down to you.
Purpose of the Serpentine Belt Diagram
Why even bother with a diagram? Well, the serpentine belt is the unsung hero that drives many crucial engine components. Understanding its routing is vital for several reasons:
- Repairs and Maintenance: The most obvious reason is to guide you during belt replacement. A correctly routed belt is crucial for proper operation and preventing component damage.
- Troubleshooting: A squealing belt, overheating, or lack of power steering could all be related to a faulty or incorrectly routed belt. The diagram helps you trace the belt and identify potential problem areas.
- Learning and Understanding: Knowing how the system works deepens your understanding of your car's mechanics and allows you to diagnose other potential problems more effectively.
- Future Mods or Upgrades: If you plan to modify your engine or add accessories that rely on the serpentine belt system, you'll need to know how the system works.
Key Specs and Main Parts
Before we get into the diagram itself, let's cover some key specs and the main components driven by the serpentine belt on your 2010 Chevy Impala 3.5L:
- Engine: 3.5L (214 cu in) V6 LXV
- Belt Type: Multi-ribbed (usually 6 ribs, sometimes referred to as a "6PK" belt). The specific length varies, so always double-check the part number on the old belt or consult your vehicle's service manual for the correct replacement.
- Key Components: The serpentine belt drives the following components:
- Crankshaft Pulley (or Damper): This is the main drive pulley, connected directly to the engine's crankshaft.
- Alternator: Provides electrical power to the vehicle and charges the battery.
- Power Steering Pump: Provides hydraulic assistance for steering.
- Air Conditioning (A/C) Compressor: Compresses refrigerant for the A/C system.
- Water Pump: Circulates coolant through the engine to prevent overheating.
- Tensioner Pulley: Maintains proper belt tension. This is spring-loaded.
- Idler Pulley (Optional): Some configurations may have an idler pulley to guide the belt around other components.
Serpentine Belt Diagram Symbols Explained
The diagram itself isn't just a picture; it's a symbolic representation of the system. Understanding these symbols is essential:
- Solid Lines: Represent the path of the belt. Follow these lines carefully when routing the new belt.
- Arrows: Indicate the direction of belt travel around each pulley. This is critical for ensuring the belt is routed correctly.
- Circles/Pulleys: Each circle represents a pulley. The size and label indicate which component it's connected to (e.g., ALT for Alternator, P/S for Power Steering, A/C for Air Conditioning, WP for Water Pump).
- Tensioner Symbol: The tensioner pulley is often represented by a unique symbol to distinguish it from the other pulleys. Look for a spring-loaded arm near the pulley.
- Rough Side and Smooth Side: Typically, the rough side of the belt makes contact with the pulleys, while the smooth side touches the idler pulley. The diagram will usually show an illustration how the belt touches the pulleys.
How It Works: The Serpentine Belt System in Action
The serpentine belt system is relatively simple in principle. The crankshaft pulley, driven by the engine, is the primary mover. It turns the serpentine belt, which in turn drives all the other accessories. The tensioner pulley maintains constant tension on the belt, preventing slippage and ensuring all components are driven efficiently. Without proper tension, the belt will slip, leading to reduced performance from the alternator (battery not charging), power steering (hard steering), A/C (no cold air), and water pump (overheating).
The beauty of the serpentine belt system is its compact and efficient design. It allows all these components to be driven by a single belt, simplifying the engine design and reducing the number of moving parts.
Real-World Use: Troubleshooting Your Serpentine Belt
Here are some common issues you might encounter and how to diagnose them using your knowledge of the serpentine belt system:
- Squealing Belt: This is often caused by a loose belt or a worn pulley. Check the tensioner pulley for proper operation. If the tensioner is weak, replace it. Also, inspect the belt for cracks, glazing, or missing ribs. A contaminated belt (oil, coolant) can also squeal.
- Overheating: If the water pump isn't being driven properly due to a slipping or broken belt, your engine can overheat. Check the belt's condition and tension immediately.
- No Power Steering: A slipping or broken belt can prevent the power steering pump from working, making the steering very difficult.
- Battery Not Charging: If the alternator isn't being driven properly, the battery won't charge. Check the belt's condition and tension.
- Broken Belt: A completely broken belt is usually caused by a worn belt, a seized pulley (e.g., a bad alternator bearing), or improper installation. Before replacing the belt, inspect all the pulleys to ensure they spin freely.
Pro Tip: Before removing the old belt, take a picture or sketch the routing. This will save you a lot of headache when installing the new belt!
Safety First: Working with Serpentine Belts
Working on the serpentine belt system involves some inherent risks. Always take these precautions:
- Disconnect the Battery: Always disconnect the negative battery cable before working on any electrical components, including the alternator. This will prevent accidental shorts.
- Hot Engine: Never work on the engine while it's hot. Allow it to cool down completely to avoid burns.
- Moving Parts: Never start the engine with your hands or tools near the serpentine belt. The rotating pulleys can cause serious injury.
- Tensioner Tool: Use the correct tensioner tool to relieve tension on the belt. Do not try to force the tensioner.
- Eye Protection: Wear safety glasses to protect your eyes from debris.
- Proper Tools: Use the correct tools for the job. Using the wrong tools can damage components or cause injury.
The Alternator is a particularly risky component because it is electrically charged when the engine is running. Shorting the alternator can cause damage to the electrical system or even a fire.
By following these safety guidelines and using your newfound knowledge of the serpentine belt system, you can confidently maintain and repair this vital part of your 2010 Chevy Impala 3.5L.
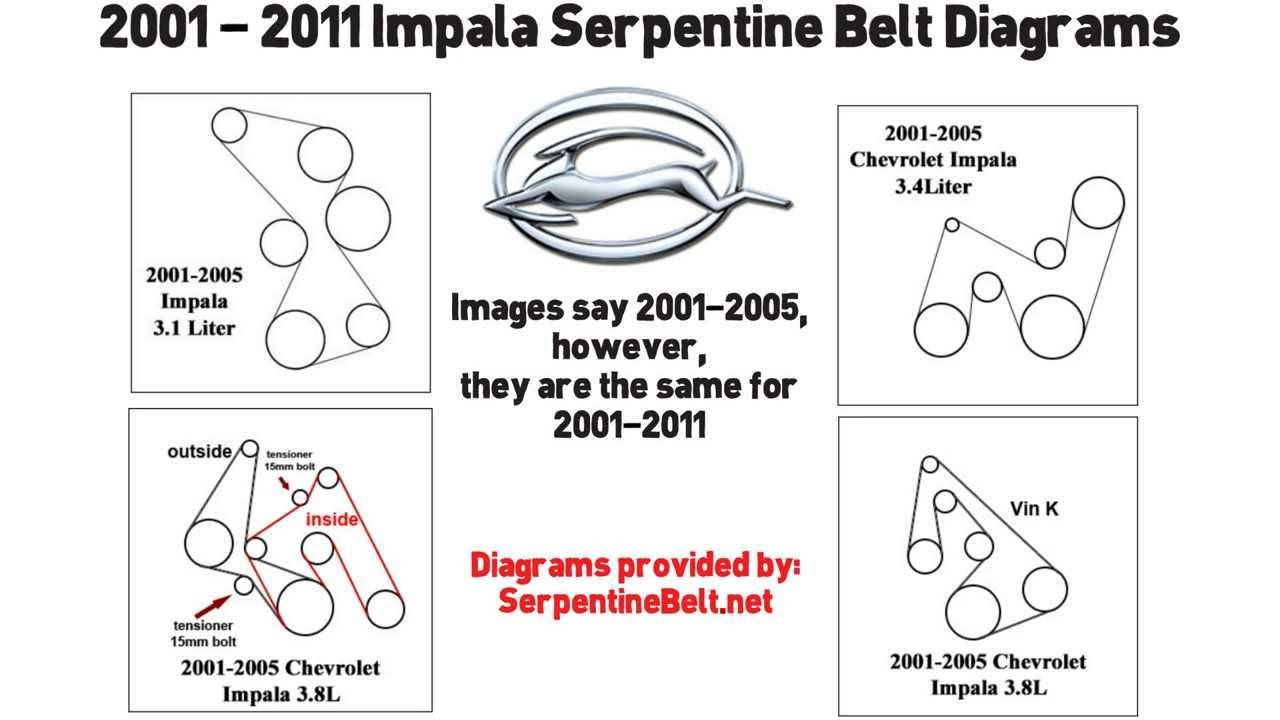
To help you even further, we have a detailed serpentine belt diagram for the 2010 Chevy Impala 3.5L. Feel free to download it [link to download]. This will be a valuable reference tool as you work on your vehicle.