
350 Chevy Starter Motor Wiring Diagram
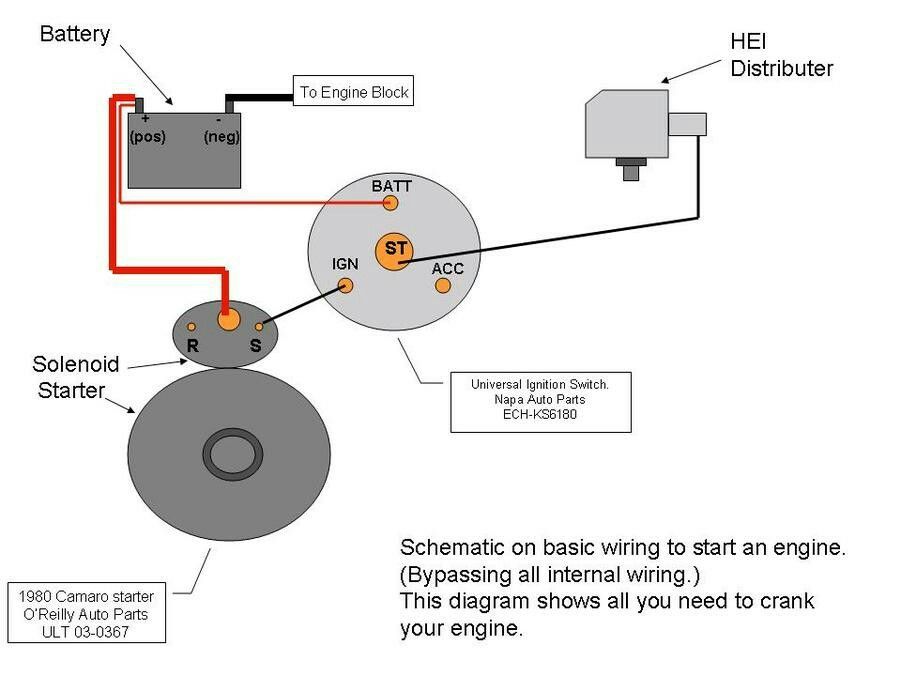
Understanding the 350 Chevy starter motor wiring diagram is crucial for anyone working on their classic Chevy, whether you're diagnosing starting problems, performing routine maintenance, or embarking on a restomod project. This guide will break down the diagram, explaining each component, connection, and symbol, empowering you to tackle starter-related tasks with confidence.
Why This Diagram Matters
The 350 Chevy engine, a legendary powerplant, has seen countless applications. Consequently, variations in wiring exist. Having a diagram tailored to *your* specific year and model 350 Chevy is indispensable for several reasons:
- Troubleshooting: Accurately pinpoint the source of starting issues, from a dead battery to a faulty solenoid.
- Repairs: Ensure correct wiring connections during starter replacement or repair. Incorrect wiring can damage components and prevent starting.
- Modifications: Integrate aftermarket components, such as high-torque starters, with proper wiring for optimal performance.
- Learning: Deepen your understanding of automotive electrical systems.
Key Specs and Main Parts
Before diving into the diagram, let's familiarize ourselves with the key components of the 350 Chevy starter system:
- Battery: The heart of the electrical system, providing the initial power for starting. Typically a 12-volt system.
- Starter Motor: An electric motor that cranks the engine to initiate combustion.
- Solenoid: An electromechanical switch mounted on the starter. It performs two critical functions: it engages the starter drive pinion with the flywheel and closes the circuit to provide high current to the starter motor.
- Ignition Switch: Controls the flow of power to the starter circuit. When the key is turned to the "start" position, it energizes the solenoid.
- Neutral Safety Switch (NSS) / Clutch Safety Switch (CSS): A safety device that prevents the engine from starting unless the transmission is in Park or Neutral (automatic) or the clutch is disengaged (manual).
- Wiring Harness: A collection of wires that connect all the components.
Understanding the Symbols
Wiring diagrams use standardized symbols to represent electrical components and connections. Here's a breakdown of common symbols you'll encounter:
- Lines: Represent wires. Thicker lines often indicate wires carrying higher current.
- Colors: Wires are color-coded for identification. Common colors include red (positive), black (ground), purple (solenoid activation), and yellow (often used for accessory circuits). Always refer to your specific diagram's color code key.
- Circles: Represent connections or terminals.
- Rectangles: Can represent various components, such as switches, relays, or the starter motor itself.
- Ground Symbol (typically three horizontal lines): Indicates a connection to the vehicle's chassis, providing a return path for the current.
- Battery Symbol (+ and -): Clearly indicates the positive and negative terminals of the battery.
- Solenoid Symbol: Typically a coil-shaped symbol, often with labeled terminals (e.g., "S" for starter activation, "I" for ignition bypass).
- Fuse Symbol: A squiggly line inside a rectangle, representing a fuse.
A detailed legend should accompany the wiring diagram, clarifying the meaning of each symbol and color code used.
How It Works
The 350 Chevy starter system operates as follows:
- When you turn the ignition key to the "start" position, power is sent to the neutral safety switch (or clutch safety switch).
- If the transmission is in Park or Neutral (or the clutch is disengaged), the NSS/CSS completes the circuit, allowing power to flow to the solenoid.
- The solenoid energizes, creating an electromagnetic field that pulls a plunger. This plunger performs two actions:
- It extends the starter drive pinion, engaging it with the flywheel teeth.
- It closes a high-current contact, connecting the battery directly to the starter motor.
- The starter motor spins, cranking the engine.
- Once the engine starts, you release the key. The ignition switch returns to the "run" position, de-energizing the solenoid.
- A spring retracts the starter drive pinion, disengaging it from the flywheel.
Real-World Use: Basic Troubleshooting
Here are some common starting problems and how the wiring diagram can help diagnose them:
- Engine doesn't crank at all:
- Check the battery voltage. A dead battery is the most common culprit.
- Inspect the battery cables for corrosion and loose connections. The diagram will show you the cable routing and connections to check.
- Test the solenoid. Use a multimeter to check for voltage at the solenoid when the key is in the "start" position. If there's voltage but the starter doesn't engage, the solenoid may be faulty.
- Check the neutral safety switch. Bypass it temporarily (with extreme caution) to see if the engine starts. The wiring diagram will show you the NSS location and connections.
- Engine cranks slowly:
- Check the battery voltage. A low battery can cause slow cranking.
- Inspect the starter motor itself. Worn brushes or a faulty armature can cause slow cranking.
- Look for excessive resistance in the wiring. Use a multimeter to measure voltage drop across the starter cable while cranking. A large voltage drop indicates a problem.
- Clicking sound but engine doesn't crank:
- This often indicates a weak battery or a faulty solenoid. The clicking sound is the solenoid engaging but not having enough power to fully engage the starter.
- Check the starter motor's connections. A loose or corroded connection can prevent the starter from getting enough power.
Safety First
Working with automotive electrical systems can be dangerous. Observe these safety precautions:
- Disconnect the battery: Always disconnect the negative battery cable before working on the electrical system. This prevents accidental shorts and potential electrocution.
- Use insulated tools: Use tools with insulated handles to avoid electrical shock.
- Be careful when bypassing safety switches: Bypassing the neutral safety switch or clutch safety switch is a serious safety hazard. Only do this for diagnostic purposes and exercise extreme caution. Ensure the vehicle is securely parked and cannot move unexpectedly.
- Avoid working in wet conditions: Water conducts electricity, increasing the risk of shock.
- Double-check your work: Before reconnecting the battery, carefully review your wiring to ensure everything is connected correctly.
- Fuses are important! Never bypass a fuse without understanding why it blew. Replacing a blown fuse with a higher amperage fuse is a fire hazard. The diagram helps to identify the correct fuse location and amperage.
Never underestimate the power of electricity. If you're uncomfortable working on the electrical system, consult a qualified mechanic.
With a solid understanding of the 350 Chevy starter motor wiring diagram, you'll be well-equipped to diagnose and repair starting problems, ensuring your classic Chevy continues to fire up reliably. We have the comprehensive wiring diagram file available for download. This diagram will be an invaluable asset for any repair or modification project.