3.6 Liter 2012 Chevy Impala Serpentine Belt Diagram
Understanding the serpentine belt system in your 2012 Chevy Impala with the 3.6L engine is crucial for preventative maintenance, diagnosing issues, and performing repairs. This article provides a comprehensive breakdown of the serpentine belt diagram, empowering you to tackle belt-related tasks with confidence.
Purpose of the Serpentine Belt Diagram
The serpentine belt diagram is your roadmap to understanding the belt's routing and component locations within your engine bay. It serves several key purposes:
- Repair and Replacement: When replacing a worn or broken belt, the diagram ensures you route the new belt correctly. Improper routing can lead to component failure and engine damage.
- Component Diagnosis: By understanding the belt's path, you can quickly identify which accessory is driven by the belt. If a specific component isn't functioning correctly (e.g., the A/C compressor is blowing warm air), you can use the diagram to verify the belt is properly engaged and tensioned.
- Preventive Maintenance: Regular inspection of the serpentine belt and its associated components is critical for preventing breakdowns. The diagram helps you locate these components for visual inspection.
- Learning Engine Layout: Even if you're not actively working on the belt, the diagram provides a valuable visual representation of how different engine components are interconnected.
Key Specs and Main Parts
Let's delve into the key specs and identify the main parts involved in the serpentine belt system of your 2012 Chevy Impala 3.6L:
Key Specs:
- Engine: 3.6L V6 (LFX or LLT Engine Code – Confirm via VIN)
- Belt Length: While specific belt length can vary slightly based on installed options (e.g., with or without heavy-duty cooling), the most common belt length is around 91-92 inches. Always verify the correct part number for your specific vehicle.
- Belt Type: Multi-ribbed serpentine belt (typically 6 ribs)
Main Parts:
- Crankshaft Pulley (Harmonic Balancer): The crankshaft pulley is directly connected to the crankshaft and drives the serpentine belt. It’s also a harmonic balancer, which dampens torsional vibrations.
- Water Pump Pulley: Driven by the serpentine belt, the water pump circulates coolant throughout the engine, preventing overheating.
- Alternator Pulley: The alternator generates electrical power to charge the battery and run the vehicle's electrical systems.
- Power Steering Pump Pulley: The power steering pump provides hydraulic assistance to make steering easier.
- Air Conditioning (A/C) Compressor Pulley: The A/C compressor circulates refrigerant, providing cool air to the cabin.
- Tensioner Pulley: This spring-loaded pulley maintains proper tension on the serpentine belt. A worn tensioner can cause belt slippage, noise, and reduced component performance.
- Idler Pulley (Optional): Some configurations include an idler pulley, which simply guides the belt and changes its direction.
Understanding Serpentine Belt Diagram Symbols
Serpentine belt diagrams use various symbols to represent different components and belt routing. Here's a breakdown of common symbols:
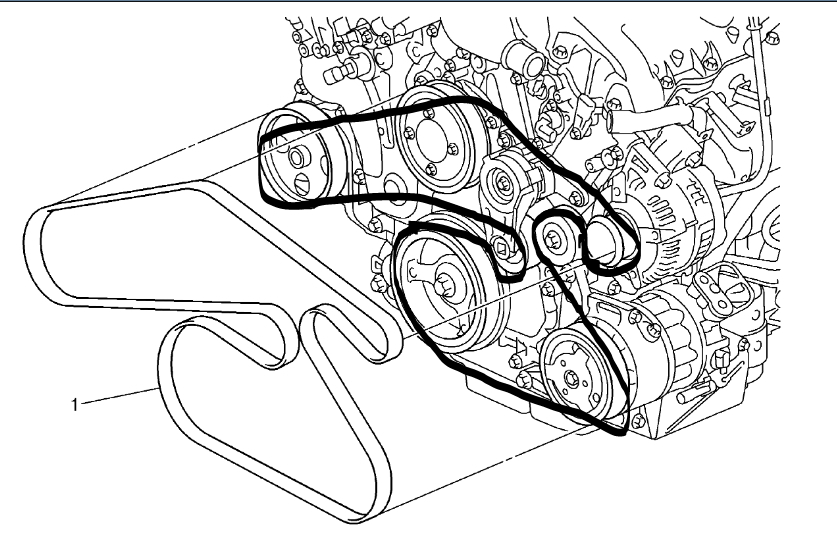
- Solid Line: Represents the serpentine belt itself.
- Arrows: Indicate the direction of belt travel. Pay close attention to these, as they are critical for correct routing.
- Circles/Disks: Represent pulleys. The specific component each pulley belongs to is usually labeled nearby (e.g., "ALT" for Alternator, "P/S" for Power Steering).
- Spring Symbol: Usually associated with the tensioner pulley, indicating its spring-loaded mechanism.
- Component Labels: Abbreviations like "ALT," "P/S," "A/C," "W/P," "CRANK," and "IDLER" are used to identify the corresponding components.
Colors are generally not standardized in serpentine belt diagrams. However, some diagrams might use different colors to highlight specific sections of the belt path or to differentiate between the front and back sides of the belt.
How It Works: The Serpentine Belt System in Action
The serpentine belt system is a relatively simple but essential mechanism. The crankshaft pulley, powered by the engine, drives the serpentine belt. As the belt rotates, it transfers power to the various accessory pulleys, such as the alternator, water pump, power steering pump, and A/C compressor. The tensioner pulley maintains the correct amount of tension on the belt to prevent slippage and ensure efficient power transfer.
The proper tension is crucial. Too little tension leads to belt slippage, causing reduced performance of the driven accessories. Too much tension can overload the accessory bearings and lead to premature failure. The tensioner is designed to automatically compensate for belt stretch and wear, maintaining optimal tension over the belt's lifespan. However, the tensioner itself can wear out and require replacement.
Real-World Use: Basic Troubleshooting Tips
Here are some common serpentine belt-related issues and how the diagram can help with troubleshooting:
- Squealing Noise: A squealing noise often indicates a slipping belt. Use the diagram to visually inspect the belt for wear, cracks, or glazing. Check the tensioner pulley for proper operation. Is it bouncing excessively? Is the belt routed correctly?
- Component Failure: If a specific component isn't working, the diagram can help you trace the belt path to that component. Verify that the belt is properly engaged with the pulley and that the pulley is rotating when the engine is running.
- Belt Wear: Regularly inspect the belt for signs of wear, such as cracks, fraying, or missing ribs. The diagram will help you locate the belt for visual inspection. Check the alignment of the pulleys. A misaligned pulley will cause premature belt wear.
- Tensioner Issues: A faulty tensioner can cause belt slippage, noise, and reduced component performance. Use the diagram to locate the tensioner and inspect it for wear, damage, or lack of tension. A worn tensioner will often bounce excessively or make noise.
Safety Precautions
Working on the serpentine belt system involves several safety considerations:
- Engine Off: Always ensure the engine is completely off and the ignition key is removed before working on the serpentine belt system.
- Battery Disconnect: Disconnecting the negative battery terminal is recommended to prevent accidental starting of the engine.
- Hot Surfaces: Be aware that some engine components, such as the exhaust manifold, can be extremely hot. Allow the engine to cool completely before working near these areas.
- Moving Parts: The serpentine belt and its associated pulleys are moving parts. Keep your hands, clothing, and tools clear of these components when the engine is running (even briefly for testing purposes).
- Tensioner Spring: The tensioner pulley is spring-loaded and can release suddenly if not handled properly. Use the correct tools to relieve the tension and prevent injury.
- Cooling Fan: Be mindful of the cooling fan. Even with the engine off, some vehicles' electric fans can cycle on unexpectedly. Disconnect the fan motor if you're working in close proximity to the fan blades.
Serpentine Belt Diagram Available for Download
For your convenience, we have a detailed serpentine belt diagram specifically for the 2012 Chevy Impala with the 3.6L engine available for download. This diagram will provide you with a visual reference to aid in your repairs and maintenance tasks.