3800 V6 Idle Adjustment Screw Location Diagram
Alright, let's talk about something foundational yet often overlooked on the venerable 3800 V6: the idle adjustment screw. Understanding its location and function is crucial, whether you're performing routine maintenance, diagnosing idle issues, or even contemplating some performance tweaks. This isn't just about turning a screw; it's about understanding the interplay between the engine's components and how they contribute to a stable idle speed. We have a detailed diagram available for download at the end of this article, which will be a valuable resource as we proceed.
Purpose of Understanding the Idle Adjustment Screw Location
Why bother learning about this? Several reasons. First, proper idle speed is critical for engine longevity and fuel efficiency. An idle that's too high wastes fuel and can cause premature wear on components like the transmission. An idle that's too low can lead to stalling, rough running, and difficulty starting. Second, locating the screw correctly is paramount during repairs. Fiddling with the wrong screw can throw off other engine parameters. Third, having a firm grasp on these basics empowers you to diagnose and potentially fix idle-related issues yourself, saving you money and time. Fourth, even if you plan to take your car to a mechanic, understanding the system allows you to communicate the problem more effectively.
Key Specs and Main Parts of the 3800 V6 Idle System
Before we dive into the diagram, let’s cover some crucial specs and the main parts involved. We're primarily focused on the engines found in vehicles from the late 80s through the early 2000s, covering both Series I and Series II 3800s. While specific locations may vary slightly between models and years, the underlying principle remains the same.
The idle speed itself typically ranges from 600-800 RPM (revolutions per minute) in park or neutral. Refer to your vehicle's service manual for the exact specification for your specific model year. This is a crucial specification to keep in mind.
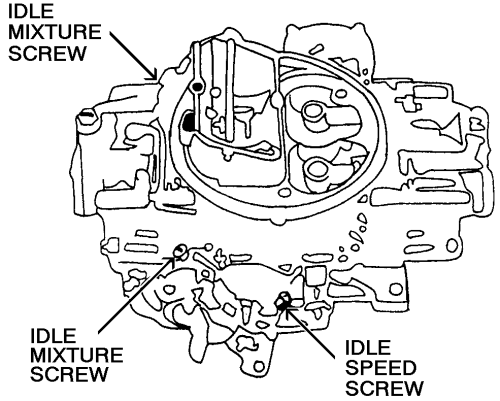
Key components we'll be dealing with include:
- Throttle Body: This is where the air enters the engine. The throttle plate inside regulates the airflow. The idle adjustment screw is located on or near the throttle body.
- Throttle Position Sensor (TPS): This sensor monitors the position of the throttle plate and sends that information to the PCM (Powertrain Control Module).
- Idle Air Control (IAC) Valve: This valve, controlled by the PCM, bypasses the throttle plate to fine-tune the idle speed. Some 3800s use an IAC in conjunction with the idle adjustment screw; others may rely solely on the IAC. The idle air control valve allows the cars computer, or PCM, to control the amount of air that is allowed to bypass the throttle plate, in order to achieve desired idle.
- Powertrain Control Module (PCM): The car's computer. It receives information from various sensors, including the TPS and coolant temperature sensor, and adjusts the IAC valve and other parameters to maintain the desired idle speed.
- Idle Adjustment Screw: The star of our show! This screw physically limits how far the throttle plate can close, thus controlling the amount of air entering the engine at idle.
Understanding the Diagram Symbols
The diagram we provide uses standard automotive symbols. Here’s a breakdown:
- Solid Lines: Represent physical connections, such as vacuum lines or electrical wiring.
- Dashed Lines: Often indicate vacuum lines. Be sure to pay attention to the descriptions next to the lines to understand what they represent.
- Arrows: Show the direction of airflow or fluid flow.
- Circles and Squares: Usually represent sensors or actuators. The diagram will include a legend that clearly labels each component.
- Colors: Some diagrams may use color-coding to distinguish between different systems or types of lines. For example, a red line might represent a vacuum line, while a blue line might represent a coolant line.
- Icons: Icons represent the physical object. For example, the Throttle Position Sensor (TPS) usually displays a rectangle. The IAC is typically a cylinder with a connector.
The diagram will clearly point out the location of the idle adjustment screw. It may show a close-up view of the throttle body, highlighting the screw's specific location and orientation. It may also provide information about the type of screw used (e.g., flathead, Phillips head, Torx).
How the Idle Adjustment Screw Works
The core principle is simple: the idle adjustment screw acts as a physical stop for the throttle plate. When you turn the screw in (clockwise), it pushes the throttle plate open slightly, allowing more air to enter the engine and increasing the idle speed. Conversely, turning the screw out (counterclockwise) allows the throttle plate to close further, restricting airflow and decreasing the idle speed.
However, things get a bit more complex with the IAC valve in the mix. The PCM uses the IAC valve to make fine adjustments to the idle speed, based on factors like engine temperature, electrical load (e.g., headlights, air conditioning), and steering input. The idle adjustment screw acts as a base setting. The PCM then uses the IAC valve to compensate for variations and maintain the desired idle speed. This is why it's crucial to set the idle adjustment screw correctly before troubleshooting other idle-related issues.
Real-World Use: Basic Troubleshooting Tips
Here are some basic troubleshooting tips using the idle adjustment screw:
- Rough Idle/Stalling: If your engine idles roughly or stalls frequently, start by checking the idle speed. Use a scan tool to monitor the RPM. If the idle speed is significantly below the specification, try turning the idle adjustment screw in slightly. Make small adjustments and allow the engine to stabilize between each adjustment.
- High Idle Speed: If your engine idles too high, try turning the idle adjustment screw out slightly. Again, make small adjustments and allow the engine to stabilize.
- Check Engine Light: If the check engine light is on, retrieve the trouble codes using a scan tool. Some codes may be related to the IAC valve or TPS. Addressing these codes may resolve the idle issue without needing to adjust the idle screw.
- Vacuum Leaks: Vacuum leaks can also cause idle problems. Inspect all vacuum hoses connected to the throttle body and intake manifold for cracks or leaks. A vacuum leak will cause the engine to run lean (too much air), which affects the idle quality.
Important Note: Before adjusting the idle adjustment screw, make sure the engine is at its normal operating temperature. Also, ensure that there are no other underlying issues causing the idle problem, such as vacuum leaks or faulty sensors.
Safety Considerations
Working on a running engine can be dangerous. Here are some key safety precautions:
- Keep Hands Clear: Keep your hands and clothing away from moving parts, such as the belts and pulleys.
- Hot Surfaces: Be aware of hot surfaces, such as the exhaust manifold.
- Electrical Hazards: Be cautious of electrical components. Disconnect the negative battery cable before working on any electrical components.
- Fuel Leaks: Be aware of fuel leaks. If you smell fuel, stop working immediately and address the leak. Fuel is highly flammable.
- Fan: Be very careful when the cooling fan engages.
The throttle body itself can also become hot, so be careful when handling it. Wear gloves if necessary. Be particularly careful if you're working on the car soon after it's been running.
When adjusting the idle adjustment screw, use the correct size and type of screwdriver. Do not force the screw, as this could damage the threads. Small, incremental adjustments are the key to success.
We've covered the essential aspects of the 3800 V6 idle adjustment screw and its location. Remember, consistent adjustment and safety practices will serve you well. To further assist you in your repair or learning endeavor, we have prepared a detailed diagram. You can download the diagram here: [Insert Download Link Here]. Good luck, and happy wrenching!