6 Pin Window Switch Wiring Diagram
So, you're wrestling with a balky power window, or maybe you're diving into a custom wiring project that involves adding or replacing a window switch. Understanding the 6-pin window switch wiring diagram is absolutely crucial. This guide isn't just about following lines; it's about understanding the why behind the connections. Whether you're diagnosing a fault, upgrading your interior, or just expanding your automotive knowledge, this breakdown will give you the confidence to tackle the job.
Purpose of Understanding the 6-Pin Window Switch Wiring Diagram
Why bother learning this? Several reasons:
- Troubleshooting: Power windows are deceptively simple until they fail. A wiring diagram helps you pinpoint whether the problem is the switch itself, the motor, the wiring in between, or even a blown fuse.
- Repair and Replacement: Replacing a faulty switch? Knowing the pinout is essential to ensure proper connection. A mistake can damage the new switch or other electrical components.
- Customization/Modding: Adding power windows to a classic car or customizing your vehicle's interior often requires understanding and modifying the existing wiring. This diagram is your roadmap.
- Understanding Vehicle Electrics: Even if you don’t plan on immediately fixing your window, knowing how a window switch works is a valuable lesson in understanding general automotive electrical principles.
Key Specs and Main Parts
Let's break down the core components and their roles in the 6-pin power window system:
The 6-Pin Switch
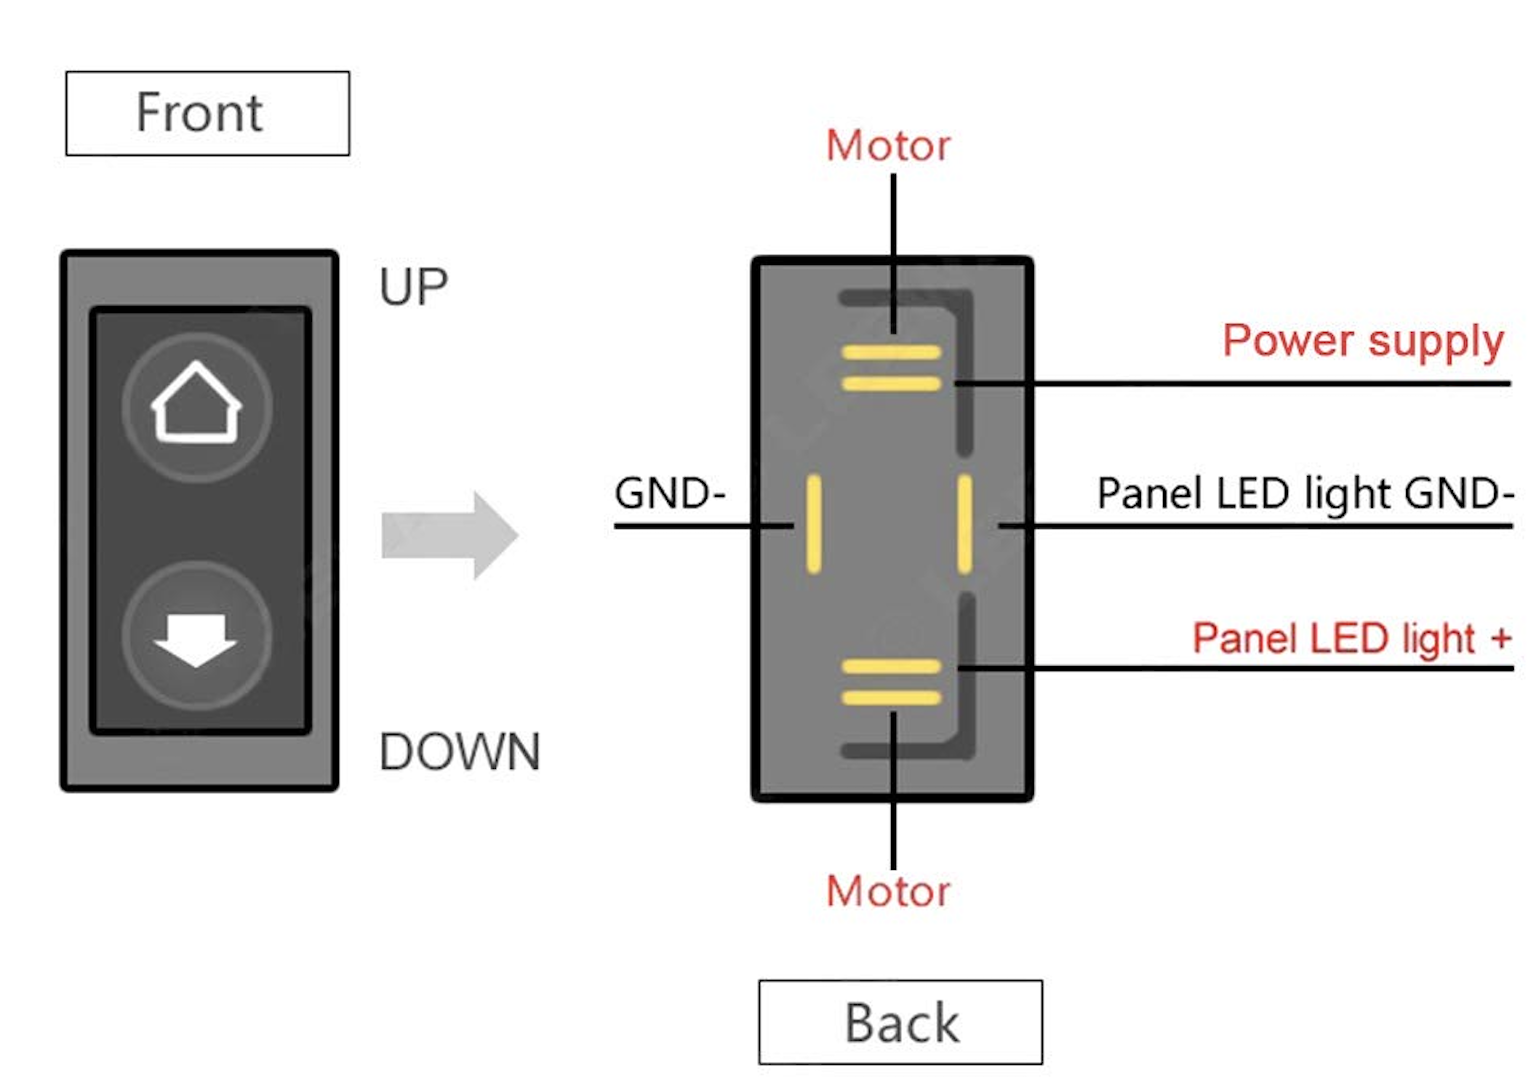
This is the heart of the system. The 6 pins typically handle the following functions:
- Power Input (12V): Usually a direct connection to the vehicle's electrical system, fused for protection.
- Ground: Provides the return path for the current.
- Motor Up: Sends power to the window motor to raise the window.
- Motor Down: Sends power to the window motor to lower the window.
- Passenger Window Control (Up): For Master switches that control other windows
- Passenger Window Control (Down): For Master switches that control other windows
Window Motor
A reversible DC motor that physically moves the window up or down. It usually has two wires, and the polarity of the voltage applied to these wires determines the direction of rotation.
Wiring Harness
The bundle of wires that connects the switch to the motor, the power source, and ground. Identifying the correct wires is critical. Colors can vary between manufacturers, but the diagram is your definitive guide.
Fuse
A crucial safety device that protects the circuit from overcurrent. A blown fuse is often the first sign of a problem. Check your vehicle's owner's manual to locate the correct fuse for the power windows.
Relay (Optional, but Common)
Some vehicles use relays to handle the high current draw of the window motor. This allows for a smaller, less robust switch to be used. The relay is controlled by the switch, and the relay then switches the power to the motor.
Symbols and Conventions in the Diagram
Understanding the symbols is key to deciphering any electrical diagram. Here are some common conventions:
- Solid Lines: Represent wires. Thicker lines may indicate wires carrying higher current.
- Dashed Lines: Often indicate wires that are optional or only present in certain configurations.
- Colors: Wire colors are usually indicated with abbreviations (e.g., BLU for blue, GRN for green, BLK for black, RED for red, WHT for white). Pay close attention, as colors can vary slightly, but the function remains the same.
- Ground Symbol (┴): Indicates a connection to the vehicle's chassis ground. This provides a common return path for the electrical current.
- Battery Symbol (+/-): Represents the power source (the vehicle's battery). The + indicates the positive terminal, and the - indicates the negative (ground) terminal.
- Switch Symbol: Shows the internal connections of the switch in different positions (up, down, neutral). These symbols will show which pins are connected depending on the switch position.
Important Note: Always refer to the specific wiring diagram for your vehicle. General diagrams are helpful for understanding the principles, but the exact wire colors and pin assignments can vary significantly between makes and models.
How It Works: The Flow of Electricity
Here's the basic principle:
- Power Source: The system receives power from the vehicle's battery through a fused connection.
- Switch Activation: When you press the window switch up or down, you're essentially connecting different pins within the switch. This completes a circuit that directs power to the window motor.
- Motor Activation:
- Up: Power is sent to the "Motor Up" pin, and the motor spins in one direction, raising the window.
- Down: Power is sent to the "Motor Down" pin, and the motor spins in the opposite direction, lowering the window.
- Return Path: The electricity flows through the motor and back to the ground connection, completing the circuit.
The 6-pin switch essentially acts as a double-pole double-throw (DPDT) switch for the motor. That is to say, it controls two different circuits with two different throws. The DPDT switch allows the polarity of the voltage applied to the motor to be switched, which controls the window direction.
Real-World Use: Troubleshooting Tips
Okay, your window is stuck. Where do you start? Here’s a basic troubleshooting approach:
- Check the Fuse: This is the easiest and most common cause. Use a multimeter to verify continuity across the fuse.
- Test the Switch: Use a multimeter to check for voltage at the power input pin of the switch. Then, check for voltage at the "Motor Up" and "Motor Down" pins when the switch is activated. If there's no voltage output, the switch is likely faulty.
- Test the Motor: Disconnect the motor and apply 12V directly to its terminals. If the motor doesn't run, it's likely the problem. If it runs in one direction and not the other, the motor may need repair or replacement.
- Check the Wiring: Look for damaged, corroded, or loose wires. Use a multimeter to check for continuity between the switch and the motor.
- Consider the Relay: If your vehicle uses a relay, test the relay's functionality. You should hear it click when the switch is activated. If the relay is not functioning properly, it won't send power to the window motor.
Example: Imagine your window only goes down, but not up. The problem may be that the "motor up" circuit in your 6-pin switch is faulty, or the wiring to the Motor Up is damaged. You'll want to test the switch and the motor up wire.
Safety Precautions
Working with automotive electrical systems can be dangerous. Here are some essential safety tips:
- Disconnect the Battery: Always disconnect the negative terminal of the battery before working on any electrical components. This prevents accidental shorts and potential electric shocks.
- Use a Multimeter Safely: Be sure you know how to use your multimeter properly. Incorrect settings can damage the meter or create a short circuit.
- Beware of Airbags: If you're working near airbags, be extra cautious. Disconnecting the battery for a sufficient amount of time (check your vehicle's service manual) can help prevent accidental deployment.
- Handle Wires Carefully: Avoid pulling or stretching wires. Damaged wires can cause shorts and electrical fires.
- Wear Safety Glasses: Protect your eyes from debris and sparks.
Working with electricity means respecting its power and potential danger. If you're not comfortable performing these tasks, consult a qualified automotive electrician.
We have the 6-pin Window Switch Wiring Diagram file to assist you further. Feel free to download the diagram for a more comprehensive guide. With this knowledge and proper precautions, you can confidently troubleshoot or upgrade your power window system!