6.0 Powerstroke Dual Alternator Belt Diagram
Alright, let's dive into the serpentine belt system for a 6.0 Powerstroke equipped with dual alternators. This configuration is a common upgrade for trucks requiring substantial electrical power – think ambulances, tow trucks, or rigs heavily modified with aftermarket electronics like high-powered audio systems or auxiliary lighting. Understanding this belt diagram is crucial for proper maintenance, troubleshooting, and even just gaining a deeper understanding of your truck's inner workings. Whether you're replacing a worn belt, diagnosing a squealing noise, or simply expanding your mechanical knowledge, this guide will walk you through it.
Purpose of Understanding the Dual Alternator Belt Diagram
Why bother learning about this diagram? Several reasons: Firstly, it's essential for correct belt routing during replacement. An incorrectly routed belt will likely fail prematurely, cause damage to pulleys, and leave you stranded. Secondly, it allows you to identify potential problems within the system. A worn idler pulley or a misaligned component can be spotted and addressed before they lead to more serious issues. Thirdly, if you're considering adding or modifying components related to the belt drive system, having this knowledge ensures compatibility and prevents costly mistakes. Essentially, it empowers you to maintain and troubleshoot this complex system effectively.
Key Specs and Main Parts
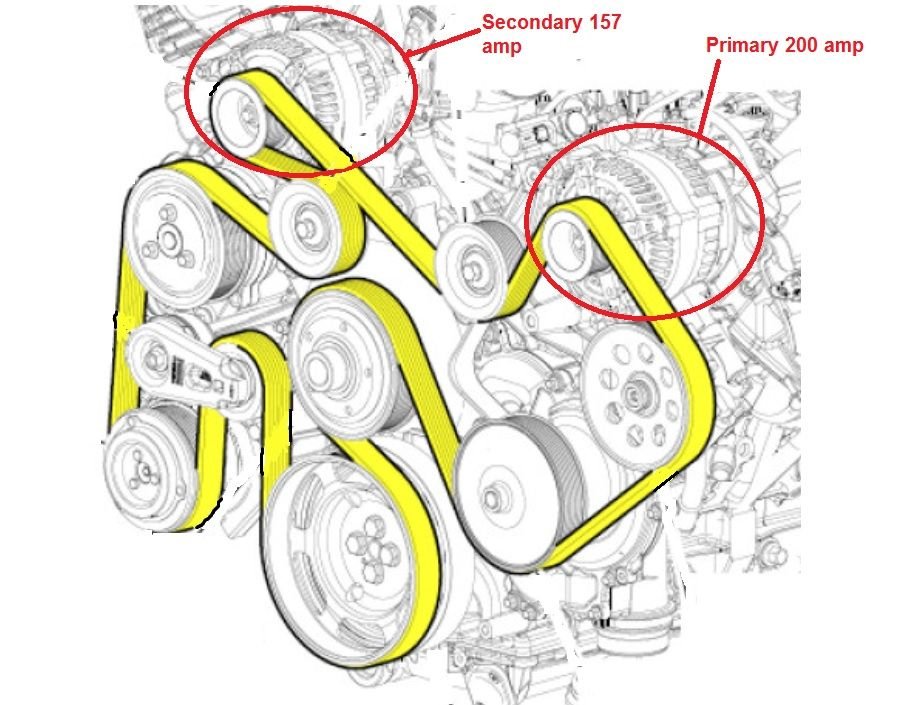
The 6.0 Powerstroke dual alternator setup uses a single, long serpentine belt to drive multiple components. Here's a breakdown of the key parts:
- Crankshaft Pulley (Damper): This is the heart of the system. Bolted to the crankshaft, it provides the rotational force that drives the entire belt.
- Main Alternator: Your primary charging source, responsible for maintaining the vehicle's electrical system under normal loads.
- Secondary Alternator: Added for increased electrical output to handle high amperage demands.
- Water Pump Pulley: Drives the water pump, circulating coolant throughout the engine.
- Fan Clutch Pulley: Engages the cooling fan as needed to regulate engine temperature.
- Power Steering Pump Pulley: Provides hydraulic pressure for the power steering system.
- Idler Pulleys: These smooth, ungrooved pulleys provide tension and guide the belt around the other components. They are critical for maintaining proper belt wrap.
- Tensioner Pulley: Spring-loaded, automatically adjusts belt tension to compensate for wear and thermal expansion. A properly functioning tensioner is crucial for belt life.
- Serpentine Belt: The long, ribbed belt that connects all the components. The ribs engage with the grooves on the pulleys to transmit rotational force.
Key Specs you'll want to know include the belt length and the correct torque specifications for each component's mounting bolts. Always consult your vehicle's service manual for precise values. The belt length is particularly important; using the wrong size can lead to insufficient or excessive tension, both detrimental to belt and component life.
Understanding the Diagram: Symbols and Conventions
Belt diagrams use a standardized set of symbols to represent different components and their arrangement. Here's what you'll typically encounter:
- Circles: Represent pulleys. Different diameters indicate different pulley sizes, influencing the rotational speed of the driven component.
- Solid Lines: Indicate the belt itself. The direction of the line shows how the belt wraps around each pulley.
- Dashed Lines (Sometimes): Can indicate the back (smooth) side of the belt contacting a pulley, or sometimes indicate a hidden section of the belt behind another component. Pay close attention to the legend if dashed lines are present.
- Arrows: Indicate the direction of rotation for each pulley. This is helpful for visualizing how the belt transfers power.
- Text Labels: Clearly identify each component (e.g., "ALT 1", "ALT 2", "WATER PUMP").
- Tensioner Symbol: Usually represented as a pulley with an attached spring or a symbol indicating its sprung nature.
Colors, if present, might highlight the belt path or different sections of the system, but are less common in simpler diagrams.
How It Works: The Flow of Power
The system's operation is relatively straightforward. The crankshaft pulley, driven by the engine's combustion, initiates the process. The serpentine belt, wrapped strategically around all the pulleys, transfers rotational force from the crankshaft to each component. The tensioner pulley maintains constant pressure on the belt, preventing slippage and ensuring efficient power transfer. Both alternators, driven by the belt, generate electrical power. The water pump circulates coolant, the power steering pump provides hydraulic assistance, and the fan clutch engages the cooling fan when needed.
The key to the dual alternator setup is that the secondary alternator is added in parallel with the primary alternator. This means they both contribute to the overall electrical output, effectively doubling the charging capacity compared to a single alternator system. This is vital for vehicles with heavy electrical loads.
Real-World Use: Basic Troubleshooting Tips
Here are some common issues you might encounter and how the belt diagram can help:
- Squealing Noise: This is often caused by a loose belt, a worn pulley, or a misaligned component. Use the diagram to inspect each pulley. Look for signs of wear, damage, or wobbling. Check the tensioner to ensure it's functioning correctly. If the belt tensioner shows significant movement and noise, it is time to replace it.
- Belt Slippage: Similar to squealing, but can also be caused by a glazed or contaminated belt. Inspect the belt for cracks, fraying, or oil contamination. Ensure all pulleys are clean and free of debris.
- Premature Belt Wear: Misalignment is a prime suspect. Use a straightedge to check the alignment of each pulley. A severely misaligned pulley will cause the belt to rub against the edge of the pulley, leading to rapid wear.
- Charging Issues: If you're experiencing electrical problems, the diagram can help you trace the belt path to both alternators. Make sure the belt is properly tensioned and driving both alternators effectively. Check alternator wiring and connections.
Remember to always consult your vehicle's service manual for specific troubleshooting procedures and torque specifications.
Safety Considerations
Working on a vehicle's belt drive system involves inherent risks. Here are some crucial safety precautions:
- Disconnect the Battery: Before working on any electrical components, including alternators, disconnect the negative battery terminal. This prevents accidental shocks and damage to the electrical system.
- Hot Engine: Never work on the belt system while the engine is hot. Allow the engine to cool down completely before starting any repairs.
- Moving Parts: Keep your hands, tools, and clothing clear of the belt and pulleys while the engine is running. The rotating components can cause serious injury.
- Eye Protection: Wear safety glasses to protect your eyes from debris.
- Proper Tools: Use the correct tools for the job. Avoid using makeshift tools that could slip and cause injury.
- Belt Tension: Use extreme caution when releasing belt tension with the tensioner tool. These tools are under high spring load and can be dangerous if released improperly.
The alternators themselves pose a risk of electrical shock, even with the battery disconnected, due to residual voltage in the capacitors. Be mindful of this, especially when handling the alternator wiring.
By understanding the 6.0 Powerstroke dual alternator belt diagram and following these safety guidelines, you can confidently tackle maintenance and repairs on your vehicle's serpentine belt system. Remember, if you're not comfortable performing these tasks yourself, it's always best to consult a qualified mechanic.
We have a detailed PDF file of the 6.0 Powerstroke Dual Alternator Belt Diagram that you can download. This file includes high-resolution images and detailed labels to help you identify each component clearly. It's a valuable resource for anyone working on this system. Feel free to download it for future reference, and don't hesitate to reach out if you have any questions.