
6.0 Powerstroke Serpentine Belt Diagram
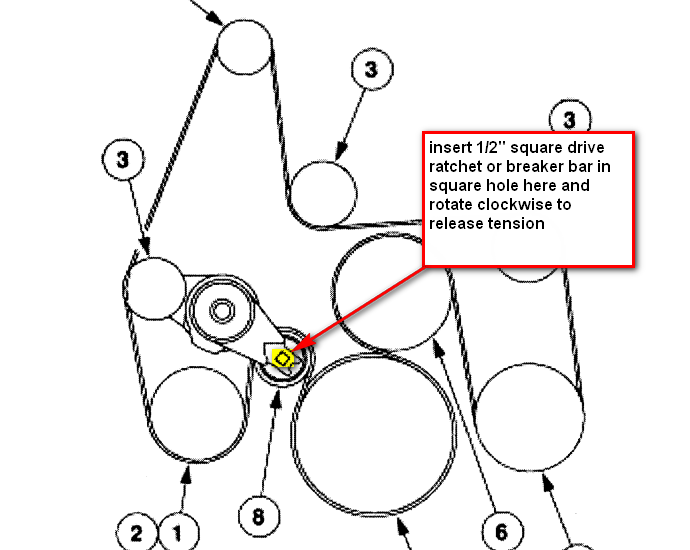
The serpentine belt on your 6.0 Powerstroke is a critical component, driving several essential engine accessories. Understanding its routing and condition is vital for preventative maintenance, troubleshooting, and ensuring your truck stays on the road. This article will provide a detailed explanation of the 6.0 Powerstroke serpentine belt diagram, equipping you with the knowledge needed for effective DIY repairs and maintenance.
Purpose of the Serpentine Belt Diagram
Why bother with a diagram? Well, a serpentine belt diagram is your roadmap when working with this crucial system. Its primary purposes include:
- Correct Belt Installation: Replacing a serpentine belt without knowing the correct routing can lead to improper installation. A misrouted belt won't drive all the accessories correctly, causing issues like a dead battery (alternator not charging), loss of power steering, or overheating (water pump not working).
- Troubleshooting: The diagram helps identify which component is causing a problem. For example, if your air conditioning isn't working, the diagram shows whether the belt drives the AC compressor.
- Preventative Maintenance: By comparing the belt's path with the diagram, you can visually inspect each pulley and accessory for potential issues like misalignment or wear.
- Learning: Understanding the serpentine belt system provides valuable insight into how your engine's accessories function and interact.
Having a readily accessible diagram saves time and frustration during repairs and maintenance. We even have a downloadable diagram available for you, which we'll mention at the end.
Key Specs and Main Parts
The 6.0 Powerstroke serpentine belt system is relatively straightforward, but let's define the key components:
- Serpentine Belt: The continuous belt, typically made of reinforced rubber, that transmits rotational force from the crankshaft to the accessories.
- Crankshaft Pulley: The driving pulley connected directly to the crankshaft, the engine's primary power output.
- Alternator: Generates electrical power to charge the battery and run electrical components.
- Water Pump: Circulates coolant throughout the engine to prevent overheating.
- Power Steering Pump: Provides hydraulic pressure to assist steering.
- Air Conditioning Compressor: Compresses refrigerant in the air conditioning system.
- Tensioner Pulley: A spring-loaded pulley that maintains proper tension on the serpentine belt. This is critical for proper operation.
- Idler Pulley(s): Smooth, bearing-equipped pulleys that guide the belt along its path. They provide necessary belt wrap around other pulleys.
The belt's length and width are crucial specs. Using the wrong size will prevent proper tension and operation. Refer to your vehicle's service manual or a parts catalog for the correct belt specifications. Typically, the belt length is indicated on the belt itself.
Symbols and Diagram Interpretation
Understanding the symbols on a serpentine belt diagram is essential for proper interpretation:
- Solid Lines: Represent the path of the belt. Follow the line to see how the belt wraps around each pulley.
- Arrows: Indicate the direction of rotation for each pulley. Pay close attention to the rotation direction, especially when diagnosing accessory problems.
- Circles/Discs: Represent the pulleys. Each circle is often labeled with the component it's attached to (e.g., ALT for alternator, WP for water pump).
- Spring Symbol: Typically denotes the tensioner pulley, which uses a spring to apply constant tension to the belt.
- Smooth vs. Grooved Pulleys: The diagram may indicate whether a pulley is smooth or grooved. The grooved side of the belt makes contact with the grooved pulleys, while the smooth side makes contact with smooth idler pulleys.
Most diagrams also include labels for each component, making identification easier. Remember to cross-reference the diagram with the actual components on your engine to ensure accurate understanding.
How the Serpentine Belt System Works
The 6.0 Powerstroke serpentine belt system is designed to efficiently transfer power from the engine to various accessories. Here's a simplified explanation:
- The crankshaft pulley, driven by the engine's rotation, initiates the power transfer.
- The serpentine belt wraps around the crankshaft pulley and transfers this rotational force to the other pulleys.
- Each pulley drives its respective accessory (alternator, water pump, etc.). The belt's tension, maintained by the tensioner pulley, ensures adequate grip and prevents slippage.
- The idler pulleys guide the belt, ensuring optimal wrap around each driven pulley. They also prevent the belt from contacting engine components.
- The tensioner pulley automatically adjusts for belt stretch and wear, maintaining proper tension throughout the belt's lifespan.
Proper belt tension is critical. Too little tension results in slippage, while excessive tension can damage bearings and shorten the belt's lifespan. The tensioner pulley is designed to maintain the correct tension, but it can fail over time.
Real-World Use: Basic Troubleshooting Tips
Knowing the serpentine belt diagram can help diagnose several common issues:
- Squealing Noise: A squealing noise often indicates a slipping belt. Check the belt for wear, cracks, or glazing. Inspect the tensioner pulley for proper operation. A faulty tensioner will not maintain adequate belt tension.
- Accessory Malfunction: If an accessory isn't working (e.g., no power steering), confirm the belt is properly routed and tensioned. If the belt is intact and the tension is correct, the problem likely lies within the accessory itself.
- Belt Wear: Regularly inspect the belt for cracks, fraying, or missing chunks. These signs indicate the need for replacement.
- Pulley Alignment: Misaligned pulleys can cause premature belt wear and noise. Use a straight edge to check the alignment of each pulley.
- Tensioner Movement: Observe the tensioner pulley while the engine is running. Excessive movement indicates a worn or failing tensioner.
When replacing the serpentine belt, always refer to the diagram to ensure correct routing. It's also a good idea to inspect the pulleys for damage or excessive wear and replace them if necessary. A worn pulley can damage a new belt.
Safety Considerations
Working on the serpentine belt system involves several safety considerations:
- Engine Off: Always ensure the engine is off and the key is removed before working on the serpentine belt system.
- Cool Engine: Allow the engine to cool down before working near the belt, as components can become very hot.
- Moving Parts: Be extremely cautious of moving parts when the engine is running. Keep hands, clothing, and tools clear of the belt and pulleys.
- Tensioner Spring: The tensioner pulley is spring-loaded and can snap back with considerable force. Use the appropriate tools to relieve tension before removing the belt.
- Battery Disconnect: Consider disconnecting the negative battery cable to prevent accidental starting while working on the system.
The tensioner is one of the riskiest parts because it can snap back with force and cause injuries. Always use the correct tool, usually a serpentine belt tool with the correct socket size for the tensioner bolt, to carefully release the tension. Never try to pry the belt off without relieving the tension.
Having a solid understanding of your 6.0 Powerstroke's serpentine belt system is a valuable asset for any DIY mechanic. Proper maintenance and timely repairs can prevent costly breakdowns and keep your truck running smoothly. And remember, we have the serpentine belt diagram available as a downloadable file, just click the link below to get access.