
7 Prong Trailer Plug Diagram With Brakes
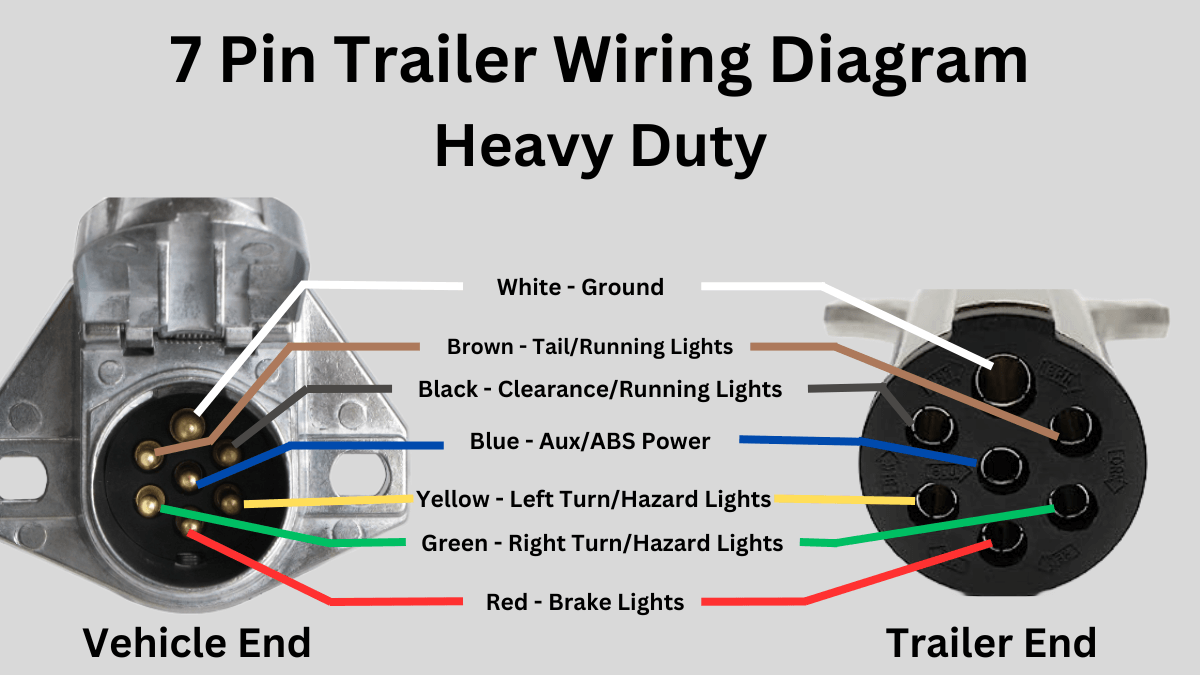
Let's dive into the world of 7-prong trailer plugs – specifically, the kind used with electric brakes. Understanding this wiring system is crucial whether you're diagnosing trailer light problems, installing a brake controller, or just trying to wrap your head around how your tow vehicle communicates with your trailer. This article will provide a detailed diagram interpretation, troubleshooting tips, and crucial safety advice.
Why This Diagram Matters
A clear understanding of the 7-prong trailer plug wiring diagram is essential for several reasons:
- Repair and Maintenance: Diagnosing and fixing common trailer lighting issues (like a flickering turn signal) becomes far easier when you know which wire corresponds to which function.
- Installation and Upgrades: Installing a new electric brake controller or upgrading your trailer's lighting system requires precise wiring. This diagram acts as your roadmap.
- Safety: Incorrect wiring can lead to brake failure, electrical shorts, and potentially dangerous situations on the road.
- Understanding your towing setup: Being able to troubleshoot and understand the electronics behind your trailer means you are self reliant when you are on the road.
Key Specs and Main Parts
The 7-prong trailer plug (often referred to as a "7-way") is the industry standard for trailers equipped with electric brakes and other auxiliary functions. It provides the necessary connections for:
- Ground: Essential for completing the electrical circuits.
- Tail Lights: Powers the taillights on the trailer.
- Left Turn Signal/Brake Light: Controls the left turn signal and brake light on the trailer.
- Right Turn Signal/Brake Light: Controls the right turn signal and brake light on the trailer.
- Electric Brakes: Sends the signal from the brake controller to the trailer's electric brakes. This is the most crucial and potentially dangerous circuit.
- Auxiliary Power (12V+): Provides a constant 12-volt power source for trailer accessories, such as interior lights or a battery charger.
- Reverse Lights: Activates the reverse lights on the trailer when the tow vehicle is in reverse.
The key components are:
- The 7-Prong Plug (Vehicle Side): Mounted on the tow vehicle, this provides the output signals to the trailer.
- The 7-Prong Connector (Trailer Side): Attached to the trailer wiring harness, this receives the signals from the tow vehicle.
- Wiring Harness: The bundle of wires connecting the plug and connector to the various lights and brakes on the trailer. Use stranded copper wire of the appropriate gauge for each circuit. Brake circuits typically require a heavier gauge wire.
- Electric Brake Controller: (Located in the tow vehicle) A device that senses the tow vehicle's braking action and proportionally applies power to the trailer's electric brakes.
Symbols: Understanding the Diagram
Let's break down how to interpret a typical 7-prong trailer plug wiring diagram. Understanding the symbols and conventions used is paramount for accurate wiring.
Colors:
While wire colors can vary slightly, there's a general color code that's widely used. It's *not* a universal standard, so always verify the actual wiring using a multimeter.
- White: Ground. This is almost always white.
- Brown: Tail Lights.
- Yellow: Left Turn Signal/Brake Light.
- Green: Right Turn Signal/Brake Light.
- Blue: Electric Brakes. Arguably the most important wire.
- Red: Auxiliary Power (12V+).
- Black: Reverse Lights.
Lines:
- Solid Lines: Indicate a direct electrical connection.
- Dashed Lines: May represent a connection that is not always present, or a signal path. Rarely seen in basic trailer wiring diagrams.
- Arrows: Show the direction of current flow (though this is less common in basic diagrams).
Icons:
- Circle with a cross inside (Ground): Represents the ground connection.
- Light Bulb Symbol: Represents the lights (tail, turn signal, brake, reverse).
- Rectangle with "Batt" inside: Indicates the auxiliary power source (typically the tow vehicle's battery).
- Rectangle with lines and a coil symbol: This signifies the electric brake actuator.
A well-drawn diagram will clearly label each connection point on both the vehicle and trailer sides of the plug. It will also indicate the function associated with each pin.
How It Works: The Electrical Flow
The system works by the tow vehicle sending electrical signals through the 7-prong plug to the trailer. Here's a breakdown of how the main functions are activated:
- Lights: When you turn on your headlights, the tow vehicle sends power through the brown wire to the trailer's tail lights. When you activate a turn signal, the corresponding yellow (left) or green (right) wire is energized, flashing the turn signal on the trailer. Pressing the brake pedal energizes both the yellow and green wires simultaneously, activating the brake lights.
- Electric Brakes: This is where the electric brake controller comes in. When you press the brake pedal in the tow vehicle (or manually activate the brake controller), the controller sends a variable voltage signal through the blue wire to the trailer's electric brake magnets. The higher the voltage, the *stronger* the braking force applied by the trailer. The brake controller modulates the voltage based on factors like deceleration rate and gain settings.
- Auxiliary Power: The red wire provides a constant 12V+ power source from the tow vehicle's battery to the trailer. This is useful for charging trailer batteries or powering interior lights. It's often fused to protect the circuit.
- Reverse Lights: When you shift the tow vehicle into reverse, a signal is sent through the black wire to activate the trailer's reverse lights.
- Ground: The white wire provides a return path for all the electrical circuits, ensuring that the current can flow properly. A good ground connection is absolutely vital for proper operation.
Real-World Use: Basic Troubleshooting Tips
Here are some common issues and how to diagnose them using the 7-prong diagram:
- No Lights at All: Check the ground connection (white wire) first. A poor ground is the most common cause of lighting problems. Also, check the fuses in your tow vehicle and on the trailer.
- One Turn Signal Not Working: Check the bulb first. If the bulb is good, use a multimeter to test for voltage at the corresponding pin (yellow or green) when the turn signal is activated. Trace the wire back to the connector to find breaks, corrosion, or loose connections.
- Brakes Not Working: This is a serious safety concern. Check the blue wire for breaks, corrosion, or loose connections. Test the brake controller output using a multimeter while manually activating the controller. If there's no voltage, the brake controller is likely faulty. Also inspect the trailer's brake magnets for damage.
- Auxiliary Power Not Working: Check the fuse on the tow vehicle that protects the auxiliary power circuit. Also, ensure the red wire is securely connected at both ends.
- Flickering Lights: This is often caused by a loose connection or corrosion. Inspect all connections, especially the ground, and clean them thoroughly. Use dielectric grease to prevent future corrosion.
Tools you might need: Multimeter, wire stripper/crimper, electrical tape, dielectric grease, circuit tester.
Safety: Handle with Care
Working with electrical systems involves inherent risks. Here are some crucial safety precautions:
- Disconnect the Battery: Before working on any wiring, disconnect the negative terminal of the tow vehicle's battery to prevent shorts and electrical shock.
- Electric Brakes are Critical: Never tow a trailer with malfunctioning electric brakes. This is extremely dangerous. Have a professional diagnose and repair brake issues.
- Use Proper Wiring: Use appropriately sized stranded copper wire for all connections. For brake circuits, use a heavier gauge wire to handle the higher current.
- Protect Wires: Secure wiring harnesses properly to prevent chafing and damage. Use conduit or loom where necessary.
- Water and Corrosion: Water and corrosion are the enemies of electrical systems. Use weatherproof connectors and apply dielectric grease to all connections to prevent corrosion.
Remember: If you're uncomfortable working with electrical systems, consult a qualified mechanic.
For your convenience, we have a detailed, printable version of the 7-Prong Trailer Plug Diagram, specifically with electric brakes, available for download. It includes color-coded wiring and clear illustrations to make your work easier. Contact us for the file.