
8 Pin Power Window Switch Wiring Diagram
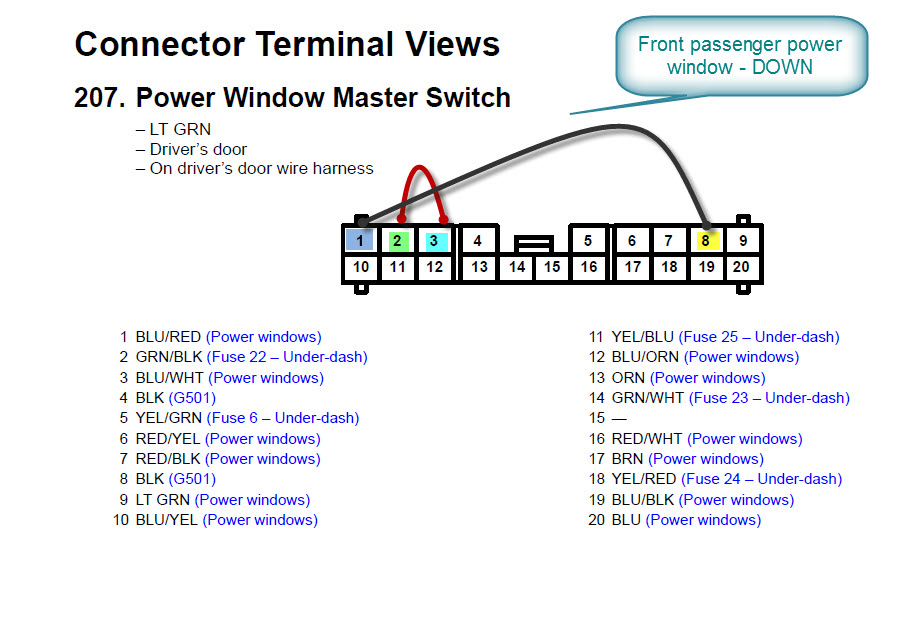
So, you're tackling a power window issue or maybe even adding power windows to a classic ride? Understanding the wiring is absolutely crucial. This article dives deep into the 8-pin power window switch wiring diagram, giving you the knowledge to diagnose problems, make repairs, or even confidently modify your system. We'll cover everything from the purpose of the diagram to troubleshooting tips, ensuring you're well-equipped for the task.
Why Bother with a Wiring Diagram?
A wiring diagram isn't just a pretty picture; it's the roadmap to your car's electrical system. Specifically for power windows, the 8-pin switch diagram is vital for:
- Repairs: When your window stops working, the diagram helps you pinpoint the faulty component – is it the motor, the switch, a broken wire, or a bad ground?
- Modifications: Want to add aftermarket power windows? The diagram will guide your installation, ensuring proper wiring and functionality.
- Troubleshooting: Electrical gremlins can be frustrating. The diagram lets you trace the circuit and isolate the problem area.
- Understanding: Even if everything's working perfectly, knowing how the system operates empowers you to perform preventative maintenance and spot potential issues early.
Key Specs and Main Parts of an 8-Pin Power Window System
Before we get into the wiring details, let's identify the key components you'll encounter in a typical 8-pin power window system. This system uses a double-pole, double-throw (DPDT) switch configuration to control the window motor in both directions (up and down).
- Power Window Switch (8-Pin): This is the central control point. The 8 pins represent the various connections for power, ground, motor control, and illumination (in some cases).
- Power Window Motor: The electric motor that physically moves the window up and down. It's a DC motor, meaning it uses direct current.
- Regulator: The mechanical linkage that connects the motor to the window glass. It translates the motor's rotational motion into linear motion to raise or lower the window. We won't delve into its mechanics here, but its proper operation is crucial.
- Fuses and Circuit Breakers: These are critical safety devices that protect the wiring from overcurrent. Locate and check them first when troubleshooting.
- Wiring Harness: The bundle of wires connecting all the components. These are often color-coded, as indicated on the wiring diagram.
- Ground Connections: A solid ground is essential for proper circuit operation. A poor ground can cause all sorts of intermittent problems.
Decoding the Diagram: Symbols and Conventions
Understanding the symbols and conventions used in the wiring diagram is key to interpreting it correctly. Here's a breakdown:
- Lines: Solid lines represent wires. Dashed lines may represent shielded cables or connections within a component.
- Colors: Wires are typically color-coded (e.g., red for power, black for ground). The diagram will have a color key, so make sure to consult it.
- Symbols for Components: Each component (switch, motor, fuse, etc.) has a standard electrical symbol.
- Numbers and Letters: These indicate pin numbers on the switch and terminal numbers on other components. They help you identify the correct connections.
- GND or Ground Symbol: Usually depicted as a series of horizontal lines, indicating a connection to the chassis or negative terminal of the battery.
- Battery Symbol: Represents the car's battery, the power source for the system.
- Switch Symbol: The switch symbol shows the internal contacts and how they change state when the switch is activated. In the case of a DPDT (double pole double throw) switch, it will typically show two sets of contacts.
Important Note: Wiring diagrams can vary slightly depending on the vehicle make, model, and year. Always use the diagram specifically designed for your car.
How It Works: A Step-by-Step Explanation
Here's a simplified explanation of how the 8-pin power window switch controls the motor:
- Power Input: A constant +12V (from the battery, through a fuse) is supplied to the switch.
- Ground Connection: The switch also has a ground connection.
- Switch at Rest (Neutral Position): When the switch is in the center or neutral position, no current flows to the motor.
- Switch Up: When you press the switch up, it connects the +12V to one of the motor terminals and connects the other motor terminal to ground. This causes the motor to rotate in one direction, raising the window.
- Switch Down: When you press the switch down, the switch reverses the polarity to the motor. The +12V is now connected to the motor terminal that was previously grounded, and vice versa. This causes the motor to rotate in the opposite direction, lowering the window.
- DPDT Configuration: The double-pole, double-throw configuration of the switch allows it to simultaneously switch both the power and ground connections to the motor, achieving the polarity reversal needed for up and down movement.
Real-World Use: Basic Troubleshooting Tips
Let's say your driver-side window refuses to budge. Here's a basic troubleshooting approach using the wiring diagram:
- Check the Fuse: The most common culprit! Use a multimeter to test the fuse for continuity.
- Test the Switch: Use a multimeter to check for voltage at the switch terminals when it's in the up and down positions. The wiring diagram will show you which pins to test. If there's no voltage, the switch is likely faulty.
- Inspect the Wiring: Look for broken or corroded wires, especially near the door hinges where flexing occurs. Use the diagram to trace the wiring from the switch to the motor.
- Test the Motor: Disconnect the motor and apply +12V directly to its terminals, reversing the polarity to check both directions. If the motor doesn't respond, it's likely defective.
- Check the Ground: Ensure a good, clean ground connection. Corrosion can impede conductivity. Use a multimeter to test for continuity between the ground point and the chassis.
Safety First: Handling Electrical Components
Working with electrical systems can be dangerous. Here are some crucial safety precautions:
- Disconnect the Battery: Always disconnect the negative terminal of the battery before working on any electrical system. This prevents accidental shorts and potential shocks.
- Use Proper Tools: Use insulated tools designed for automotive electrical work.
- Be Aware of Potential Hazards: Be careful when working near live wires. Double-check your connections before reconnecting the battery.
- Consult a Professional: If you're uncomfortable with any part of the process, consult a qualified automotive electrician.
- Fuses are Safety Devices: Never replace a fuse with a higher amperage rating. This can overload the wiring and cause a fire. Always use the correct amperage fuse specified for the circuit.
Remember, we have the wiring diagram file ready for you to download. Having this visual aid alongside this guide will greatly enhance your ability to diagnose and repair power window issues.