98 Dodge Ram Rear Drum Brake Diagram
Let's dive into the rear drum brake system on a 1998 Dodge Ram. This article will serve as your comprehensive guide, detailing its diagram, components, and function. Understanding your drum brakes is crucial, whether you're tackling a simple shoe replacement, diagnosing a pesky squeak, or simply expanding your automotive knowledge. We'll cover the diagram in detail, explain the symbols, and offer some real-world troubleshooting tips. We have access to the full diagram file, which you'll be able to download at the end of this article.
Purpose of a Rear Drum Brake Diagram
A diagram of your 1998 Dodge Ram's rear drum brake system serves several vital purposes. It's your roadmap for understanding the system's layout and how its various parts interact. Specifically, a diagram is essential for:
- Repairs and Maintenance: Identifying components during disassembly and reassembly, ensuring proper placement of springs, retainers, and other hardware.
- Troubleshooting: Locating the source of problems such as brake noise, uneven braking, or a soft pedal.
- Parts Identification: Accurately identifying and ordering replacement parts. This is especially important since similar vehicles can have slight variations.
- Learning and Understanding: Deepening your understanding of automotive brake systems in general. Knowing the function of each part enhances your ability to diagnose and repair issues.
Key Specs and Main Parts
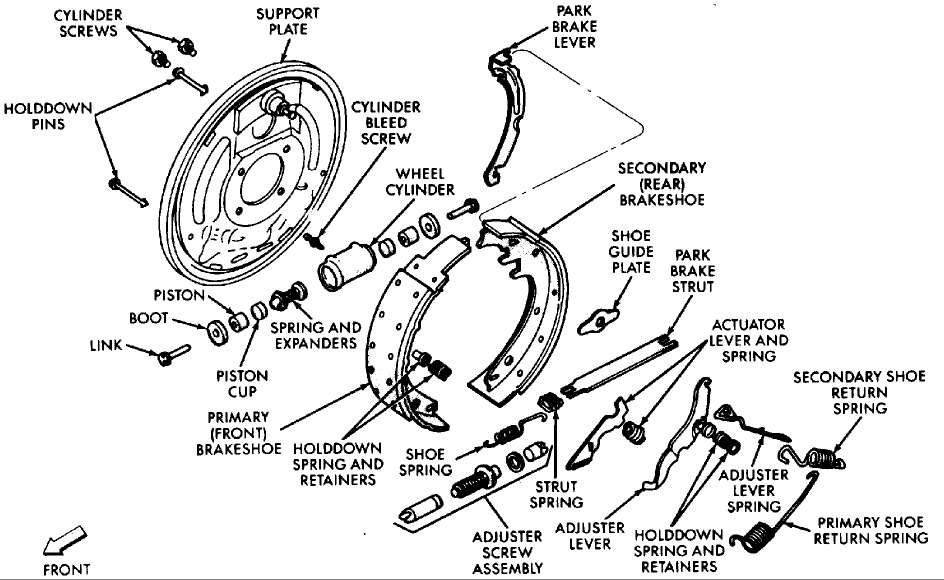
The 1998 Dodge Ram 1500 (and similar models) typically use a self-adjusting rear drum brake system. Here are the main components you'll find in the diagram and on your truck:
- Brake Drum: The rotating cylindrical part that the brake shoes press against to create friction and slow the vehicle. The drum is usually made of cast iron.
- Brake Shoes: Curved friction material (linings) bonded to a metal shoe. These press against the inside of the brake drum. You'll typically see a primary shoe and a secondary shoe, often with different lining materials and lengths.
- Wheel Cylinder: A hydraulic cylinder that pushes the brake shoes outward when the brake pedal is pressed. Contains pistons, seals, and bleeder screw.
- Return Springs: These springs pull the brake shoes back away from the drum when the brake pedal is released, ensuring the brakes aren't dragging. They are critical for proper brake operation.
- Hold-Down Springs: These small springs, along with retainers, hold the brake shoes against the backing plate.
- Adjuster Mechanism: A screw-type mechanism that automatically adjusts the brake shoe clearance as the linings wear. It usually consists of an adjuster screw, adjuster wheel (star wheel), and adjuster cable (or link).
- Parking Brake Lever and Linkage: A lever attached to one of the brake shoes and connected to the parking brake cable. Applies the brakes mechanically when the parking brake is engaged.
- Backing Plate: A stationary plate that supports all the brake components.
Typical drum brake diameter for the 1998 Dodge Ram 1500 is around 11 inches. However, always verify the specific size for *your* truck based on its GVWR and configuration.
Diagram Symbols Explained
Understanding the symbols used in a brake diagram is crucial for interpreting it correctly. Here's a breakdown of common symbols:
- Solid Lines: Indicate solid mechanical connections, such as the metal brake shoes, backing plate, or wheel cylinder body.
- Dashed Lines: Often represent hydraulic lines or control cables (like the parking brake cable).
- Springs: Depicted as coiled lines. Different spring types (return springs, hold-down springs) may have slightly different representations.
- Arrows: Indicate the direction of force or movement. For example, arrows on the wheel cylinder pistons show the direction they push the brake shoes.
- Circles/Dots: Represent fasteners like bolts, rivets, or pins.
- Hydraulic Lines: Indicated by a solid or dashed line often labelled with their respective fluids.
Color-coding is less common in older diagrams, but if present:
- Red: May indicate hydraulic brake fluid lines.
- Blue: Could represent electrical connections (if the vehicle has ABS).
The diagram also often includes exploded views showing the order of assembly of individual components, and detailed cross-sections of the wheel cylinder and adjuster mechanism.
How Drum Brakes Work
The drum brake system relies on friction to slow the vehicle. Here's a simplified explanation of how it works:
- Brake Pedal Activation: When you press the brake pedal, the master cylinder sends pressurized hydraulic fluid through the brake lines.
- Wheel Cylinder Activation: The hydraulic fluid reaches the wheel cylinder in the rear drum brake assembly.
- Shoe Expansion: The fluid pressure forces the wheel cylinder pistons outward. These pistons push the brake shoes against the inside surface of the rotating brake drum.
- Friction and Deceleration: The friction between the brake shoes and the drum creates resistance, slowing the drum's rotation and therefore the vehicle's wheels.
- Self-Adjustment: As the brake shoe linings wear down, the adjuster mechanism automatically compensates for the increased clearance. This mechanism, typically activated by the parking brake or during reverse braking, turns the adjuster screw, moving the shoes closer to the drum.
- Release: When you release the brake pedal, the hydraulic pressure drops. The return springs pull the brake shoes back away from the drum, allowing the wheels to rotate freely again.
Real-World Use & Troubleshooting
Here are some common problems and how the diagram can help:
- Squealing Brakes: Could indicate worn brake shoes, glazed drum surfaces, or contaminated linings. The diagram helps you identify the shoes and check their thickness.
- Uneven Braking: One side grabbing more than the other could be a sign of a faulty wheel cylinder on one side, contaminated linings, or an improperly adjusted brake on one side. Use the diagram to compare the components on each side.
- Soft Brake Pedal: Air in the brake lines, a leaking wheel cylinder, or a faulty master cylinder are potential causes. The diagram helps you trace the hydraulic lines and identify the wheel cylinder's location.
- Parking Brake Issues: If the parking brake doesn't hold the vehicle securely, the cable may be stretched or broken, or the parking brake lever mechanism within the drum brake assembly may be faulty. The diagram shows the parking brake lever and its connection to the cable.
- Brake Drag: If the brakes are dragging, it could be caused by sticking wheel cylinder pistons, weak return springs, or an improperly adjusted brake.
Basic Troubleshooting Tips:
- Visual Inspection: Always start with a visual inspection of all components. Look for leaks, cracks, or signs of wear.
- Brake Shoe Thickness: Check the thickness of the brake shoe linings. Replace the shoes if they are worn to the minimum allowable thickness.
- Wheel Cylinder Leaks: Inspect the wheel cylinder for leaks. If leaking, rebuild or replace the cylinder.
- Adjuster Mechanism: Ensure the adjuster mechanism is working properly. Clean and lubricate the threads of the adjuster screw.
Safety Considerations
Working on brake systems requires caution. Some areas pose greater risks than others:
- Brake Dust: Brake dust can contain asbestos (in older vehicles) and other harmful materials. Always wear a mask and gloves when working on brakes and clean the components with a brake cleaner specifically designed to encapsulate dust.
- Brake Fluid: Brake fluid is corrosive and can damage painted surfaces. Avoid spills and wear eye protection.
- Springs: Brake springs can be under significant tension and can cause injury if released unexpectedly. Use proper brake spring tools to safely remove and install springs.
- Wheel Cylinder: Be careful when disassembling the wheel cylinder. Springs and small parts can eject with force.
- Hydraulic System: Ensure the brake system is properly bled after any repairs to remove air from the lines.
Remember: If you are not comfortable working on your brakes, consult a qualified mechanic.
You now have a detailed overview of your 1998 Dodge Ram rear drum brake system. With this knowledge, coupled with the actual diagram (available for download below), you'll be much better equipped to tackle repairs and maintenance with confidence.
You can now download the full 1998 Dodge Ram Rear Drum Brake Diagram file. [Download Link Placeholder]