Aftermarket Radio Wiring Harness Color Code
So, you're diving into the fascinating, and sometimes frustrating, world of aftermarket car audio. A new head unit, maybe some upgraded speakers? Excellent choice! But before you start tearing out your dashboard, let's talk about something crucial: the aftermarket radio wiring harness color code. Understanding this code is the key to a successful, safe, and headache-free installation. Forget about guessing which wire does what – this guide will arm you with the knowledge to wire your new radio like a pro.
Purpose: Why Bother Understanding the Wiring Harness?
Why spend time deciphering color codes? Simple: avoiding disaster. A properly wired aftermarket radio is essential for several reasons:
- Correct Functionality: Ensures your radio turns on, plays sound through the correct speakers, retains memory (presets), and dims appropriately with your headlights.
- Preventing Damage: Incorrect wiring can fry your new head unit, your car's electrical system, or both. Trust me, you don't want that.
- Maintaining Safety: Improper grounding or power connections can lead to electrical shorts, potentially causing fires. Safety first!
- Future Upgrades: A well-documented installation makes future upgrades (amps, subs, etc.) much easier.
This knowledge isn't just for installations, either. Need to diagnose why your radio isn't working? Maybe a fuse blew? Knowing the wiring color code lets you pinpoint the problem quickly and efficiently. It's also invaluable for understanding and modifying your car's audio system in general.
Key Specs and Main Parts of a Wiring Harness
A wiring harness is essentially an adapter. It connects the standardized wires from your aftermarket radio to the proprietary wiring of your car's factory radio harness. Here's a breakdown of the key components and what they typically handle:
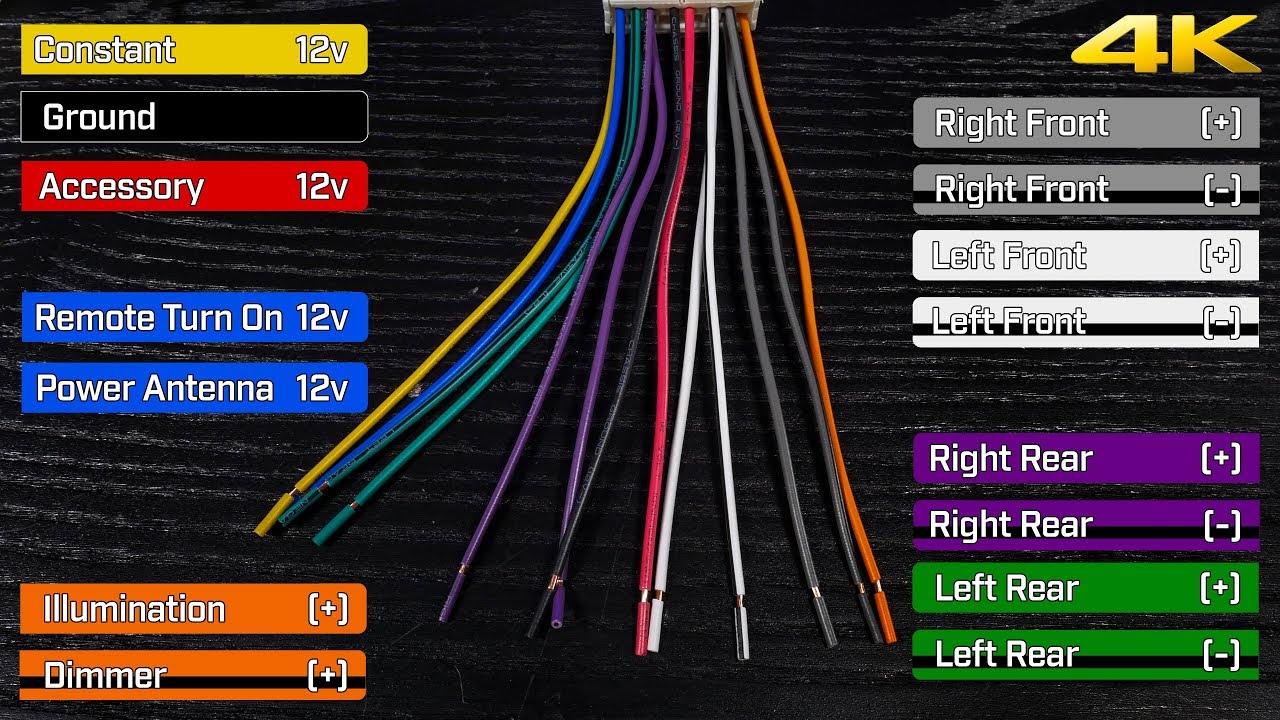
- Power Wires:
- 12V Constant (Battery): Usually yellow. Provides constant power to the radio for memory functions (presets, clock). This wire is always "hot".
- 12V Switched (Accessory): Usually red. Turns the radio on and off with the ignition. Only "hot" when the key is in the accessory or on position.
- Ground: Usually black. Provides the return path for the electrical current. Crucially important for proper operation.
- Speaker Wires: These come in pairs (positive and negative) for each speaker.
- Front Left: Usually white (positive) and white/black stripe (negative).
- Front Right: Usually gray (positive) and gray/black stripe (negative).
- Rear Left: Usually green (positive) and green/black stripe (negative).
- Rear Right: Usually purple (positive) and purple/black stripe (negative).
- Other Wires:
- Remote Turn-On (Amplifier): Usually blue. Sends a 12V signal to turn on external amplifiers when the radio is powered on.
- Illumination: Usually orange or orange/white stripe. Dims the radio display when the headlights are turned on.
- Power Antenna: Usually blue/white stripe. Extends or retracts the power antenna.
- Mute: Often brown or black/yellow. Mutes the radio when a phone call is received (if your radio supports this feature).
- Steering Wheel Control Adapter Wire: Color varies depending on the adapter and car make/model. Consult your adapter's documentation.
- Harness Connectors: These are the plastic connectors that plug into your factory radio harness and your aftermarket radio.
Important Note: While these color codes are generally standardized, always double-check the wiring diagram that comes with your aftermarket radio and your vehicle's wiring diagram. There can be variations, especially across different car makes and models.
Decoding the Symbols: Lines, Colors, and Icons
A wiring diagram, or schematic, uses symbols to represent electrical components and connections. Understanding these symbols is vital for interpreting the diagram accurately.
- Lines: Represent wires. A solid line indicates a direct connection.
- Colors: Each wire is labeled with its color (e.g., "YEL" for yellow, "GRN" for green, "BLK" for black, "WHT" for white, "BLU" for blue, "RED" for red, "GRY" for gray, "PUR" for purple, "ORG" for orange). Wires with a stripe will be indicated with two colors separated by a slash (e.g. "WHT/BLK" is white with a black stripe).
- Circles or Dots: Indicate a connection between wires. A dot where lines cross means they are electrically connected. If lines cross without a dot, they are not connected.
- Rectangles: Often represent connectors or blocks.
- Fuse Symbol: A wavy line inside a rectangle, indicating a fuse.
- Ground Symbol: Usually a series of horizontal lines getting progressively shorter, representing a connection to ground (the car's chassis).
- Speaker Symbol: A circle with a cross inside, representing a speaker. Usually has the speaker name noted (e.g. "Front Left").
The diagram will also typically include voltage values (e.g., 12V, 5V) and polarity (+ or -) to further clarify the connections.
How It Works: The Electrical Circuit
Understanding the basics of an electrical circuit will help you grasp how the wiring harness works. A circuit is a complete loop that allows electricity to flow from a power source (the car battery) to a component (the radio) and back to ground.
- The 12V Constant wire provides a continuous power source to the radio, even when the ignition is off. This allows the radio to retain its memory and settings.
- The 12V Switched wire provides power to the radio only when the ignition is in the accessory or on position. This turns the radio on and off with the car.
- The Ground wire provides the return path for the electrical current, completing the circuit.
- The Speaker Wires carry the audio signal from the radio to the speakers. Each speaker has two wires: a positive (+) and a negative (-) to complete the speaker circuit.
The other wires (remote turn-on, illumination, etc.) provide additional functionality and control the radio's features.
Real-World Use: Basic Troubleshooting Tips
Even with a wiring diagram, things can sometimes go wrong. Here are a few troubleshooting tips:
- No Power: Check the fuses (both in your car and on the radio itself). Verify that the 12V Constant and 12V Switched wires are receiving power using a multimeter. Also, double-check your ground connection. A bad ground is a common culprit.
- No Sound: Ensure the speaker wires are properly connected and not shorted to ground. Check the radio's fader and balance settings.
- Radio Won't Turn Off: The 12V Switched wire may be connected to a constant power source. Double-check your wiring.
- Dimming Not Working: Make sure the illumination wire is properly connected to the car's headlight circuit.
- Blown Fuses: Indicates a short circuit. Carefully inspect all wiring for damaged insulation or loose connections.
Pro Tip: Use a multimeter to test voltage and continuity. This is an essential tool for diagnosing electrical problems.
Safety: Handling Risky Components
Working with car electrical systems can be dangerous. Here are some key safety precautions:
- Disconnect the Battery: Always disconnect the negative terminal of your car battery before working on the electrical system. This prevents accidental shorts and electrical shocks.
- Use Proper Tools: Use insulated tools designed for electrical work.
- Avoid Working in Wet Conditions: Water and electricity don't mix.
- Double-Check Your Work: Before reconnecting the battery, carefully inspect all wiring connections to ensure they are secure and properly insulated.
- Be Aware of Airbags: Avoid disturbing any wiring or components related to the airbag system. Improper handling can cause accidental deployment, which can be dangerous.
Important Note: If you are not comfortable working with electrical systems, consult a qualified professional. It's better to be safe than sorry.
We have a detailed wiring diagram file available for download, covering the most common aftermarket radio wiring color codes. This diagram includes labeled wires, symbols, and troubleshooting tips. Download it, print it, and keep it handy for your next car audio project. You'll be glad you did!