Air Conditioning Diagram For 2013 Terrain 3.6 L Gmc
Alright, let's dive into the air conditioning (A/C) system diagram for your 2013 GMC Terrain with the 3.6L engine. Understanding this diagram is crucial whether you're tackling A/C repairs yourself, want to better understand your vehicle's inner workings, or are planning any modifications that might interact with the A/C system. This guide is designed to be technical but approachable, assuming you have some existing mechanical knowledge. And remember, we have the full, detailed diagram file available for download at the end of this article. This diagram provides a visual guide to trace the A/C system components and their connections, this can save time during troubleshooting and prevent costly mistakes.
Purpose of Understanding the A/C Diagram
Why bother learning about this diagram? Simply put, it's your roadmap to the A/C system. The diagram allows you to:
- Diagnose A/C Problems: Pinpoint leaks, identify faulty components (like the compressor or condenser), and understand pressure readings at different points in the system.
- Perform Repairs: Accurately replace parts, understand hose routing, and ensure proper connections.
- Understand System Operation: Grasp the refrigerant flow, how the compressor cycles, and the role of each component.
- Plan Modifications: If you're considering upgrades or modifications near the A/C system, knowing the layout is essential to avoid unintended consequences.
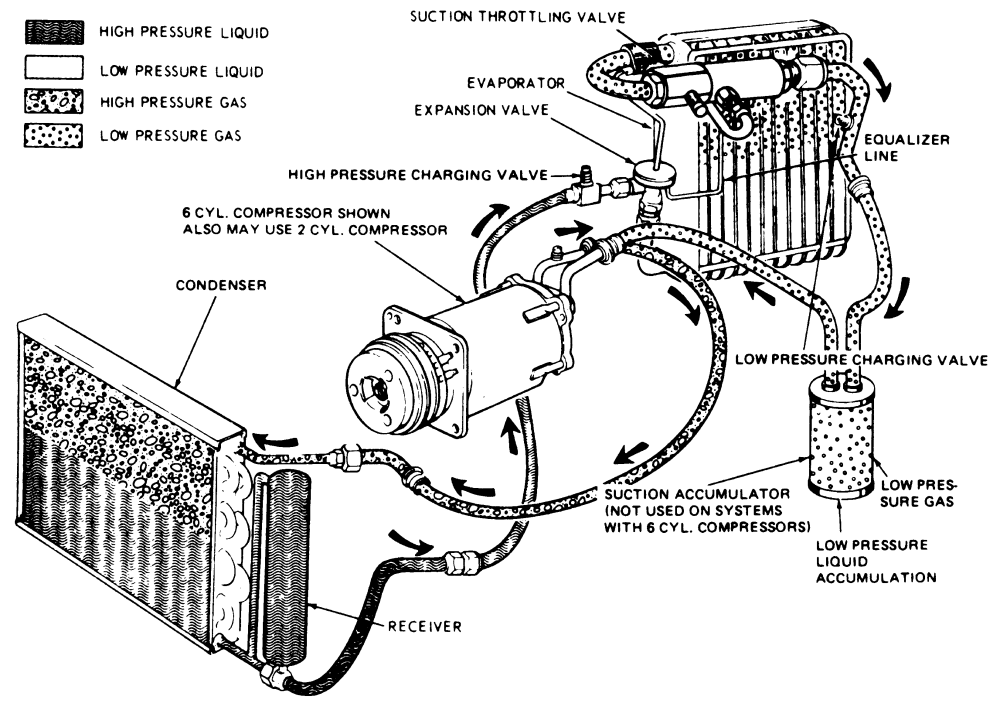
Key Specs and Main Parts of the 2013 Terrain 3.6L A/C System
Before dissecting the diagram, let's quickly review the core components of the A/C system:
- Compressor: The heart of the system. It compresses the refrigerant, raising its pressure and temperature. Driven by the engine via a belt.
- Condenser: Located in front of the radiator, the condenser dissipates heat from the high-pressure, high-temperature refrigerant, turning it into a high-pressure liquid.
- Receiver-Drier (or Accumulator): This component filters the refrigerant, removes moisture, and stores a small amount of liquid refrigerant. The 2013 Terrain uses an Accumulator, which is typically located on the low-pressure side of the system (between the evaporator and the compressor).
- Expansion Valve (or Orifice Tube): This metering device controls the flow of high-pressure liquid refrigerant into the evaporator, causing a pressure drop and rapid cooling. The 2013 Terrain uses an orifice tube.
- Evaporator: Located inside the passenger compartment, the evaporator absorbs heat from the cabin air as the refrigerant evaporates, cooling the air that blows into the vehicle.
- Refrigerant Lines (Hoses and Pipes): These lines carry the refrigerant between the various components. They are high-pressure and low-pressure lines.
- Pressure Sensors/Switches: These sensors monitor the refrigerant pressure and provide feedback to the vehicle's computer (PCM/ECU). They are critical for system protection and compressor control.
- A/C Control Module/HVAC Control Head: This is the user interface that allows you to control the A/C system, adjusting temperature, fan speed, and mode.
Understanding A/C Diagram Symbols
The A/C diagram uses specific symbols to represent components, lines, and connections. Here's a breakdown:
- Lines:
- Solid Lines: Typically represent refrigerant lines. The thickness may indicate the size or pressure capacity of the line.
- Dashed Lines: Often represent vacuum lines or control lines (e.g., signals to the compressor clutch).
- Dotted Lines: Could indicate electrical wiring or grounding connections.
- Arrows: Indicate the direction of refrigerant flow.
- Colors: While not universally standardized, colors often indicate:
- Red: High-pressure side of the system.
- Blue: Low-pressure side of the system.
- Green: Electrical wiring.
- Icons: These represent the individual components:
- Compressor: Usually depicted as a pump-like symbol.
- Condenser: Often shown as a zigzag pattern representing the fins.
- Evaporator: Similar to the condenser, but usually located inside the cabin schematic.
- Accumulator: Represented as a cylindrical tank with a line entering and exiting.
- Expansion Valve/Orifice Tube: Shown as a restriction or a valve symbol.
- Pressure Sensors: Illustrated as a sensor symbol with electrical connections.
Important: The legend on the diagram itself is your best reference. Always refer to the specific legend accompanying the diagram for your 2013 Terrain.
How the A/C System Works
The A/C system operates on a closed-loop cycle, utilizing refrigerant to transfer heat:
- Compression: The compressor, driven by the engine, compresses the refrigerant, increasing its pressure and temperature.
- Condensation: The hot, high-pressure refrigerant flows to the condenser, where it releases heat to the outside air and condenses into a high-pressure liquid.
- Metering: The high-pressure liquid refrigerant passes through the orifice tube. This causes a significant pressure drop, turning some of the liquid into a cool, low-pressure mist.
- Evaporation: The cold, low-pressure refrigerant enters the evaporator core inside the vehicle's cabin. Here, it absorbs heat from the air passing over the evaporator fins, cooling the cabin air. The refrigerant evaporates into a low-pressure gas.
- Accumulation: The low-pressure gas refrigerant flows to the accumulator, where any remaining liquid refrigerant is separated and the refrigerant is dried.
- Return: The low-pressure gas refrigerant returns to the compressor to begin the cycle again.
Real-World Use: Basic Troubleshooting Tips
Armed with the diagram, you can start diagnosing common A/C issues:
- No Cold Air: Check the compressor clutch is engaging. If not, check the electrical connections and the low-pressure switch. Use the diagram to trace the wiring and identify the switch location. Low refrigerant can cause the low-pressure switch to shut off the compressor.
- Weak Airflow: Ensure the blower motor is functioning correctly. Check for obstructions in the air ducts or a clogged cabin air filter.
- A/C Cuts Out: This could be due to the high-pressure switch tripping, indicating a problem with the condenser or refrigerant overcharge. Use the diagram to locate the high-pressure switch and check its condition.
- Leaks: Inspect the refrigerant lines, compressor, condenser, and evaporator for signs of leaks (oily residue). Use a UV dye and light to pinpoint the leak source.
Safety Precautions
Important: Working on A/C systems involves handling refrigerant, which can be dangerous if not handled properly. Refrigerant can cause frostbite and is harmful to the environment. Always wear appropriate safety gear, including gloves and eye protection.
- Depressurize the System: Before disconnecting any A/C lines, recover the refrigerant using a certified recovery machine. It is illegal and environmentally irresponsible to release refrigerant into the atmosphere.
- High-Pressure Side: Be extremely cautious when working on the high-pressure side of the system (compressor, condenser, high-pressure lines). High pressure can cause serious injury if lines rupture.
- Electrical Components: Disconnect the battery before working on any electrical components related to the A/C system.
- Professional Assistance: If you're unsure about any aspect of A/C repair, seek professional assistance from a qualified mechanic.
By understanding the A/C diagram and following proper safety procedures, you can confidently diagnose and repair A/C problems on your 2013 GMC Terrain 3.6L. This is a complex system, and this information is for guidance only. Always consult with a qualified mechanic if you have any doubts or concerns.
As mentioned, we have the complete A/C system diagram file specifically for your 2013 GMC Terrain 3.6L. You can download it here: [Link to Download]. Good luck with your A/C troubleshooting!