
Audi A4 1.8 T Serpentine Belt Diagram
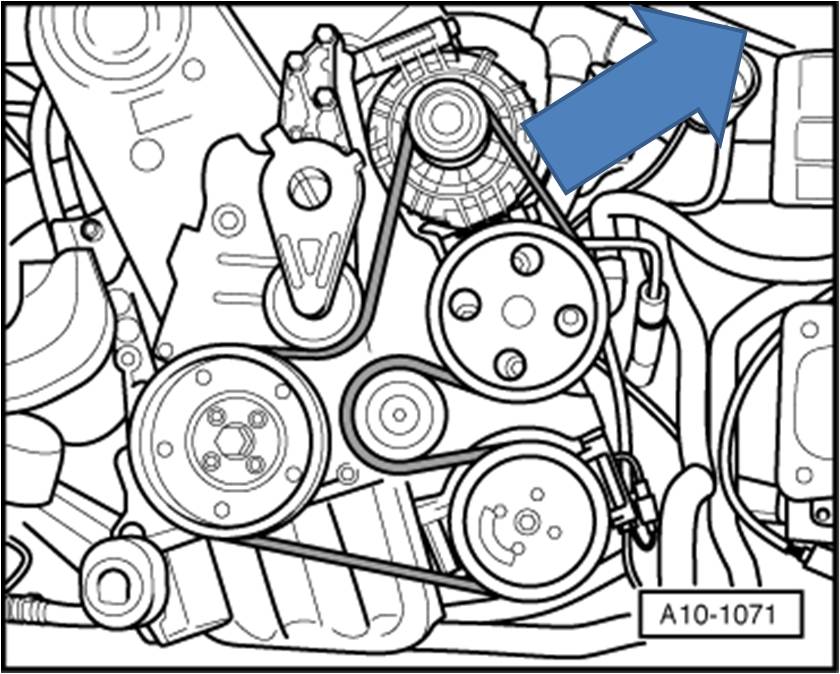
So, you're looking to tackle a serpentine belt replacement or troubleshoot some accessory drive issues on your Audi A4 1.8T? Excellent! This article is your guide to understanding the serpentine belt diagram for your specific engine. Having a clear understanding of this diagram is crucial for accurate repairs, proper belt routing, and preventing potential damage to your engine. We'll break down the diagram, the components it represents, and how to use it effectively. And yes, we have the diagram available for download – more on that later.
Why This Diagram Matters
A serpentine belt diagram isn't just a pretty picture; it's an essential tool. Its primary purposes are:
- Repairs and Maintenance: Accurately route the new serpentine belt during replacement. Incorrect routing can lead to belt failure, damage to accessories, and even engine overheating.
- Troubleshooting: Identify which accessory is causing problems based on belt slip or unusual noises. Knowing the belt path helps pinpoint the faulty component.
- Learning Engine Layout: Familiarize yourself with the location and function of various engine accessories like the alternator, power steering pump, and air conditioning compressor.
- Modifications: When installing performance accessories that might affect the belt routing or require a shorter/longer belt, the diagram becomes invaluable for ensuring proper fitment.
Key Specs and Main Parts
Let's talk about the components you'll find on the serpentine belt diagram for your Audi A4 1.8T (B5 or B6 chassis – small differences may exist, so double-check the specific diagram for your model year). Here's a breakdown:
- Crankshaft Pulley (Crank Pulley): This is the heart of the system. Driven directly by the engine, it transfers rotational force to the serpentine belt.
- Alternator: Charges the battery and powers the car's electrical system. Usually has a clutch pulley in later models.
- Power Steering Pump: Provides hydraulic assistance for steering, making it easier to turn the wheel.
- Air Conditioning Compressor: Compresses refrigerant to cool the cabin.
- Tensioner Pulley: This is the spring-loaded component responsible for maintaining proper belt tension. A worn tensioner is a common cause of belt squeal.
- Idler Pulley(s): Smooth, non-driven pulleys that guide the belt around the accessories and help maintain the correct wrap angle on the driven pulleys.
- Serpentine Belt: The polygroove belt that transmits power from the crankshaft to the accessories. Made of reinforced rubber.
Important Spec: Belt Length. This is arguably the most critical spec. Using the wrong length belt will either be too loose (slippage) or too tight (excessive wear on bearings and the belt itself). The correct belt length is usually specified in millimeters and will be listed in your vehicle's repair manual or online parts databases. You can also often find it printed directly on the old belt – if it's still legible!
Decoding the Diagram: Symbols and Conventions
Understanding the symbols and conventions used in the diagram is key to interpreting it correctly.
- Solid Lines: Represent the path of the serpentine belt itself. The thicker the line, generally the more important the part of the belt run you are looking at.
- Dashed Lines: Can sometimes indicate the direction of rotation of the pulleys. Pay attention to the arrows!
- Arrows: Indicate the direction of rotation for each pulley. Essential for understanding how the belt is driven.
- Component Icons: Each accessory (alternator, power steering pump, etc.) will be represented by a simplified icon. These icons are usually labeled with abbreviations (e.g., ALT for alternator, PS for power steering).
- Tensioner Symbol: The tensioner pulley is usually depicted with a spring symbol to indicate its tensioning function.
- Overlapping Belt Lines: When the belt path overlaps, the diagram should clearly indicate which section is on top and which is underneath. This is crucial for correct routing.
Colors are less consistently used, but sometimes they might differentiate between different belt routing options for vehicles with and without certain accessories (like AC). Consult the diagram legend if colors are present.
How It Works: The Serpentine Belt System
The serpentine belt system is a brilliantly simple yet effective way to power multiple accessories from a single belt. The crankshaft pulley drives the belt, which in turn wraps around and drives each of the accessory pulleys. The tensioner pulley maintains the necessary tension on the belt to prevent slippage and ensure efficient power transfer.
Think of it like this: The crankshaft is the engine's heart, and the serpentine belt is the artery that delivers power to vital organs (the accessories). Without proper tension, that artery becomes weak, and the organs don't get enough power. The idler pulleys act as guides, ensuring the belt takes the most efficient and reliable path.
The automatic tensioner is very important. It applies a constant force to the belt. As the belt wears, stretches, or as temperatures change, the tensioner maintains proper tension. A failing tensioner will cause belt slippage, squealing, and reduced accessory performance. It’s wise to replace the tensioner when replacing the belt, especially if it shows signs of weakness or wear.
Real-World Use: Troubleshooting with the Diagram
Here's how you can use the serpentine belt diagram in real-world troubleshooting scenarios:
- Belt Squeal: Squealing often indicates a slipping belt. Check the tensioner pulley for proper operation. If it's moving erratically or not applying sufficient tension, replace it. Also, inspect the belt for glazing (a shiny, hardened surface) or cracks. A glazed or cracked belt should be replaced. Using the diagram, examine if the squeal appears related to a certain driven component, like the AC compressor only squealing when the AC is engaged.
- Accessory Failure: If an accessory stops working (e.g., no power steering), verify that the belt is properly routed and not broken. Next, ensure the pulley for the faulty accessory is spinning freely. A seized pulley can cause the belt to slip or even break.
- Belt Damage: Check for fraying, cracking, or missing chunks. These indicate a worn or damaged belt that needs replacement. Also, look for signs of misalignment, which could be caused by a bent pulley or a worn bearing.
- Installation Errors: After replacing the belt, double-check the routing against the diagram. Incorrect routing is a common mistake and can lead to immediate belt failure or damage to accessories.
Safety First!
Working on the serpentine belt system involves certain risks. Always remember these safety precautions:
- Disconnect the Battery: Before working on any part of the engine, disconnect the negative battery terminal to prevent accidental electrical shocks.
- Hot Engine: Never work on the serpentine belt system when the engine is hot. Allow the engine to cool completely to avoid burns.
- Moving Parts: Keep your hands and clothing away from the belt and pulleys when the engine is running. The rotating components can cause serious injury.
- Tensioner Spring: The tensioner pulley is spring-loaded and can snap back with considerable force. Use the correct tools to relieve the tension and avoid injury.
- Eye Protection: Wear safety glasses to protect your eyes from debris.
High-Risk Components: The alternator and crankshaft pulley are particularly risky due to their high speeds and potential for electrical hazards (alternator). Exercise extreme caution when working near these components.
Next Steps: Getting Your Hands on the Diagram
Now that you have a solid understanding of the serpentine belt diagram for your Audi A4 1.8T, you're well-equipped to tackle repairs, maintenance, and troubleshooting. And as promised, we have the diagram ready for you to download. Accessing and utilizing a reliable diagram will make the whole process much smoother and safer. You can often find these diagrams in your vehicle's repair manual, online parts databases, or through dedicated automotive resources.