Auto Air Conditioning Wiring Diagram
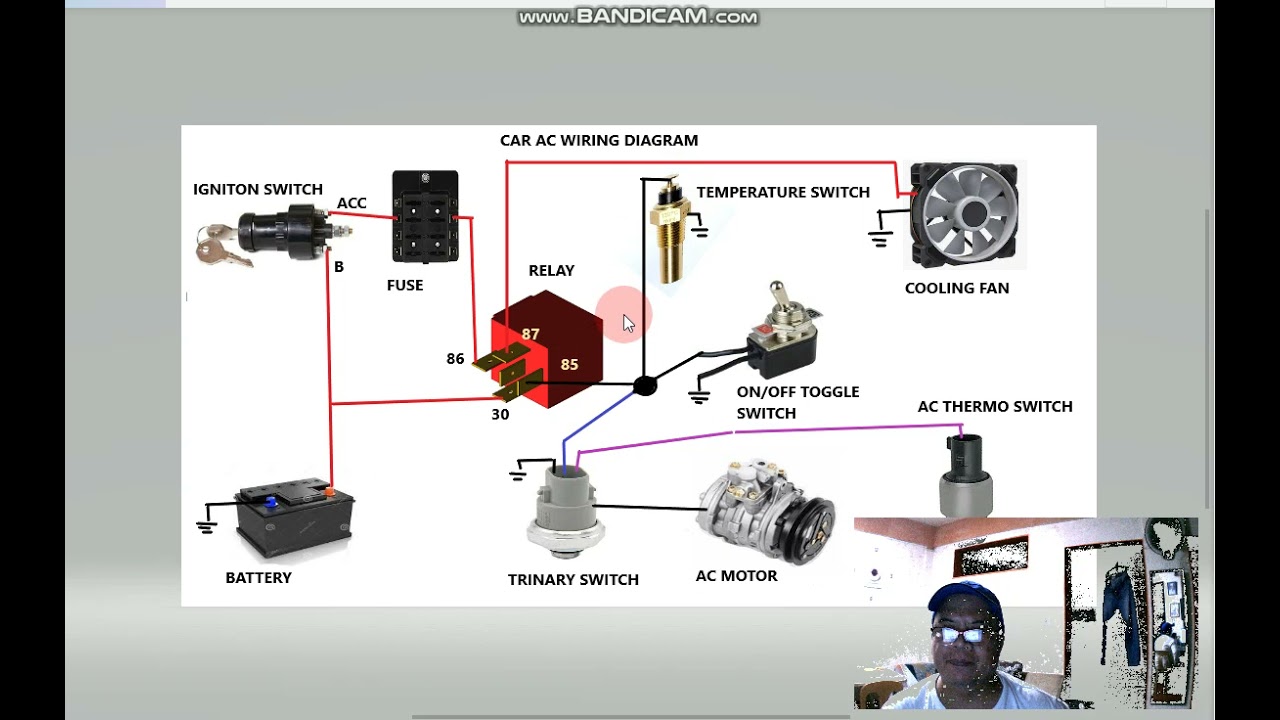
Understanding your car's auto air conditioning (A/C) wiring diagram is crucial for various tasks, from diagnosing a simple cooling issue to performing more complex modifications or even designing custom A/C systems. Think of it as a roadmap that guides you through the intricate electrical network powering your car's climate control. Whether you're troubleshooting a faulty compressor clutch, chasing down a mysterious refrigerant leak, or simply wanting to better understand how the whole system interacts, knowing how to interpret this diagram will give you a distinct advantage. We'll explore the intricacies of these diagrams, empowering you with the knowledge to confidently tackle A/C repairs and modifications.
Key Specs and Main Parts
Before diving into the diagram itself, let's review the core components of a typical automotive A/C system and their electrical connections. Understanding these parts is essential for effectively reading the wiring diagram:
- Compressor: The heart of the system, responsible for compressing the refrigerant. Electrically, it's activated by the compressor clutch, an electromagnetic device that engages the compressor when energized.
- Compressor Clutch Relay: A switch controlled by the car's computer (ECU/PCM) that provides power to the compressor clutch. This relay protects sensitive circuits by handling the high current required by the clutch.
- Pressure Switches: These switches monitor the refrigerant pressure. A low-pressure switch prevents the compressor from running when refrigerant is low, protecting it from damage. A high-pressure switch shuts down the compressor if pressure gets too high, preventing system rupture. These are often wired in series.
- Blower Motor: Circulates air through the evaporator core and into the cabin. Its speed is typically controlled by a blower motor resistor or a dedicated blower motor control module, both of which vary the voltage supplied to the motor.
- Evaporator Temperature Sensor: Monitors the temperature of the evaporator core. This sensor helps prevent the evaporator from freezing up, which would block airflow.
- HVAC Control Panel: The interface inside the car that allows the driver to control the A/C system. This panel contains switches and potentiometers (variable resistors) that send signals to the ECU/PCM.
- ECU/PCM (Engine Control Unit/Powertrain Control Module): The "brain" of the car, which receives signals from various sensors and controls the A/C system accordingly. It manages the compressor clutch relay, blower motor, and other components based on driver input and sensor readings.
Symbols – Lines, Colors, and Icons
An A/C wiring diagram uses a standardized set of symbols to represent electrical components and connections. Here's a breakdown of common symbols:
- Lines: Represent wires. Solid lines usually indicate a direct electrical connection, while dashed lines may represent shielded wires or diagnostic connections. The thickness of the line generally isn't significant in automotive wiring diagrams.
- Colors: Wires are color-coded to aid in identification. Common colors include red (power), black (ground), and various other colors for signal wires. The diagram's legend will provide a complete color code key. For example, you might see "RD" for Red, "BK" for Black, "BL" for Blue, "GN" for Green, "WT" for White, "YL" for Yellow, and so on. Sometimes, you’ll see two colors listed, like "RD/BK," indicating a red wire with a black stripe.
- Icons: Standard icons represent specific components. Examples include:
- A circle with an "M" inside for a motor (blower motor).
- A rectangle with diagonal lines for a resistor (blower motor resistor).
- A diamond or square with a switch symbol inside for pressure switches.
- A coil symbol for a relay.
- A ground symbol (usually three horizontal lines diminishing in size) for a chassis ground.
It's crucial to consult the diagram's legend or key, which explains all the symbols and abbreviations used. Each manufacturer might have slight variations in their symbols, so always refer to the specific diagram for your vehicle model and year.
How It Works
Let's trace the typical electrical flow in an A/C system:
- The driver activates the A/C system via the HVAC control panel. This sends a signal to the ECU/PCM.
- The ECU/PCM evaluates the signals from the various sensors (evaporator temperature, pressure switches, etc.).
- If the conditions are met (refrigerant pressure is within range, evaporator temperature is not too low, engine is running, etc.), the ECU/PCM energizes the compressor clutch relay.
- The energized relay sends power from the car's electrical system (typically through a fuse) to the compressor clutch.
- The energized compressor clutch engages the compressor, which begins circulating refrigerant.
- The blower motor is activated, circulating air through the evaporator core, cooling the air that enters the cabin. The driver can adjust the blower motor speed using the HVAC control panel, which in turn controls the blower motor resistor or control module.
- The pressure switches continuously monitor the refrigerant pressure and can shut down the compressor clutch if the pressure falls outside the acceptable range. This protects the compressor and the system from damage.
The wiring diagram shows how all these components are interconnected, allowing you to trace the electrical path and identify potential points of failure.
Real-World Use – Basic Troubleshooting Tips
Armed with the wiring diagram, you can perform some basic troubleshooting:
- A/C Not Cold: If the A/C isn't blowing cold air, start by checking the compressor clutch. Use the diagram to locate the compressor clutch relay and the wiring to the clutch itself. Check for voltage at the clutch connector when the A/C is turned on. If there's no voltage, the problem could be the relay, a faulty pressure switch, the ECU/PCM, or a wiring issue.
- Blower Motor Not Working: If the blower motor isn't working, consult the diagram to locate the blower motor fuse, relay (if equipped), resistor, and the blower motor itself. Use a multimeter to check for power at the blower motor connector. If there's power, the motor is likely faulty. If there's no power, trace the wiring back through the resistor/control module, relay, and fuse to identify the break in the circuit.
- Fuse Blowing Repeatedly: A frequently blowing fuse indicates a short circuit. Use the diagram to identify all components powered by that fuse. Visually inspect the wiring for damage or chafing. Use a multimeter to check for continuity to ground on the circuit.
Remember to always disconnect the battery's negative terminal before working on electrical components.
Safety – Highlight Risky Components
While working on automotive A/C systems, be aware of the following safety considerations:
- High Voltage: While the A/C system itself doesn't typically involve high voltage, the car's electrical system operates at 12V or 24V (depending on the vehicle). Always disconnect the battery before working on any electrical components to avoid shocks.
- Refrigerant: Refrigerant is under high pressure and can cause frostbite if it comes into contact with skin. Never disconnect refrigerant lines unless you have the proper equipment and training to recover and handle the refrigerant safely and legally. Releasing refrigerant into the atmosphere is illegal and harmful to the environment.
- Moving Parts: The compressor is driven by the engine's belt system. Keep your hands and clothing clear of moving parts when the engine is running.
Always consult your vehicle's repair manual for specific safety precautions and procedures.
By understanding the A/C wiring diagram and following proper safety procedures, you can confidently troubleshoot and repair your car's A/C system, saving you time and money. Good luck!
We have the A/C wiring diagram file available for download. Please contact us to access the document.