
Basic Simple Headlight Wiring Diagram
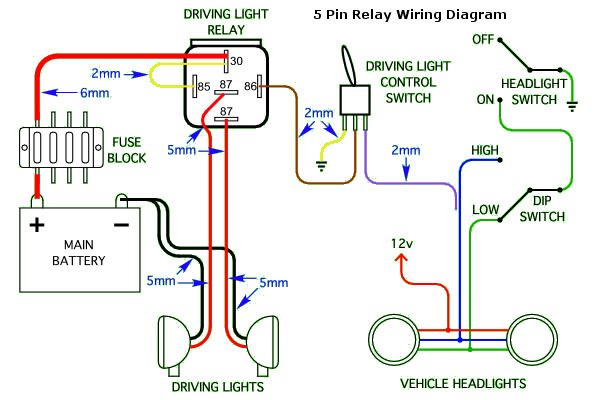
You're here because you're ready to delve a little deeper into your car's electrical system, specifically the headlight wiring. Whether you're troubleshooting a dim bulb, installing new headlights, or just expanding your automotive knowledge, understanding the basic headlight wiring diagram is crucial. This isn't just about replacing a bulb; it's about understanding the flow of electricity that illuminates your path and keeps you safe on the road. We'll cover the essentials of a simple headlight circuit, focusing on the most common configurations. And, to make things even easier, we have the complete diagram available for download.
Purpose of Understanding the Headlight Wiring Diagram
Why bother learning this? Several reasons, actually:
- Troubleshooting: A blown fuse is one thing. But what if the headlights are dim, flicker, or one side doesn't work? The diagram helps you trace the circuit and pinpoint the problem – a bad ground, a faulty switch, or damaged wiring.
- Modifications: Upgrading to brighter bulbs, adding auxiliary lights, or converting to HID or LED requires understanding how the existing circuit works. You need to know where to tap into power and how to properly wire in relays to avoid overloading the system.
- Repairs: Accidents happen. Wiring can get damaged. The diagram is your roadmap for repairing or replacing damaged wiring harnesses.
- Learning: Understanding the headlight circuit is a stepping stone to grasping more complex automotive electrical systems.
Key Specs and Main Parts
Let's break down the key components of a basic headlight circuit. Keep in mind, the exact configuration can vary slightly depending on the vehicle year, make, and model.
- Battery: The heart of the electrical system, providing the voltage (typically 12V DC) to power the headlights. It's essential to have a good, fully charged battery for optimal headlight performance.
- Fuse: A critical safety device. The fuse is a sacrificial link that breaks the circuit if the current exceeds a safe level, protecting the wiring and components from damage. The amperage rating of the fuse is crucial; using a fuse with a higher amperage rating than specified can be dangerous.
- Headlight Switch: Controls whether the headlights are on or off, and often selects between low beams and high beams. This switch usually has multiple contacts and intricate internal wiring.
- Dimmer Switch (High/Low Beam Switch): This switch, often located on the steering column, allows you to switch between low beam and high beam headlights.
- Headlight Bulbs: The light source itself. Common types include halogen, HID (High-Intensity Discharge), and LED (Light-Emitting Diode). Each type has different power requirements and wiring considerations.
- Relays (Optional but Recommended for High-Power Lights): An electrically operated switch that allows a low-current circuit (like the headlight switch) to control a high-current circuit (the headlights). Using relays is essential when upgrading to higher-wattage bulbs to prevent overloading the headlight switch and wiring.
- Wiring: The conductors that carry the electrical current. Wiring gauge (thickness) is important; using too-thin wire can result in voltage drop and overheating.
- Grounds: The return path for the current to the battery. A good, clean ground connection is essential for proper circuit operation. Poor grounds are a common cause of headlight problems.
Understanding the Symbols in the Diagram
Electrical diagrams use a standardized set of symbols to represent components. Here are some common ones you'll encounter in a headlight wiring diagram:
- Straight Line: Represents a wire. Thicker lines may indicate heavier gauge wiring.
- Dotted Line: Often represents a ground connection or a connection to the vehicle chassis.
- Battery Symbol: A series of short and long lines, indicating the positive (+) and negative (-) terminals.
- Fuse Symbol: A zigzag line or a small rectangle with a line through it.
- Switch Symbol: A line that can be connected or disconnected from another line, indicating an open or closed circuit. Multiple switches are shown with multiple positions.
- Light Bulb Symbol: A circle with an "X" inside, or a stylized representation of a light bulb.
- Relay Symbol: A coil (representing the electromagnet) and a switch (representing the contacts).
- Wire Colors: Diagrams typically use color codes to identify wires. Common colors include red (power), black (ground), and various other colors for specific functions. The wiring diagram legend is *critical* to understand.
How It Works: A Step-by-Step Explanation
Here's how a basic headlight circuit operates:
- Power from the Battery: The circuit begins at the battery, where the positive terminal provides the power source.
- Through the Fuse: The current flows through a fuse, which protects the circuit from overloads.
- To the Headlight Switch: The current then reaches the headlight switch. When the switch is turned on, it closes the circuit.
- To the Dimmer Switch: If equipped, the current goes to the dimmer switch which selects between high and low beams.
- Through the Wiring: The current flows through the wiring to the headlight bulbs.
- Illuminating the Bulbs: The current passes through the filament (in a halogen bulb) or the gas (in an HID bulb) or the semiconductor (in an LED bulb), causing it to heat up and emit light.
- Returning to Ground: After passing through the bulb, the current returns to the battery's negative terminal through a ground connection. A good ground is *essential* for proper operation.
Relays (If Used): If relays are used, the headlight switch only controls a small current to activate the relay's coil. The relay then closes a separate, high-current circuit directly from the battery to the headlights. This prevents the headlight switch from being overloaded.
Real-World Use: Basic Troubleshooting Tips
Here are some common headlight problems and how to troubleshoot them using the wiring diagram:
- Headlights Don't Work at All:
- Check the fuse first. A blown fuse is the most common cause. Replace it with a fuse of the same amperage rating.
- If the fuse is good, check the headlight switch. Use a multimeter to test for voltage at the switch terminals.
- Check the ground connections. Clean and tighten any loose or corroded ground connections.
- Inspect the wiring for damage, such as cuts, abrasions, or melted insulation.
- One Headlight Doesn't Work:
- Check the bulb. Replace it with a new bulb of the correct type.
- Check the wiring to the affected headlight. Look for loose connections or damaged wires.
- If the bulb and wiring are good, check the ground connection for that specific headlight.
- Dim Headlights:
- Check the battery voltage. A weak battery can cause dim headlights.
- Check the ground connections. A poor ground can restrict current flow and cause dimness.
- Check the wiring for corrosion or damage. Damaged wiring can increase resistance and reduce voltage to the headlights.
Safety Precautions
Working with automotive electrical systems can be dangerous. Here are some safety tips:
- Disconnect the Battery: Always disconnect the negative terminal of the battery before working on the electrical system. This prevents accidental shorts and electrical shocks.
- Work in a Well-Lit Area: Ensure you have adequate lighting to see what you're doing.
- Use Proper Tools: Use insulated tools designed for automotive electrical work.
- Avoid Working in Wet Conditions: Water can conduct electricity and create a shock hazard.
- Be Careful with HID Bulbs: HID bulbs contain high-pressure gas and can explode if mishandled. Never touch the glass bulb with your bare hands. Handle with gloves.
- Relays and Fuses: These are *critical* safety components. Ensure to use the correct amperage and rating.
Understanding the basic headlight wiring diagram is a valuable skill for any car owner or DIY mechanic. It allows you to troubleshoot problems, make modifications, and perform repairs with confidence. Remember to always prioritize safety and disconnect the battery before working on the electrical system.
Ready to put this knowledge to use? You can download the complete headlight wiring diagram that compliments this article. Having the diagram handy will make your troubleshooting and repair tasks much easier.