Belt Routing 5.7 Hemi Serpentine Belt Diagram
So, you're tackling the serpentine belt on your 5.7 Hemi? Smart move. Whether you're replacing a worn belt, swapping pulleys, or just getting a handle on your engine's layout, understanding the serpentine belt routing is crucial. A diagram isn’t just a pretty picture; it's your roadmap to a smooth-running engine and avoiding costly mistakes. This article will break down the serpentine belt diagram for your 5.7 Hemi, making sure you're well-equipped for the job.
Why Bother with the Serpentine Belt Diagram?
Let's be clear: blindly guessing the belt routing is a recipe for disaster. The serpentine belt powers a whole host of vital accessories, including:
- The alternator (charges the battery)
- The power steering pump (makes steering easier)
- The air conditioning compressor (keeps you cool)
- The water pump (cools the engine)
If the belt is misrouted, one or more of these components won't function correctly. This can lead to a dead battery, overheating, loss of power steering, and a very uncomfortable ride (or worse, engine damage). A diagram helps you:
- Ensure correct installation: Avoid misrouting that can cause component failure.
- Troubleshoot issues: A properly routed belt is the first step in diagnosing accessory problems.
- Plan repairs: Identifying component locations and belt pathways before you start saves time and frustration.
- Learn your engine: Understanding the belt system gives you a deeper knowledge of how your engine functions.
Key Specs and Main Parts
Before diving into the diagram itself, let's cover the key components and specs. Keep in mind there may be subtle variations depending on the year and specific model of your 5.7 Hemi (e.g., Ram, Charger, Challenger, etc.).
- Belt Length: The serpentine belt length varies, typically around 90-100 inches. Check your specific vehicle's service manual for the exact length. Using the wrong length belt can cause tensioning issues or prevent proper routing.
- Belt Material: Serpentine belts are typically made of EPDM rubber, known for its durability and resistance to cracking and wear.
Here are the main components the belt interacts with:
- Crankshaft Pulley (Harmonic Balancer): Located at the bottom of the engine, this pulley drives the entire serpentine belt system.
- Alternator Pulley: Powers the alternator.
- Power Steering Pump Pulley: Drives the power steering pump.
- Air Conditioning Compressor Pulley: Powers the AC compressor.
- Water Pump Pulley: Drives the water pump, circulating coolant.
- Tensioner Pulley: Automatically adjusts belt tension. This is a spring-loaded pulley.
- Idler Pulley(s): Smooth, ungrooved pulleys that guide the belt and maintain proper wrap around other pulleys.
Decoding the Serpentine Belt Diagram
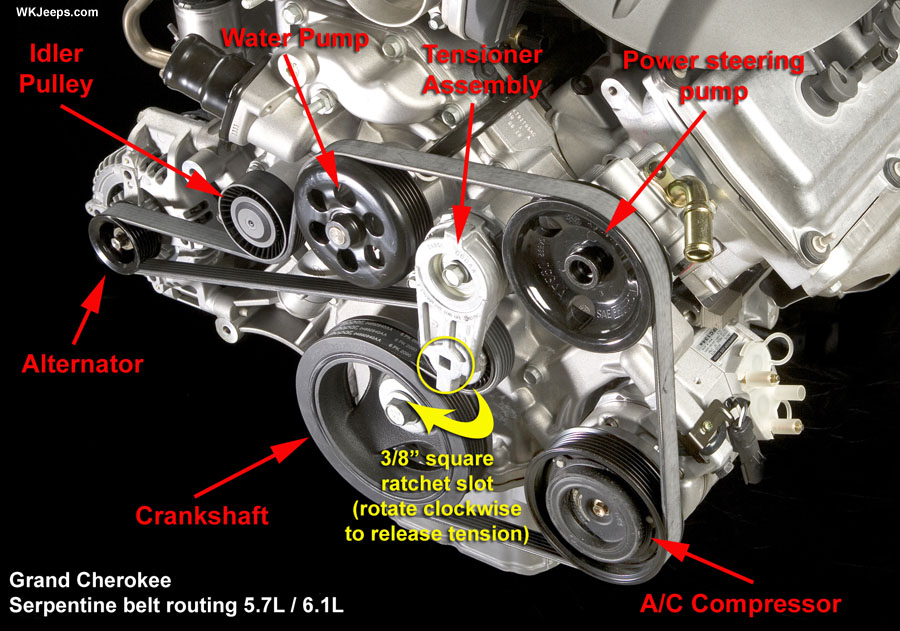
The diagram itself isn't just a drawing; it's a symbolic representation of the belt's path. Let's break down what those symbols mean:
- Solid Lines: Represent the belt itself. Follow the line to trace the belt's path.
- Arrows: Indicate the direction of belt travel. Pay close attention to these, as they're critical for correct routing.
- Pulleys: Shown as circles. Some diagrams might label each pulley with an abbreviation (ALT for alternator, P/S for power steering, etc.).
- Tensioner Pulley: Often depicted with a spring or arrow indicating the direction it moves to apply tension.
- Ribbed vs. Smooth Sides: Some diagrams differentiate between the ribbed (grooved) and smooth sides of the belt. The ribbed side typically engages with pulleys that have grooves, while the smooth side engages with smooth idler pulleys or the back side of other pulleys.
- Color Coding: Some diagrams may use colors to distinguish different sections of the belt path or to highlight specific components.
Understanding these symbols is key to correctly interpreting the diagram and routing the belt properly.
How It Works: The Serpentine Belt System
The crankshaft pulley is the heart of the system. As the engine turns, it spins the crankshaft pulley, which in turn drives the serpentine belt. The belt then transmits this rotational force to all the other pulleys, powering the various accessories. The tensioner pulley is crucial because it maintains constant tension on the belt. Without proper tension, the belt can slip, reducing the efficiency of the accessories and potentially causing the belt to wear out prematurely. The spring mechanism within the tensioner automatically compensates for belt stretch and engine vibrations.
The idler pulleys play a supporting role, guiding the belt around tight corners and increasing the wrap angle on certain pulleys. A larger wrap angle means more contact between the belt and the pulley, resulting in better power transfer and less slippage.
Real-World Use: Troubleshooting Tips
Here's how understanding the serpentine belt diagram can help you troubleshoot common issues:
- Squealing Noise: Often indicates a worn belt, loose tension, or misaligned pulleys. Check the belt for cracks, glazing, or missing ribs. Verify that the tensioner is functioning correctly and that all pulleys are aligned. Compare the belt's routing to the diagram.
- Accessory Failure: If an accessory (e.g., alternator, power steering pump) isn't working, check the belt routing first. Make sure the belt is properly engaged with that accessory's pulley. A slipped or misrouted belt could be the culprit.
- Belt Slipping: Can be caused by a loose belt, worn pulleys, or excessive load on the accessories. Inspect the belt tensioner and pulleys. A glazed or contaminated belt can also slip.
Remember to always inspect the pulleys for wear or damage when replacing the serpentine belt. A damaged pulley can quickly destroy a new belt.
Safety First: Handle with Care
Working around the serpentine belt system involves some inherent risks:
- Moving Parts: Never work on the serpentine belt system while the engine is running. The belt and pulleys can cause serious injury.
- Hot Components: The engine and its components can get extremely hot. Allow the engine to cool down completely before working on the serpentine belt system.
- Spring Tension: The tensioner pulley is under spring tension. Use the correct tools to release the tension before removing the belt. A sudden release of tension can cause injury.
- Sharp Edges: Be careful of sharp edges on pulleys and brackets. Wear gloves to protect your hands.
Always disconnect the negative battery cable before working on any electrical components, including the alternator. This prevents accidental shorts and potential damage to the electrical system.
Get Your Diagram!
While this article provides a comprehensive overview, having a detailed diagram specific to your vehicle is essential. We have a high-resolution serpentine belt diagram for the 5.7 Hemi ready for you to download. It's a valuable resource that you can print out and keep handy for future reference.
With this guide and the detailed diagram in hand, you'll be well-prepared to tackle your 5.7 Hemi's serpentine belt with confidence. Good luck!