Belt Routing Cub Cadet Zero Turn Drive Belt Diagram
Alright, let's talk about the drive belt routing diagram for your Cub Cadet zero turn mower. This isn't just some piece of paper; it's your roadmap to understanding and maintaining a crucial system that keeps your mower moving. Whether you're tackling a snapped belt, diagnosing a loss of power, or just trying to get familiar with your machine, knowing how to read and interpret this diagram is a game-changer.
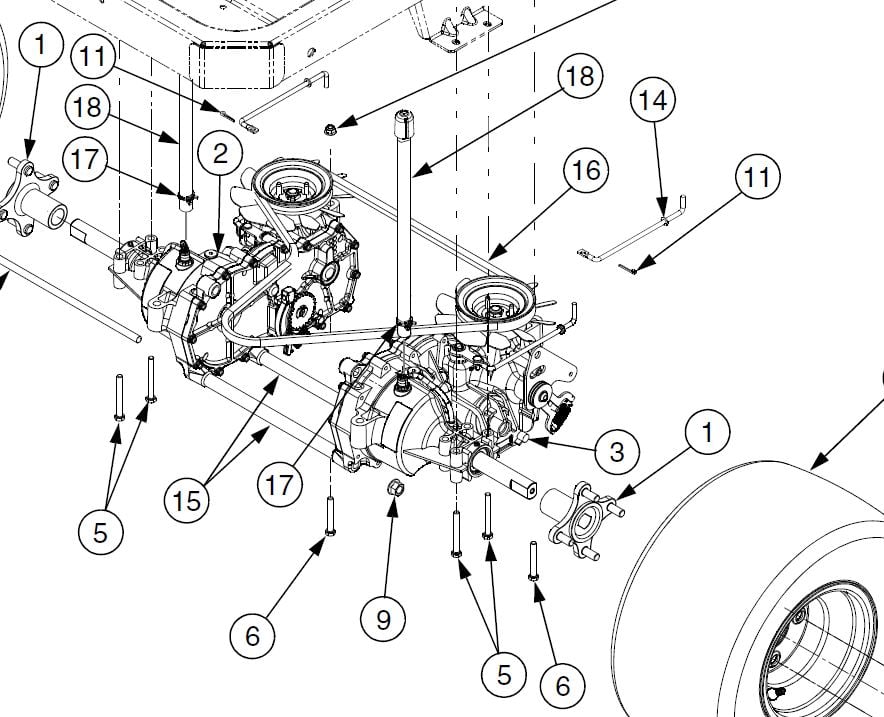
Purpose of the Drive Belt Routing Diagram
So, why is this diagram so important? Simple: It's your visual guide to replacing, inspecting, and troubleshooting the drive belt system. Without it, you're basically guessing how the belt should snake around the various pulleys and components. Trust me, guessing is not a good strategy when dealing with machinery. A misrouted belt can lead to premature wear, slippage, and even catastrophic engine damage. The diagram provides clear, step-by-step instructions, ensuring that the belt is correctly installed and tensioned, maximizing its lifespan and your mower's performance.
Furthermore, the diagram can aid in diagnosing problems. If your mower is sluggish, the belt is squealing, or you're experiencing uneven cutting, the diagram can help you identify potential issues related to the belt's condition, routing, or the health of the pulleys involved. By comparing the diagram to the actual belt configuration on your mower, you can quickly spot discrepancies or abnormalities.
Key Specs and Main Parts
Before we dive into the diagram itself, let's cover the key components and their specifications that are usually represented within. Understanding these terms will make the diagram much easier to decipher.
Main Components:
- Engine Pulley: This is the driving force. It's connected directly to the engine's crankshaft and transfers rotational power to the drive belt. Pay attention to its size and any specifications regarding its balance, as imbalance can contribute to belt wear.
- Idler Pulleys: These pulleys don't directly drive any components; instead, they guide and tension the belt. They're crucial for maintaining proper belt tension and preventing slippage. There are typically two types: flat idler pulleys and v-groove idler pulleys, and the diagram will clearly indicate which type is used in each location.
- Drive Pulleys (Wheel Pulleys): These are the pulleys that ultimately transfer the power from the engine to the wheels, causing the mower to move. Each wheel has its own drive pulley, allowing for independent speed control for zero-turn maneuverability.
- Tension Arm Assembly: This assembly houses the idler pulley and a spring (or sometimes a more sophisticated mechanism) that automatically maintains the correct belt tension. The tension arm is critical to compensate for belt stretch and wear over time.
- Drive Belt: Of course, the star of the show! The drive belt is the link between all these components. The diagram may specify the belt type (e.g., A-section, B-section V-belt), its length, and its material (e.g., Kevlar-reinforced).
Key Specs (Found in mower's service manual):
- Belt Length: Probably the most crucial specification. Using the wrong belt length will result in either insufficient tension (causing slippage) or excessive tension (leading to premature wear and potential damage to bearings).
- Belt Type: V-belts are the most common type, and each has a specific profile. Using the incorrect profile will affect the belt's grip and efficiency.
- Tension Spring Force: The force exerted by the tension spring is critical for maintaining proper belt tension. The service manual will specify the acceptable range for this force. Measuring this requires a specialized tool (a spring scale).
- Pulley Diameter: The diameters of the pulleys affect the speed ratios and torque. This information is rarely used for belt replacement, but important when troubleshooting performance issues.
Symbols – Deciphering the Diagram
Drive belt diagrams use a standardized set of symbols to represent the various components and the belt's path. Let's break down the most common ones:
- Solid Lines: These represent the drive belt itself. The thickness of the line might indicate the belt's cross-sectional size.
- Dashed Lines: Dashed lines often indicate the *hidden* portion of the belt, meaning it's running behind another component or under a guard.
- Circles: Circles represent pulleys. The type of pulley is often indicated by shading or a symbol within the circle.
- Arrows: Arrows show the direction of belt travel. Pay close attention to these, as they indicate the correct orientation of the belt around the pulleys.
- Tensioner Symbol: Usually, a spring or a small block with a spring symbol represents the tensioner arm. It's often connected to an idler pulley symbol.
- Component Labels: The diagram will label each component (e.g., "Engine Pulley," "Idler Pulley #1," "Left Wheel Drive Pulley"). This makes it easy to identify each part on your mower.
Some diagrams might also use color coding, although this is less common. If present, the legend should clearly explain the meaning of each color. For example, different colors might represent different belt segments or different types of pulleys.
How It Works: The Power Transmission System
The drive belt system is essentially a mechanical power transmission system. The engine generates rotational power, which is transferred to the engine pulley. The drive belt, looped around the engine pulley and the drive pulleys (one for each wheel), transmits this rotational force. The idler pulleys, strategically placed along the belt's path, maintain the correct tension and prevent the belt from slipping. The tension arm, with its spring, automatically adjusts the belt tension as the belt stretches or wears down. Zero-turn mowers utilize a dual-drive system, one drive belt and system for each wheel. By controlling the speed of each wheel independently (via levers or pedals), the mower can pivot and turn with remarkable agility.
The engagement mechanism (often a lever or pedal) engages the drive belt system by tightening the belt against the drive pulleys. When disengaged, the belt is slackened, preventing power from being transmitted to the wheels.
Real-World Use: Troubleshooting Tips
Okay, so you've got the diagram. Now, how do you use it to fix problems?
- Belt Slippage: A squealing belt is a classic sign of slippage. Check the belt tension. Is the tension arm moving freely? Is the spring broken or weak? Also, inspect the pulleys for wear or damage. A worn pulley can have a reduced diameter or a polished surface, both of which can contribute to slippage.
- Belt Wear: Cracks, fraying, or missing chunks of rubber are signs of a worn belt. Replace the belt immediately. Also, investigate the cause of the wear. Misalignment of pulleys, excessive tension, or debris caught in the belt path can all accelerate wear.
- Uneven Cutting: This can sometimes be attributed to drive belt issues. If one wheel is consistently slower than the other, it could indicate a problem with the corresponding drive belt or pulley. Check the belt tension on both sides and inspect the pulleys for damage.
- Loss of Power: A sudden loss of power can be caused by a snapped drive belt. Follow the diagram to replace the belt. Before installing the new belt, thoroughly inspect all pulleys for damage and ensure they are properly aligned.
Safety: A Word of Caution
Working on a mower's drive system can be dangerous. Always disconnect the spark plug wire before working on the mower. This prevents accidental starting. The engine pulley and the drive belts themselves are particularly risky when the engine is running. Keep your hands, clothing, and tools away from these components. Pulleys can also get very hot, so exercise caution when working around them after the engine has been running.
When working with tension springs, be extremely careful. These springs are under high tension and can cause serious injury if they snap or are released unexpectedly. Use appropriate tools to safely relieve the tension before removing or replacing the spring.
Finally, always wear safety glasses when working on your mower. Debris can easily fly off the pulleys or belt, posing a risk to your eyes.
We have the complete drive belt routing diagram available for download. Refer to the manual of your specific Cub Cadet model for safety warnings, detailed diagrams, and torque specifications.