Belt Routing John Deere Sabre Drive Belt Diagram
Understanding the belt routing on your John Deere Sabre mower is crucial for various reasons. Whether you're tackling a belt replacement, troubleshooting a slipping belt, or simply gaining a deeper understanding of your machine's mechanics, having access to and knowing how to interpret the drive belt diagram is indispensable. This article will walk you through the intricacies of a typical John Deere Sabre drive belt diagram, equipping you with the knowledge to confidently handle belt-related maintenance and repairs.
Purpose of the John Deere Sabre Drive Belt Diagram
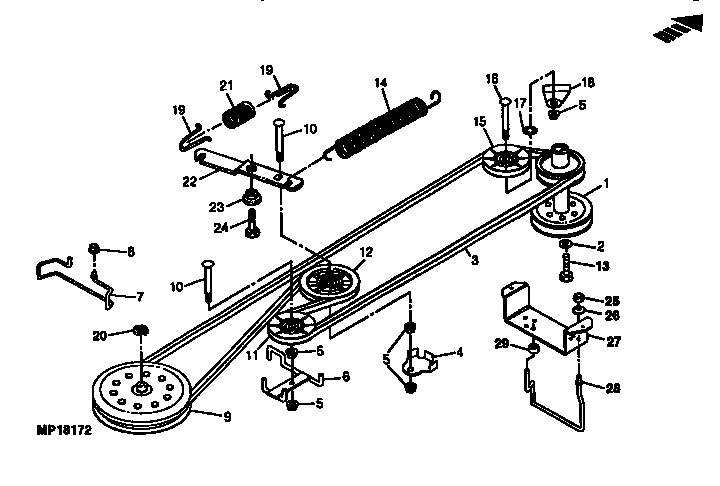
The drive belt diagram, often found affixed to the mower deck or inside the operator's manual, serves as a visual roadmap for the belt's path around the various pulleys and components. Its primary purposes are:
- Belt Replacement:** Providing a precise route for installing a new drive belt, ensuring correct tension and preventing premature wear.
- Troubleshooting:** Assisting in diagnosing issues like belt slippage, unusual noises, or uneven cutting, by verifying proper belt alignment and tension.
- Maintenance:** Guiding routine maintenance tasks such as belt inspection and tension adjustments.
- Learning and Understanding:** Improving your comprehension of the mower's mechanical systems and how they interact.
Key Specs and Main Parts
Before diving into the diagram itself, it's important to familiarize yourself with the key components involved in the drive belt system:
- Engine Pulley:** Connected directly to the engine's crankshaft, this pulley initiates the power transfer to the rest of the system. Its size is critical in determining the overall speed of the mower deck.
- Transmission Pulley:** Receives power from the engine pulley and transmits it to the transmission, controlling the mower's forward and reverse motion.
- Deck Pulleys:** These pulleys, typically two or three in number, are responsible for rotating the mower blades.
- Idler Pulleys:** These pulleys are strategically placed to maintain proper belt tension and guide the belt around obstacles. They can be either fixed or spring-loaded (tensioner pulleys).
- Tensioner Pulley:** A spring-loaded idler pulley that automatically adjusts belt tension, compensating for belt stretch and wear. It's crucial for maintaining consistent performance and preventing belt slippage.
- Drive Belt:** The V-belt itself, made of reinforced rubber, transmits power between the pulleys. Its length, width, and cross-sectional profile are critical for proper operation. Incorrect belt size will cause major performance issues or total failure.
The specs of the drive belt, such as its length and width, are usually listed in the operator's manual or on the belt itself. Using the correct belt is paramount; an incorrect belt can lead to slippage, premature wear, and damage to the mower's components.
Understanding the Diagram's Symbols and Conventions
Drive belt diagrams use specific symbols and conventions to convey information clearly and concisely. Here's a breakdown of common elements:
- Solid Lines:** Represent the drive belt itself. The thickness of the line may vary, but it generally indicates the belt's physical presence.
- Dotted Lines:** May indicate the path of the belt on the *underside* of a pulley, or hidden components.
- Arrows:** Indicate the direction of belt travel. Following the arrows is critical for understanding how the pulleys interact.
- Circles:** Represent pulleys. Their relative size in the diagram may or may not reflect their actual physical size.
- Labels:** Identify each pulley (e.g., "Engine Pulley," "Deck Pulley").
- Icons:** Small icons may indicate specific features, such as the tensioner pulley spring or a belt guide. Refer to the diagram's legend, if present, for clarification.
- Colors: While not always present, different colors might delineate different belt segments or systems in more complex setups. If present, a color key will be provided.
Pay close attention to the arrows indicating belt direction. Incorrect belt routing can cause severe damage.
How the Drive Belt System Works
The drive belt system operates on the principle of transferring rotational force from the engine to the mower blades and the transmission. The engine's rotational energy is converted to linear force via the drive belt, which drives the pulleys. Here's a simplified explanation:
- The engine's crankshaft rotates the engine pulley.
- The drive belt, wrapped around the engine pulley, is set in motion.
- The belt's motion is transferred to the deck pulleys, causing them to rotate and spin the mower blades.
- Simultaneously, the belt might also drive a transmission pulley, enabling the mower to move forward or backward.
- The tensioner pulley maintains constant tension on the belt, preventing slippage and ensuring efficient power transfer.
Real-World Use: Basic Troubleshooting Tips
Understanding the drive belt diagram can greatly assist in troubleshooting common problems:
- Belt Slippage:** If the blades aren't spinning properly or the mower is losing power, check the belt tension. A loose or worn belt is a prime suspect. Use the diagram to verify the tensioner pulley is functioning correctly and applying adequate pressure. Also check pulleys for wear or damage.
- Unusual Noises:** Squealing or chirping noises often indicate a worn or misaligned belt. Consult the diagram to ensure the belt is properly seated on all pulleys. Inspect the pulleys for damage or debris.
- Uneven Cutting:** If the mower is cutting unevenly, one or more blades might not be spinning at the correct speed. This could be due to a slipping belt or a damaged deck pulley. Use the diagram to verify the belt's path and the condition of the pulleys.
- Belt Jumping Off Pulleys:** Incorrect belt size or worn pulleys can cause the belt to jump off. Verify the correct belt size from the operator's manual or parts list, then inspect pulleys for damage (nicks, excessive wear).
If you suspect a misaligned pulley, use a straight edge to check its alignment with the other pulleys in the system.
Safety Precautions
Working on the drive belt system involves inherent risks. Adhere to these safety precautions:
- Disconnect the Spark Plug:** Before performing any maintenance, disconnect the spark plug wire to prevent accidental starting.
- Wear Safety Glasses:** Protect your eyes from debris and flying objects.
- Use Gloves:** Protect your hands from sharp edges and potentially hot surfaces.
- Be Aware of Moving Parts:** Keep your hands and clothing away from moving parts when the engine is running.
- Never work on the mower while it is running.
The engine pulley is particularly risky because it's directly connected to the engine's crankshaft. Exercise extreme caution when working near this component.
The tensioner pulley spring can also be hazardous if not handled properly. Always use the correct tools and techniques when removing or installing it.
We have the John Deere Sabre Drive Belt Diagram file available for download. Having a copy of the diagram readily accessible can save you time and frustration during repairs and maintenance.