Best Way To Splice Automotive Wiring
So, you're looking to splice some automotive wiring? Great! Knowing how to do this *correctly* is crucial for vehicle maintenance, repairs, and modifications. A poorly executed splice can lead to all sorts of electrical gremlins – intermittent failures, blown fuses, even fires. This article will walk you through the best and most reliable method for splicing automotive wiring, focusing on the solder and heat shrink technique. We’ll cover everything from the ‘why’ to the ‘how’ and even some troubleshooting tips.
Purpose – Why This Matters
Whether you're repairing a damaged wire, installing aftermarket accessories like lights or a stereo system, or modifying your vehicle's electrical system, splicing wires is often necessary. A well-executed splice ensures a reliable, low-resistance connection that will stand the test of time and the harsh under-hood environment. A bad splice, on the other hand, can introduce resistance, leading to voltage drops and potentially damaging sensitive electronic components. Understanding proper splicing techniques isn’t just about convenience; it's about ensuring the safety and reliability of your vehicle.
Key Specs and Main Parts
The success of any wiring project depends on selecting the right components and understanding their specifications. Here's what you need:
- Wire Strippers: Invest in a good quality wire stripper that cleanly removes insulation without nicking or damaging the conductors. Different gauges require different settings.
- Crimping Tool (Optional, but Recommended for Butt Connectors): While we're focusing on soldering, having a quality crimping tool for other types of connections is always useful.
- Soldering Iron: A temperature-controlled soldering iron is ideal. Look for one with a wattage of at least 40 watts.
- Solder: Use rosin-core solder specifically designed for electrical work. Avoid acid-core solder, as it can corrode the wiring. 60/40 tin/lead solder is a common choice, but lead-free alternatives are available.
- Heat Shrink Tubing: Choose heat shrink tubing that's slightly larger than the wire diameter. It should shrink down to provide a tight, weatherproof seal. Marine-grade heat shrink tubing with adhesive lining offers superior protection.
- Heat Gun: A heat gun is used to shrink the heat shrink tubing. Avoid using a lighter, as it can unevenly heat the tubing and potentially damage the wiring.
- Multimeter: A multimeter is essential for testing continuity and voltage after the splice is complete.
- Electrical Tape (As Backup): While not the primary method for insulation, electrical tape can provide an extra layer of protection, but should never be the ONLY insulation.
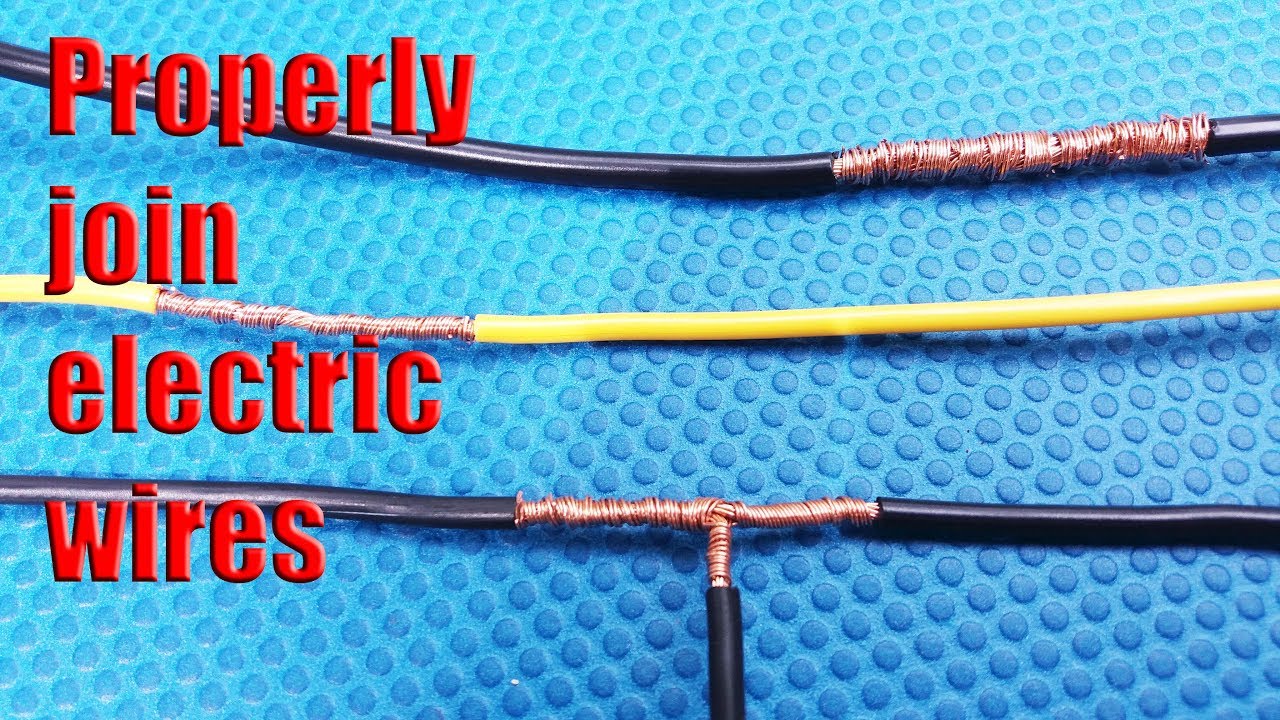
How It Works – The Solder and Heat Shrink Technique
This method creates the most durable and reliable electrical connection. Here’s a step-by-step guide:
- Prepare the Wires: Strip approximately 1/2 inch of insulation from the ends of both wires you're connecting. Use the correct setting on your wire strippers to avoid damaging the conductors.
- Twist the Wires Together: Intertwine the exposed conductors of both wires. The goal is to create a strong mechanical connection before soldering. The tighter the twist, the better the electrical connection.
- Solder the Connection: Heat the intertwined wires with the soldering iron. Once the wires are hot enough, apply the solder to the wires, not directly to the soldering iron tip. The solder should flow smoothly and evenly around the entire connection. Ensure the solder melts and adheres to both sets of conductors.
- Let it Cool: Allow the solder joint to cool completely before moving on. This prevents the solder from crystallizing, which can weaken the connection.
- Apply Heat Shrink Tubing: Slide a piece of heat shrink tubing over one of the wires before you twist and solder. This is critical – you won't be able to add it after the fact! Center the heat shrink tubing over the soldered connection, ensuring it extends slightly beyond the soldered area on both sides.
- Shrink the Tubing: Use a heat gun to evenly shrink the tubing around the connection. Start in the middle and work your way outwards. The tubing should conform tightly to the wire, creating a waterproof seal. Avoid overheating the tubing, as it can become brittle.
Real-World Use – Basic Troubleshooting Tips
Even with the best techniques, problems can sometimes arise. Here are a few common issues and how to address them:
- High Resistance: Use a multimeter to measure the resistance across the splice. A good splice should have very low resistance (close to zero ohms). High resistance indicates a poor connection, potentially due to insufficient solder, a cold solder joint (solder that didn't flow properly), or corroded conductors. Resolder the connection or redo the splice entirely.
- Intermittent Failures: These can be tricky to diagnose. Check for loose connections, damaged insulation, or corrosion. Gently tug on the wires near the splice to see if the connection is secure. If you suspect a problem, redo the splice.
- Heat Shrink Tubing Doesn't Shrink Properly: Make sure you're using a heat gun and not a lighter. The heat gun should be held a few inches away from the tubing and moved evenly around the connection. If the tubing still doesn't shrink, it may be old or of poor quality. Replace it with new tubing.
- Solder Not Flowing Correctly: Ensure your soldering iron is hot enough. Also, make sure you're heating the wires, not the solder itself. Clean the tip of your soldering iron regularly with a damp sponge to ensure good heat transfer.
Safety – Highlight Risky Components
Working with automotive electrical systems involves inherent risks. Always observe the following safety precautions:
- Disconnect the Battery: Before working on any electrical components, disconnect the negative terminal of the battery to prevent accidental shorts and electrical shocks.
- Work in a Well-Ventilated Area: Soldering produces fumes that can be harmful if inhaled. Work in a well-ventilated area or use a fume extractor.
- Wear Eye Protection: Wear safety glasses to protect your eyes from solder splatters.
- Be Careful with Heat: Soldering irons and heat guns can cause burns. Use caution and avoid touching hot surfaces.
- Avoid Working on Live Circuits: Never attempt to splice wires while the vehicle is running or the ignition is on.
- Airbags: Extreme Caution must be taken when working near any airbag components. Disconnecting and reconnecting airbags requires specialized knowledge and can be dangerous. If in doubt, consult a qualified technician. Accidental deployment can cause serious injury.
- Fuel System: Never work on the fuel system or wiring near the fuel system while the vehicle is hot or running. Fuel vapors are highly flammable and can cause an explosion.
Mastering the art of wire splicing is a valuable skill for any car enthusiast or DIY mechanic. By following these guidelines and practicing proper techniques, you can ensure reliable and safe electrical connections in your vehicle. Remember to always prioritize safety and double-check your work. Good luck!
We have a detailed wiring diagram file that can further assist you in your automotive electrical projects. Contact us if you'd like to download it.