Blueprint Honda Accord Under The Hood Diagram
Alright, let's dive into the blueprint of your Honda Accord's engine bay – what I like to call the "under-the-hood diagram." We're talking about a roadmap to understanding, maintaining, and even modifying your Accord. This isn't just a pretty picture; it's the key to unlocking a deeper understanding of your vehicle's inner workings.
Purpose: Why Bother With the Under-the-Hood Diagram?
So, why should you, an experienced DIYer or modder, care about an under-the-hood diagram? Simple: it's your cheat sheet for everything. Think of it as the Rosetta Stone for automotive maintenance. Here’s why it's crucial:
- Repair and Maintenance: Diagnosing problems becomes infinitely easier with a clear visual representation of component locations. Trying to find the evaporative emissions canister (EVAP) without knowing where to look? Good luck. The diagram points you right to it.
- Troubleshooting: Tracing vacuum lines, identifying sensors, and understanding the flow of coolant are all simplified. When your Check Engine Light throws a code, this diagram helps you pinpoint the potential culprit.
- Modification and Upgrades: Planning an aftermarket modification? Knowing the layout and proximity of components is essential for a clean and safe install. Want to install a cold air intake? The diagram will show you the optimal routing for the intake piping and where you'll need to relocate any interfering components.
- Learning and Understanding: Even if you're not currently wrenching, studying the diagram builds a solid foundation for future projects. Understanding the interrelationships between systems is key to becoming a truly proficient mechanic.
- Part Identification: Ordering replacement parts becomes less stressful. You can confidently identify and locate the correct components to minimize errors.
Key Specs and Main Parts: Accord Under the Hood Essentials
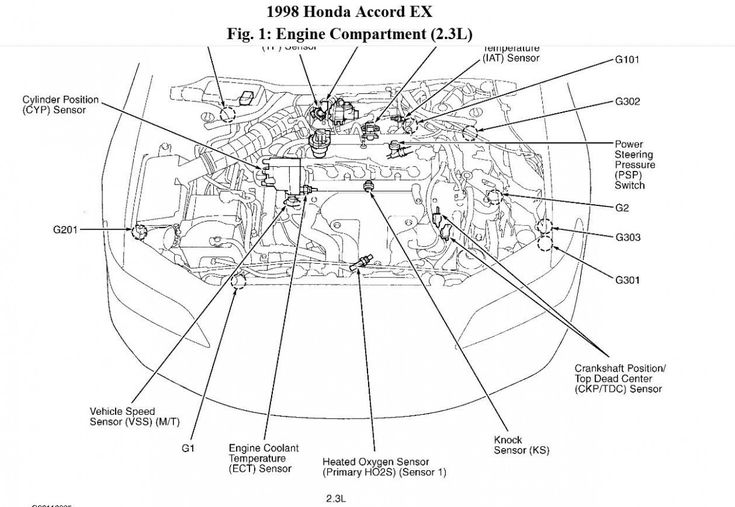
The exact layout of the under-the-hood diagram varies slightly depending on the model year and engine type of your Accord. However, the core components and their relative positions remain consistent. Let's break down the main players, assuming a common 2.4L inline-4 engine configuration:
- Engine Block: The heart of the beast. It's usually shaded prominently in the diagram. Key features shown might include the cylinder head, valve cover, and oil pan.
- Intake Manifold: This directs air into the cylinders. The diagram will illustrate its location and potentially show the vacuum line connections.
- Exhaust Manifold: This channels exhaust gases out of the engine. It's typically depicted with heat shielding around it.
- Cooling System: This includes the radiator, coolant hoses, thermostat housing, and coolant reservoir. The diagram will show the flow path of coolant throughout the engine and radiator.
- Electrical System: Battery, alternator, starter motor, fuse box, and various sensors (oxygen sensors, mass airflow sensor, crank position sensor, etc.). The wiring harnesses and grounding points will also be visible.
- Fuel System: Fuel injectors, fuel rail, fuel pressure regulator (if applicable), and fuel lines. Understanding the fuel system layout is crucial for diagnosing fuel delivery issues.
- Air Conditioning System: Compressor, condenser, evaporator, and refrigerant lines. These components are often depicted with specific symbols to indicate high and low-pressure sides.
- Power Steering System: Power steering pump, reservoir, and hydraulic lines.
- Brake System (Master Cylinder): Although a larger diagram might focus on the entire braking system, the under-the-hood diagram will always show the master cylinder and brake lines.
Pay attention to the labeling conventions in your specific diagram. Manufacturers often use abbreviations and part numbers directly on the diagram to aid in identification.
Decoding the Symbols: Lines, Colors, and Icons
Understanding the symbols used in the diagram is crucial for proper interpretation. Here's a breakdown of common symbols:
- Lines: Different types of lines represent different types of connections.
- Solid lines: Typically represent fluid lines (coolant, fuel, oil, brake fluid).
- Dashed lines: Often indicate vacuum lines.
- Dotted lines: Can represent electrical wiring or signal paths.
- Colors: While color-coding isn't universally standardized, common conventions exist.
- Red: Often signifies high-pressure lines or hot fluids.
- Blue: Typically represents coolant lines.
- Yellow: Sometimes used for vacuum lines.
- Black: Common for electrical grounds or return lines.
- Icons: These represent specific components. Common icons include:
- Rectangle with a jagged line: Resistor.
- Circle with an "M" inside: Motor (e.g., starter motor).
- Coil symbol: Solenoid or relay.
- Diamond shape: Sensor.
Always refer to the legend or key that accompanies the diagram. It will provide specific explanations for the symbols used in that particular diagram.
How It Works: System Interrelationships
The diagram isn't just a collection of parts; it illustrates how these components work together as a system. For example, tracing the coolant lines will show how the engine's heat is dissipated through the radiator. Following the fuel lines reveals how fuel is delivered from the tank to the injectors. Understanding these interrelationships is critical for effective troubleshooting.
For instance, if your engine is overheating, the diagram can help you trace the coolant flow and identify potential blockages or malfunctioning components like the thermostat or water pump. Or, if you're experiencing poor fuel economy, you can use the diagram to check for vacuum leaks or identify faulty sensors that might be affecting fuel trim.
Real-World Use: Basic Troubleshooting Tips
Let's say your Accord is throwing a P0171 code (System Too Lean, Bank 1). Here's how the under-the-hood diagram helps:
- Locate the Components: The diagram will show the location of the oxygen sensor (O2 sensor) on Bank 1 (usually the bank containing cylinder #1) and the mass airflow sensor (MAF sensor).
- Inspect Vacuum Lines: The diagram will show you the vacuum line routing. Visually inspect for cracks or disconnections. Common culprits are vacuum lines connected to the intake manifold or EVAP system.
- Check Sensor Connections: Ensure the electrical connectors to the O2 sensor and MAF sensor are secure and free from corrosion.
- Evaluate Fuel System: While not always directly evident on the diagram, you can infer the fuel system layout and check for obvious leaks or damage to fuel lines.
By using the diagram as a guide, you can systematically inspect these components and narrow down the potential causes of the lean condition.
Safety First: Highlighting Risky Components
Working under the hood can be dangerous. The diagram helps you identify potentially hazardous components:
- High-Voltage Components: The ignition system (ignition coils, spark plugs) operates at very high voltages. Always disconnect the battery before working on these components. Never touch a spark plug wire while the engine is running.
- High-Pressure Fuel Lines: The fuel system is under pressure. Relieve the fuel pressure before disconnecting any fuel lines. Fuel is highly flammable.
- Hot Surfaces: The exhaust manifold and other engine components become extremely hot during operation. Allow the engine to cool completely before working near these areas.
- Moving Parts: Be aware of rotating components like the serpentine belt and pulleys. Keep hands and loose clothing clear of these areas when the engine is running.
- Air Conditioning System: Refrigerant can cause frostbite and is harmful to the environment. Do not attempt to work on the A/C system yourself unless you are properly trained and equipped.
Always wear appropriate safety gear, including safety glasses and gloves. And when in doubt, consult a qualified mechanic.
We have the under-the-hood diagram for your specific Honda Accord model year and engine configuration available for download. Contact us, and we'll gladly provide you with the file. Armed with this knowledge and the diagram, you'll be well-equipped to tackle a wide range of maintenance and repair tasks on your Honda Accord. Happy wrenching!