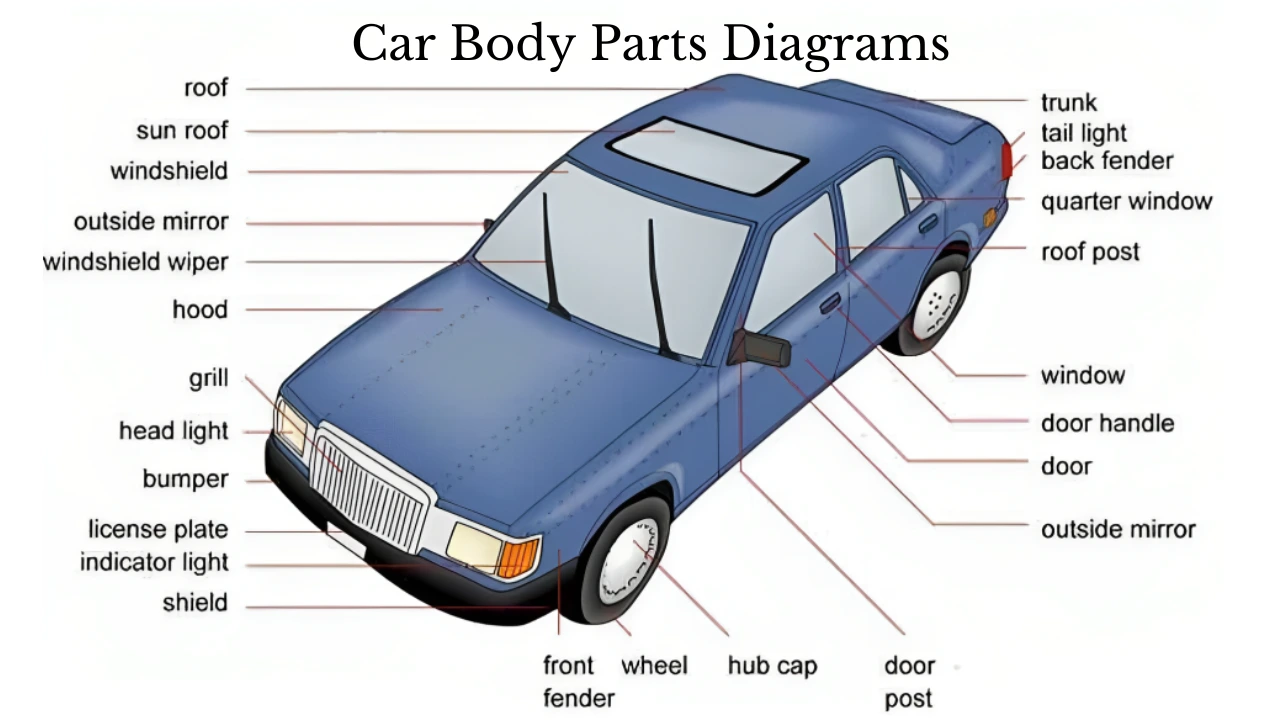
Body Parts Of A Car Diagram
Understanding the anatomy of your car is crucial, whether you're planning a simple oil change or a more complex modification. This article delves into the body parts of a car diagram, explaining its purpose, key components, symbols, operational principles, and practical applications. Think of it as your roadmap to automotive understanding.
Purpose of a Car Body Diagram
Why bother with a car body diagram? Several reasons:
- Repairs and Maintenance: Identifying the exact location of components is essential for accurate diagnosis and repair. A diagram helps you pinpoint the problem area quickly.
- Modifications: Planning modifications, such as installing aftermarket lights or body kits, requires a thorough understanding of the car's structure.
- Learning Automotive Mechanics: Even if you don't plan on becoming a professional mechanic, understanding how your car works empowers you to make informed decisions about its care.
- Troubleshooting: A diagram can guide you through troubleshooting common issues, like locating fuses or relays.
- Estimating Repair Costs: Knowing the names of the parts that need replacing or repair, and their relative location can help you get fair and accurate quotes from repair shops.
Key Specs and Main Parts
A typical car body diagram includes several key components. Let's break down some of the most common:
Front End
The front end is designed for aerodynamics and impact absorption. Key parts include:
- Hood (Bonnet): Provides access to the engine compartment.
- Fenders (Wings): Protect the wheels and direct airflow.
- Bumper: Absorbs impact during low-speed collisions. Modern bumpers often house sensors for parking assistance and adaptive cruise control.
- Grille: Allows airflow to the radiator for engine cooling.
- Headlights: Provide illumination for nighttime driving. Various types exist (halogen, LED, HID), each with different light output and energy efficiency.
- Windshield: Provides visibility and structural support.
Mid-Section
This area houses the passenger compartment. Key parts include:
- Doors: Allow access to the vehicle's interior.
- Rocker Panels (Sills): Provide structural support and protect the body from damage. These are particularly vulnerable to rust.
- Pillars (A, B, C): Vertical supports that hold the roof in place and contribute to crashworthiness.
- Roof: Provides overhead protection and contributes to the vehicle's structural integrity.
- Windows: Provide visibility and ventilation.
Rear End
The rear end often incorporates storage and safety features. Key parts include:
- Trunk (Boot): Provides storage space.
- Rear Bumper: Absorbs impact during low-speed rear-end collisions.
- Taillights: Signal braking, turning, and reversing.
- Rear Window (Backglass): Provides rear visibility. Often includes a defroster grid.
- Quarter Panels: Located between the rear doors and taillights.
Undercarriage
The undercarriage is often overlooked but is crucial for structural integrity and performance. Key parts include:
- Frame/Unibody: The structural backbone of the vehicle. Most modern cars use a unibody construction, where the body and frame are integrated. Trucks and some SUVs often use a separate frame.
- Suspension Components (Control Arms, Struts, Shocks): Provide a smooth ride and maintain contact between the tires and the road.
- Exhaust System: Carries exhaust gases away from the engine.
- Fuel Tank: Stores fuel for the engine.
- Driveshaft/Axles: Transfer power from the engine to the wheels.
Symbols on a Car Body Diagram
Understanding the symbols used in a car body diagram is essential for accurate interpretation. Here's a breakdown of common symbols:
- Solid Lines: Typically represent visible edges or outlines of components.
- Dashed Lines: Indicate hidden lines, such as parts located behind another component.
- Arrows: Show the direction of movement, flow, or forces. For example, arrows might indicate the direction of airflow through the radiator.
- Colors: Different colors can represent different materials or systems. For instance, blue might indicate coolant lines, while red indicates brake lines. Consult the diagram's legend for color-coding details.
- Icons: Standardized icons represent specific components, such as lights, sensors, or connectors. These icons often follow industry standards. For example, a zig-zag line within a square usually represents a resistor.
- Numbers/Labels: Parts are usually numbered or labeled to correspond with a parts list or assembly instructions.
How It Works
A car body diagram is essentially a visual representation of how the different components fit together. By studying the diagram, you can trace the relationships between parts, understand how they are connected, and identify potential points of failure. For example, if you are experiencing issues with your car's electrical system, the diagram can help you trace the wiring harness and locate the source of the problem.
Real-World Use: Basic Troubleshooting Tips
Let's consider a practical example: you notice a rust spot on your rocker panel.
- Consult the Diagram: Locate the rocker panel on the diagram.
- Identify Surrounding Components: Note any components that are connected to or located near the rocker panel, such as the door sill trim or the fender.
- Assess the Damage: Carefully inspect the rust spot and determine the extent of the damage. Is it just surface rust, or has it penetrated the metal?
- Plan Your Repair: Based on your assessment, determine the best course of action. You might be able to treat surface rust with a rust converter, or you might need to replace the entire rocker panel.
- Reference the Diagram Again: If you decide to replace the rocker panel, the diagram can help you identify the fasteners and attachment points.
Another example: Your headlight is not working.
- Consult the Diagram: Locate the headlight assembly on the diagram.
- Trace the Wiring: Follow the wiring diagram to identify the fuse, relay, and connectors associated with the headlight.
- Check the Fuse: Inspect the fuse to see if it is blown.
- Test the Relay: Use a multimeter to test the relay to see if it is functioning properly.
- Inspect the Connectors: Check the connectors for corrosion or damage.
Safety Considerations
Working on a car can be dangerous if you're not careful. Here are some safety tips to keep in mind:
- Disconnect the Battery: Before working on any electrical components, disconnect the negative terminal of the battery to prevent short circuits.
- Use Jack Stands: Never work under a car that is only supported by a jack. Use jack stands to provide stable support.
- Wear Safety Glasses: Protect your eyes from flying debris.
- Wear Gloves: Protect your hands from sharp edges and chemicals.
- Be Aware of High-Pressure Systems: The air conditioning system contains refrigerant under high pressure. Do not attempt to disconnect any AC lines without proper training and equipment.
- Fuel System: The fuel system is highly flammable. Do not work near open flames or sparks when working on the fuel system. Always relieve fuel pressure before disconnecting any fuel lines. Never smoke while working on your car.
Certain components pose higher risks:
Airbags: Airbags can deploy unexpectedly if handled improperly. Always disconnect the battery and wait at least 30 minutes before working on any airbag components. Fuel System: As mentioned above, the fuel system is highly flammable. Electrical System: The electrical system can deliver dangerous shocks. Always disconnect the battery before working on any electrical components.
We hope this article has provided you with a comprehensive overview of car body diagrams. They are valuable tools for anyone interested in understanding, maintaining, or modifying their vehicle.
We have a detailed car body diagram file available for download. It's a great resource to keep handy for your next project. Contact us, and we will provide the file.