Brake Line Routing Chevy Silverado Master Cylinder Diagram
Alright folks, let's talk brake lines. Specifically, how they're routed on a Chevy Silverado and how to interpret a master cylinder diagram. Understanding this is crucial for anything from basic brake repairs to complete brake system upgrades. Whether you're chasing down a leak, replacing a rusted-out line, or just wanting to understand your truck better, this knowledge is power. We're going to break down the key components, explain how it all works, and give you some real-world troubleshooting tips. And remember, brakes are nothing to mess around with if you're not comfortable. If you're even slightly unsure, take it to a professional. Safety first!
Purpose of the Silverado Brake Line Diagram
Why even bother with a brake line diagram? Several reasons. Firstly, for repairs. When a brake line fails – usually due to rust or damage – knowing exactly where it runs is essential for replacing it correctly. You need to ensure the new line follows the factory routing to avoid kinks, chafing, or interference with other components. Secondly, it's invaluable for diagnostics. If you're experiencing braking issues, the diagram helps you trace the system and identify potential problem areas, like a collapsed hose or a seized proportioning valve. Thirdly, for modification or upgrades, such as installing a new master cylinder, adding aftermarket calipers, or even swapping out the entire brake system. Knowing the existing layout is critical for planning and executing these changes safely and effectively. Finally, it's simply great for learning about your vehicle. Understanding the brake system is a fundamental part of being a responsible vehicle owner.
Key Specs and Main Parts of the Silverado Brake System
Before we dive into the diagram itself, let's identify the key components of a typical Chevy Silverado brake system (specific models may vary slightly):
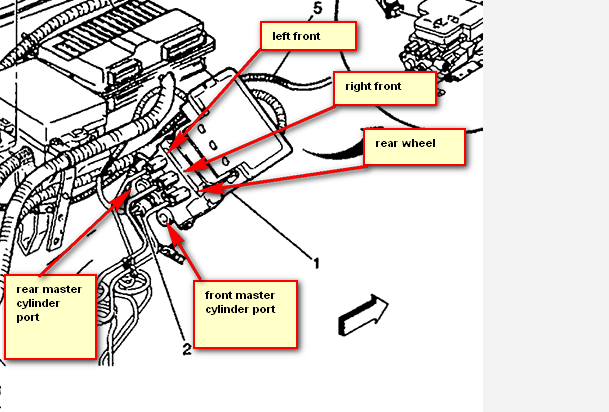
- Master Cylinder: The heart of the system, responsible for generating hydraulic pressure when you press the brake pedal. It typically has two separate reservoirs, one for the front brakes and one for the rear.
- Brake Booster: Utilizes vacuum from the engine to amplify the force you apply to the brake pedal, making it easier to stop.
- Brake Lines: Steel or composite lines that carry brake fluid under pressure from the master cylinder to the wheel cylinders or calipers.
- Flexible Brake Hoses: Short sections of flexible hose connecting the hard lines to the calipers. These allow for movement of the suspension and steering without damaging the brake lines.
- Proportioning Valve: Regulates the pressure to the rear brakes, preventing them from locking up prematurely during hard braking. This is crucial for maintaining vehicle stability.
- ABS (Anti-lock Braking System) Module (if equipped): Prevents wheel lockup during braking, allowing you to maintain steering control. This module contains sensors, valves, and a controller.
- Wheel Cylinders (Drum Brakes): Hydraulic cylinders that push the brake shoes against the brake drums (typically on older models or the rear brakes).
- Calipers (Disc Brakes): Hydraulic devices that squeeze brake pads against the brake rotors to slow the vehicle.
- Rotors (Disc Brakes): The rotating metal discs that the calipers clamp onto.
- Drums (Drum Brakes): The rotating metal drums that the brake shoes press against.
Typical Silverado brake lines are made of steel. Some are composite to prevent corrosion. They are standardized with 3/16" tubing, and fittings are usually inverted flare. Knowing this makes sourcing replacement parts easier. Also, remember to check your specific year and trim level as brake setups can vary.
Understanding the Symbols in the Brake Line Diagram
A good brake line diagram will use standardized symbols to represent the different components and lines. Here's a breakdown of common symbols:
- Solid Lines: Represent rigid brake lines (typically steel).
- Dashed Lines: Usually indicate vacuum lines (for the brake booster) or electrical wiring related to the ABS system.
- Different Colors: Some diagrams use different colors to differentiate between the front and rear brake circuits. For example, red might represent the front brakes and blue the rear. Refer to the diagram's legend for clarification.
- Reservoir Symbol: Represents the brake fluid reservoirs in the master cylinder. Often depicted as rectangles or circles.
- Caliper/Wheel Cylinder Symbol: Represented by a small cylinder or a stylized drawing of the caliper or wheel cylinder.
- Proportioning Valve Symbol: Often a rectangle with a diagonal line through it or a specifically designed valve symbol.
- ABS Module Symbol: Usually a box with multiple connections representing the various sensors, valves, and controller integrated into the ABS unit.
- T-Fittings or Connectors: Represented by a dot or a small circle where lines connect or split.
Always refer to the legend or key provided with the diagram to understand the specific symbols and color coding used. Don't assume anything – double-check!
How the Silverado Brake System Works
Here's a simplified explanation of how the brake system functions:
- When you press the brake pedal, the pushrod actuates the master cylinder.
- The master cylinder generates hydraulic pressure, which is transmitted through the brake lines.
- The brake booster, using engine vacuum, amplifies the force applied to the master cylinder, reducing the effort required from the driver.
- The hydraulic pressure travels through the brake lines to the calipers (for disc brakes) or wheel cylinders (for drum brakes) at each wheel.
- In disc brakes, the pressure forces the caliper pistons to clamp the brake pads against the rotor, creating friction and slowing the wheel.
- In drum brakes, the pressure forces the wheel cylinder pistons to push the brake shoes against the drum, creating friction and slowing the wheel.
- The proportioning valve regulates the pressure to the rear brakes to prevent premature lockup.
- If the vehicle is equipped with ABS, the ABS module monitors wheel speed and modulates brake pressure to prevent wheel lockup, allowing you to maintain steering control during hard braking.
The system is a closed hydraulic loop. Any leaks in the lines mean pressure loss and reduced braking efficiency. It's crucial to maintain the integrity of the system.
Real-World Use: Basic Troubleshooting
Let's say you're experiencing a soft brake pedal. Here's how the brake line diagram can help:
- Visual Inspection: Use the diagram to trace the brake lines from the master cylinder to each wheel. Look for any signs of leaks, corrosion, or damage. Check the flexible brake hoses for cracks or bulges.
- Fluid Level Check: Check the fluid level in the master cylinder reservoir. Low fluid can indicate a leak in the system. The diagram will show you where the reservoirs are.
- Bleeding the Brakes: If you suspect air in the system (another cause of a soft pedal), you'll need to bleed the brakes. The diagram can help you identify the correct bleeding sequence for your vehicle (usually starting with the wheel farthest from the master cylinder).
- Proportioning Valve Issues: If you suspect a faulty proportioning valve (e.g., rear wheels locking up easily), the diagram will help you locate it and test its function.
Remember: Always use the correct type of brake fluid specified for your vehicle. Mixing different types of brake fluid can damage the system. When bleeding brakes, prevent air from entering the system. Keep the master cylinder reservoir filled during the bleeding process.
Safety Considerations
Working on brake systems can be dangerous. Here are some crucial safety precautions:
- Brake Fluid: Brake fluid is corrosive and can damage paint and irritate skin. Wear gloves and eye protection when handling it. Clean up any spills immediately.
- High Pressure: The brake system operates under high pressure. Never disconnect a brake line while the system is pressurized. Always relieve the pressure by opening a bleeder screw at a wheel cylinder or caliper.
- Air in the System: Air in the brake lines can significantly reduce braking performance. Always bleed the brakes thoroughly after opening any part of the system.
- Jack Stands: Always use jack stands to support the vehicle when working underneath it. Never rely solely on a jack.
- Proper Tools: Use the correct tools for the job. Using the wrong tools can damage components or lead to injury. Flaring tools for brake lines are a must.
- Contamination: Prevent dirt and debris from entering the brake system. Always clean the area around any connections before disconnecting them.
The brake booster is also a crucial component, and any failure can be catastrophic. A hard pedal feel often points to booster issues, which should be immediately addressed.
We have the detailed master cylinder diagram and the full brake lines layout file ready for you to download. It will provide a more specific visual guide for your Silverado model. Download it below and happy wrenching!