
Buick Enclave Serpentine Belt Diagram
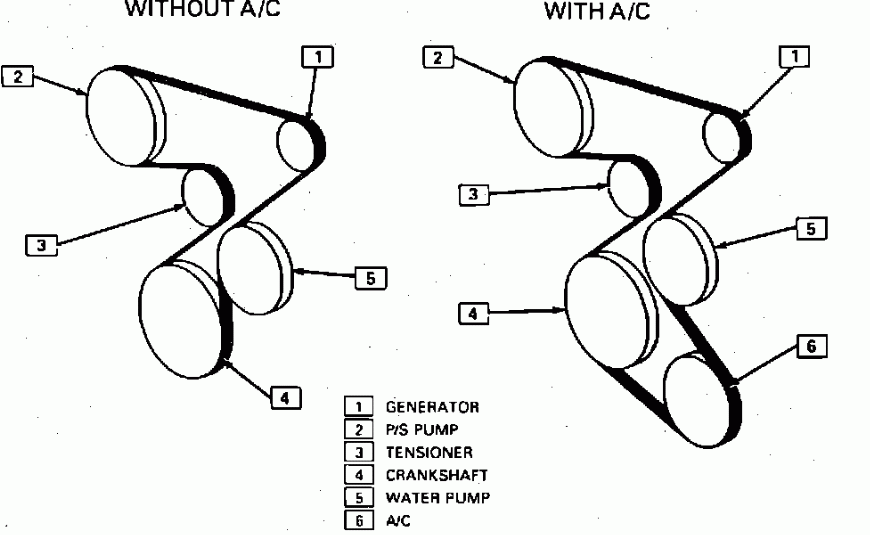
For the seasoned DIYer tackling repairs on their Buick Enclave, understanding the serpentine belt system is crucial. This article dives into the specifics of the Enclave's serpentine belt diagram, providing you with the knowledge to diagnose issues, perform replacements, and keep your engine running smoothly. We'll break down the diagram's key elements, explain its operation, offer troubleshooting tips, and emphasize critical safety precautions.
Purpose of the Serpentine Belt Diagram
The serpentine belt diagram is your roadmap to understanding the belt's routing and the components it drives. It's invaluable for several reasons:
- Belt Replacement: Correct routing is essential when replacing a worn or broken serpentine belt. An improperly routed belt can lead to component failure and potential engine damage.
- Troubleshooting: The diagram helps you identify potential causes of squealing belts, weak power steering, or a non-charging alternator by visually connecting the belt to its driven components.
- Component Identification: The diagram provides a clear view of each pulley's location and function, aiding in component diagnosis and repair.
- Learning and Understanding: Even if you're not actively working on the car, studying the diagram provides a deeper understanding of how your Enclave's engine operates.
Key Specs and Main Parts
The Buick Enclave's serpentine belt system typically drives the following components. (Note that specific configurations may vary slightly depending on the model year and engine type, primarily the 3.6L V6):
- Crankshaft Pulley: The heart of the system, driven directly by the engine. It's the driving force for the entire serpentine belt.
- Alternator: Charges the battery and powers the electrical system.
- Power Steering Pump: Provides hydraulic assistance for steering.
- Air Conditioning Compressor: Compresses refrigerant for the air conditioning system.
- Water Pump: Circulates coolant through the engine to regulate temperature. (On some Enclave models, the water pump might be driven by the timing chain, not the serpentine belt. Consult your specific diagram).
- Idler Pulleys: Smooth, ungrooved pulleys used to guide the belt and maintain proper tension.
- Tensioner Pulley: An adjustable pulley with a spring-loaded mechanism to maintain the correct belt tension. Proper tension is crucial for optimal performance and belt life.
The serpentine belt itself is a long, continuous belt, typically made of reinforced rubber. Its length and width are critical for proper fit and function. Always use the manufacturer-recommended belt size for your specific Enclave model.
Symbols and Conventions on the Diagram
Understanding the symbols and conventions used in the serpentine belt diagram is key to interpreting it accurately.
- Solid Lines: Indicate the primary path of the serpentine belt.
- Dotted Lines: Might be used to indicate the belt's path behind other components, showing its relative position without obscuring the view.
- Arrows: Indicate the direction of belt travel and pulley rotation. Pay attention to these to understand which components are driving and which are being driven.
- Component Icons: Standardized symbols are used to represent each component (e.g., a stylized alternator, steering wheel for the power steering pump).
- Text Labels: Each component is clearly labeled with its name (e.g., "ALT" for alternator, "P/S" for power steering).
- Routing Indicators: Some diagrams include small numbers or letters along the belt path, corresponding to notes or instructions on the diagram. These can highlight specific routing instructions or potential problem areas.
- Color Coding: While not always present, some diagrams use color coding to differentiate between the front and back sides of the belt, or to highlight critical areas.
How It Works
The serpentine belt system is a relatively simple, yet vital, system. The crankshaft pulley, connected directly to the engine's crankshaft, rotates, transferring its rotational force to the serpentine belt. The belt, in turn, drives all the accessories connected to it – alternator, power steering pump, A/C compressor, and sometimes the water pump. The tensioner pulley maintains the correct tension on the belt, ensuring adequate grip on each pulley. Without proper tension, the belt will slip, leading to reduced performance of the driven components and potential overheating (if the water pump is belt-driven) or electrical issues (if the alternator slips). The idler pulleys guide the belt along the correct path, preventing it from rubbing against other components or becoming misaligned.
Real-World Use: Basic Troubleshooting Tips
Here are some common issues related to the serpentine belt system and how the diagram can aid in diagnosis:
- Squealing Belt: A squealing belt is often a sign of slippage. The diagram helps you identify all the components driven by the belt. Check the tensioner pulley to ensure it's applying adequate tension. Also, inspect each pulley for signs of damage or misalignment. A worn or contaminated belt can also cause squealing.
- Weak Power Steering: If the power steering pump isn't receiving sufficient power due to belt slippage, you'll experience stiff steering. The diagram confirms the belt's connection to the power steering pump.
- Battery Not Charging: A slipping belt can prevent the alternator from spinning at the necessary speed to charge the battery. The diagram verifies the belt's link to the alternator. Check the belt tension and alternator pulley condition.
- Overheating: If the water pump is driven by the serpentine belt, a slipping belt can reduce coolant circulation, leading to overheating. The diagram will confirm if the water pump is part of the serpentine belt system.
- Visible Belt Damage: Inspect the belt for cracks, fraying, or missing chunks. Use the diagram to trace the belt's path and identify any potential points of contact or rubbing that might be causing the damage.
When troubleshooting, always start by visually inspecting the entire serpentine belt system, referring to the diagram to ensure everything is properly aligned and connected.
Safety Precautions
Working on the serpentine belt system can be dangerous if proper precautions aren't taken.
- Disconnect the Battery: Always disconnect the negative battery cable before working on any electrical components, including the alternator.
- Engine Off and Cool: Never work on the serpentine belt system while the engine is running or hot. Wait for the engine to cool completely to prevent burns.
- Moving Parts: Be extremely cautious of moving parts. Keep your hands, hair, and clothing away from the serpentine belt and pulleys while the engine is running. Even at idle, these components can cause serious injury.
- Tensioner Spring: The tensioner pulley is spring-loaded and can snap back with considerable force when released. Use the correct tools to relieve the tension safely.
- Proper Tools: Use the appropriate tools for the job, including a serpentine belt tool for removing and installing the belt.
The area around the crankshaft pulley is particularly risky due to its proximity to the engine and its high rotational speed. Exercise extreme caution when working near this component.
By understanding the serpentine belt diagram and following these safety guidelines, you can confidently diagnose and repair issues related to your Buick Enclave's serpentine belt system, saving you time and money.
We have a high-resolution version of the Buick Enclave Serpentine Belt Diagram available for download. This diagram provides a clear and detailed view of the belt routing and component locations, making it an invaluable resource for your repairs.