C3 Corvette Air Conditioning Diagram
The C3 Corvette, spanning model years 1968 to 1982, is a classic American muscle car. But even classic cars need to be comfortable. A properly functioning air conditioning (A/C) system is crucial for enjoying your C3, especially in warmer climates. Understanding the C3 Corvette A/C diagram is essential for anyone looking to maintain, troubleshoot, or upgrade their A/C system. This guide will break down the diagram, explain its components, and provide practical advice for keeping your Corvette cool.
Purpose of the C3 Corvette A/C Diagram
The A/C diagram serves as a roadmap for the entire air conditioning system. It illustrates how each component is connected, both electrically and mechanically. Why is this important? Well, without it, diagnosing A/C problems becomes a guessing game. The diagram helps you:
- Locate components: Quickly identify the physical location of parts within the engine bay.
- Trace wiring: Follow electrical connections to diagnose shorts, opens, or other electrical faults.
- Understand the flow: Visualize the refrigerant's path through the system.
- Plan repairs: Determine which parts need to be replaced and how to access them.
- Perform upgrades: Plan for modifications or upgrades to the A/C system, such as converting to R134a refrigerant.
Whether you're tackling a minor repair or overhauling the entire system, having a clear A/C diagram will save you time, frustration, and potentially costly mistakes.
Key Specs and Main Parts
The C3 Corvette A/C system, while varying slightly across different model years, generally includes the following key components:
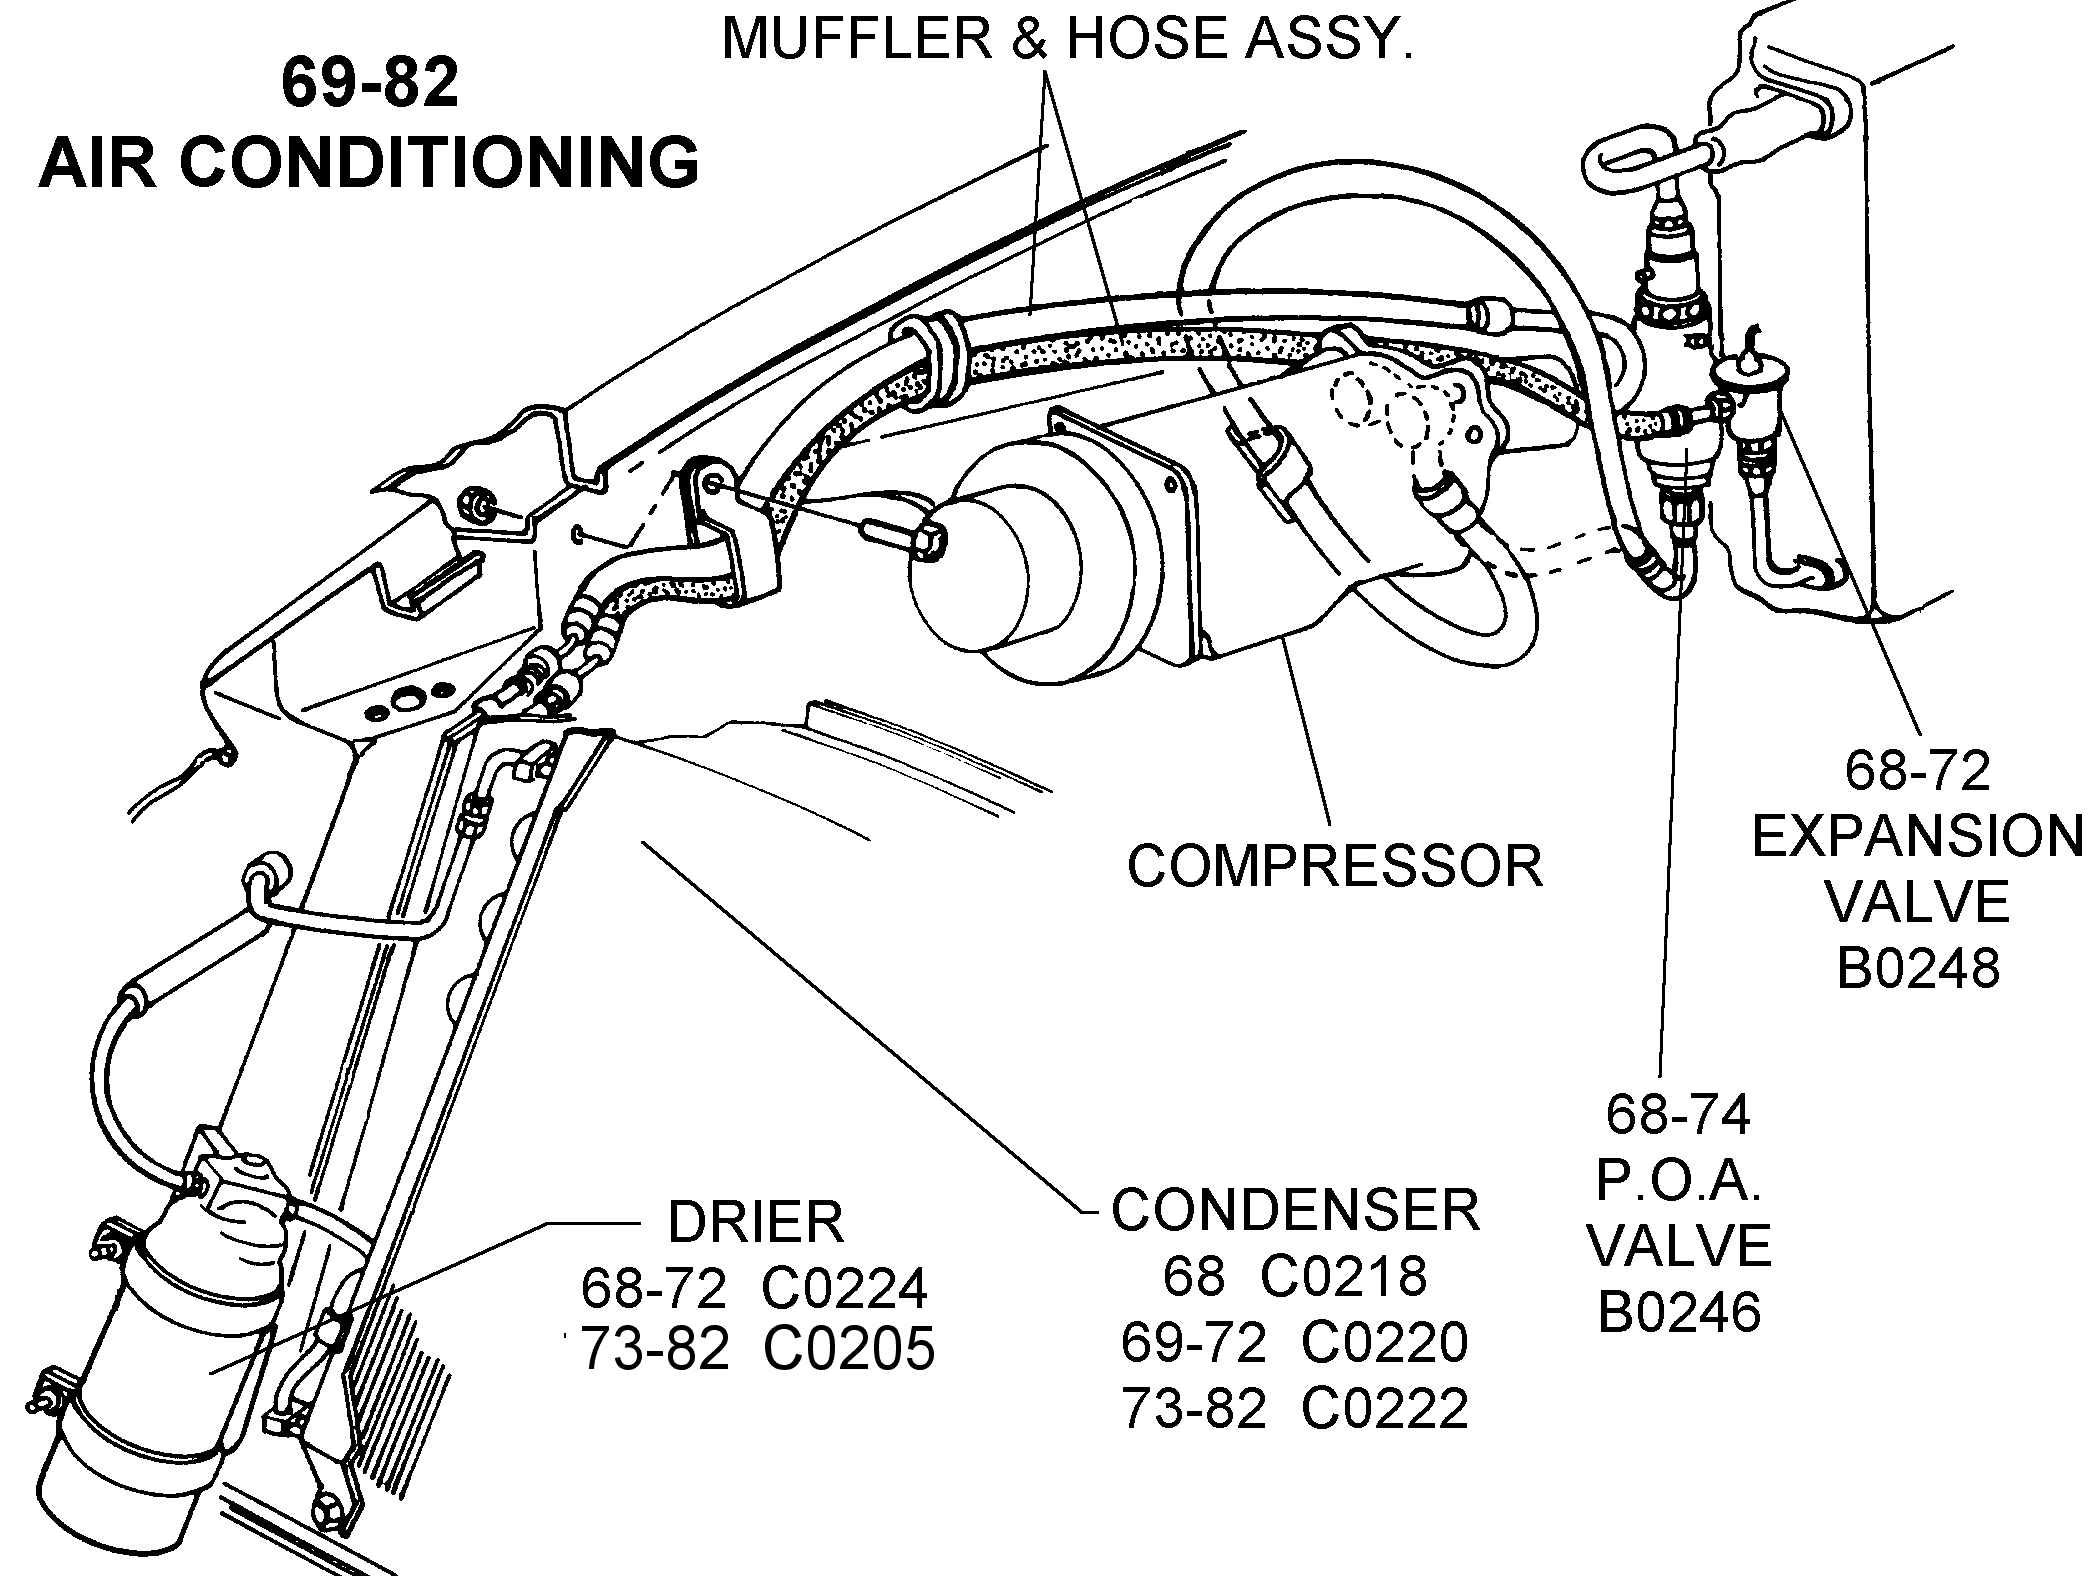
- Compressor: The heart of the system. The compressor, typically a radial or axial type, pumps the refrigerant and circulates it throughout the system. It increases the pressure and temperature of the refrigerant.
- Condenser: Located in front of the radiator, the condenser cools the high-pressure refrigerant, causing it to change from a gas to a liquid. Airflow across the condenser is vital for effective cooling.
- Receiver-Drier (or Accumulator): This component filters out moisture and debris from the refrigerant. It also provides a reservoir for liquid refrigerant. Models using a TXV (Thermal Expansion Valve) will use a receiver-drier; systems using an orifice tube typically employ an accumulator.
- Evaporator: Located inside the passenger compartment, typically behind the dashboard, the evaporator absorbs heat from the cabin air, cooling it down. The liquid refrigerant changes to a gas in the evaporator.
- Expansion Valve (or Orifice Tube): This metering device controls the flow of refrigerant into the evaporator. It regulates the pressure and temperature of the refrigerant entering the evaporator, ensuring optimal cooling. A TXV (Thermal Expansion Valve) is a more sophisticated valve that adjusts refrigerant flow based on evaporator temperature, providing more efficient cooling.
- Hoses and Lines: These flexible and rigid lines connect all the components and carry the refrigerant. They are specifically designed to handle the high pressures and temperatures involved.
- Electrical Components: This includes the A/C compressor clutch, switches, relays, and wiring harnesses that control the system's operation.
- Control Panel: The controls inside the vehicle that allows the driver to control the A/C functions. This include setting the temperature and fan speed.
Refrigerant: The type of refrigerant used is crucial. Early C3 Corvettes used R-12, which is now illegal to use and replace. Most C3s have been converted to R-134a. When working on the A/C system, be sure to use the correct type and amount of refrigerant.
Symbols and Nomenclature on the A/C Diagram
Understanding the symbols and nomenclature used in the A/C diagram is key to interpreting it correctly. Here's a breakdown of common elements:
- Lines: Different types of lines represent different types of connections:
- Solid lines: Typically indicate refrigerant lines.
- Dashed lines: Often represent vacuum lines or signal wires.
- Dotted lines: May indicate electrical wiring or ground connections.
- Colors: Wiring diagrams often use color-coded wires to identify different circuits. Consult the diagram's legend to understand the color code used.
- Component Symbols: Each component has a specific symbol representing its function. These symbols are standardized to some extent, but always refer to the diagram's legend for accurate identification. Common symbols include squares for switches, circles for motors, and stylized shapes for the compressor, condenser, and evaporator.
- Abbreviations: The diagram will use abreviations, like TXV, PCM, ECM, etc... Refer to the legend for accurate identification.
- Pressure Readings: Some diagrams include typical pressure readings at different points in the system. These readings are invaluable for diagnosing performance problems.
How the C3 Corvette A/C System Works
The C3 Corvette A/C system operates on the principle of vapor compression refrigeration. Here's a simplified explanation of the refrigerant's journey through the system:
- Compression: The compressor draws in low-pressure, low-temperature refrigerant gas and compresses it, increasing its pressure and temperature.
- Condensation: The high-pressure, high-temperature refrigerant gas flows into the condenser. Here, it releases heat to the surrounding air and condenses into a high-pressure liquid.
- Metering: The high-pressure liquid refrigerant passes through the expansion valve (or orifice tube). This device reduces the pressure of the refrigerant, causing it to cool rapidly.
- Evaporation: The low-pressure, low-temperature refrigerant flows into the evaporator. Here, it absorbs heat from the air passing over the evaporator coil, cooling the air that enters the passenger compartment. The refrigerant evaporates back into a low-pressure gas.
- Cycle Repeats: The low-pressure refrigerant gas returns to the compressor, and the cycle repeats.
The electrical components control the engagement of the compressor clutch, the blower motor speed, and other functions to regulate the cooling process.
Real-World Use: Basic Troubleshooting Tips
The A/C diagram can be your best friend when troubleshooting A/C problems. Here are some basic tips:
- No Cold Air: If the A/C isn't blowing cold air, start by checking the compressor clutch. Is it engaging when the A/C is turned on? Use the diagram to locate the clutch wiring and test for voltage.
- Weak Airflow: Check the blower motor and its resistor. Use the diagram to trace the blower motor circuit and test for proper voltage and ground.
- Leaks: Look for visible signs of refrigerant leaks, such as oily residue around fittings and hoses. A UV dye and a black light can help pinpoint leaks.
- Pressure Readings: Connect a set of A/C gauges to the high and low-pressure ports and compare the readings to the specifications in the diagram or service manual. Abnormal pressure readings can indicate various problems, such as a clogged orifice tube or a faulty compressor.
- Electrical Issues: Many A/C problems are electrical. Use a multimeter and the wiring diagram to check for continuity, voltage, and ground in the various circuits.
Common Problems: Typical issues with C3 Corvette A/C systems include leaks, compressor failure, clogged orifice tubes, and faulty switches and relays. Converting an R-12 system to R-134a can also introduce new problems if not done correctly.
Safety First!
Working on an A/C system involves certain risks. Always keep these safety precautions in mind:
- Refrigerant: Refrigerant can cause frostbite and is harmful if inhaled. Wear gloves and eye protection when handling refrigerant. Properly recover and dispose of refrigerant according to environmental regulations.
- High Pressure: The A/C system operates at high pressures. Never disconnect hoses or fittings without first properly discharging the system.
- Electrical Hazards: Disconnect the battery before working on any electrical components of the A/C system.
- Compressor Clutch: The compressor clutch can get very hot during operation. Avoid touching it immediately after the engine has been running.
Professional Help: If you're not comfortable working with refrigerant or electrical systems, it's best to seek the help of a qualified A/C technician.
Armed with the A/C diagram and this knowledge, you'll be well-equipped to tackle most C3 Corvette A/C problems. Remember to always consult the specific service manual for your Corvette's model year for the most accurate information.
We have a detailed C3 Corvette A/C diagram available for download. It will be useful for your repair work.