
Car Radio Installation Wiring Diagram
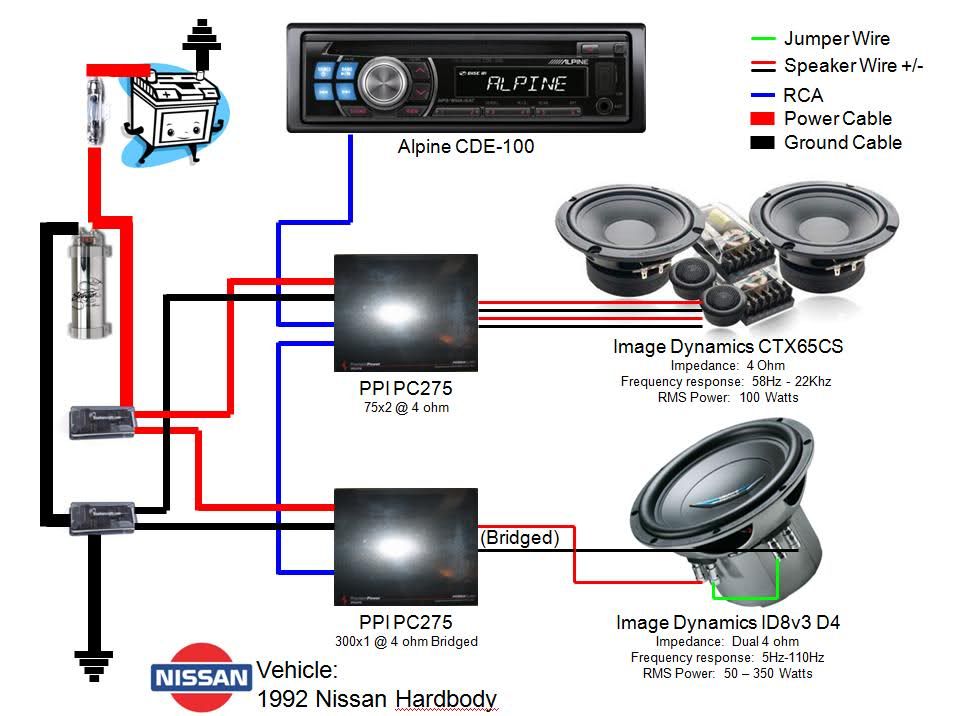
Understanding your car radio's wiring diagram is crucial for a variety of tasks, from simple radio replacement and speaker upgrades to diagnosing complex audio system problems. Think of it as the roadmap to your car's audio nerve center. Whether you're a seasoned DIYer looking to customize your sound system, or simply trying to troubleshoot a malfunctioning radio, this guide will equip you with the knowledge to navigate the complexities of car radio wiring.
Purpose of a Car Radio Wiring Diagram
A wiring diagram isn't just a pretty picture; it's a vital tool. It serves several key purposes:
- Radio Replacement: Safely disconnect the old radio and connect a new one without damaging your vehicle's electrical system. This is perhaps the most common use.
- Speaker Upgrades: Properly wire aftermarket speakers, amplifiers, and subwoofers for optimal performance and sound quality.
- Troubleshooting: Identify faulty wiring, blown fuses, or short circuits that might be causing audio problems. Without a diagram, you're essentially guessing!
- Adding Accessories: Integrate new features like Bluetooth modules, USB ports, or backup cameras that connect to the radio.
- Learning & Understanding: Gain a deeper understanding of your car's electrical system and how different components interact.
Think of it like this: you wouldn't attempt to repair a complex engine without a service manual, and the same applies to your car's audio system. A wiring diagram provides the clarity and precision needed for successful and safe modifications and repairs.
Key Specs and Main Parts
Before diving into the intricacies of the diagram itself, let's familiarize ourselves with the core components you'll typically encounter:
- Head Unit (Radio): The brains of the operation. This is where you select your music source, adjust the volume, and often control other vehicle functions.
- Speakers: Convert electrical signals into audible sound. Typically, you'll find speakers in the front and rear doors (or dashboard) of your car.
- Amplifier (Optional): Increases the power of the audio signal, allowing for louder and clearer sound. Factory radios often have built-in amplifiers, while aftermarket systems may use separate amplifiers.
- Wiring Harness: The bundle of wires that connects the radio to the car's electrical system. It's usually a standardized connector, but variations exist across different car models.
- Antenna: Receives radio signals.
- Ground Wire: Provides a return path for electrical current and is usually connected to the car's chassis.
- Power Wire (+12V): Supplies the radio with power. This wire is usually connected to the car's battery through a fuse.
- Accessory Wire (Switched +12V): Provides power to the radio only when the ignition is turned on. This prevents the radio from draining the battery when the car is off.
- Remote Turn-On Wire (Amplifier): Signals an external amplifier to turn on and off with the radio.
- Speaker Wires: These wires carry the amplified audio signal from the radio or amplifier to the speakers. Each speaker requires two wires: one positive (+) and one negative (-).
Understanding these components and their functions is essential for interpreting the wiring diagram accurately.
Symbols – Decoding the Diagram
A wiring diagram uses a standardized set of symbols to represent different electrical components and connections. Here's a breakdown of the most common symbols:
- Solid Lines: Represent wires. The thickness of the line doesn't usually indicate anything specific, but sometimes thicker lines might indicate heavier gauge wire.
- Dashed Lines: Often represent shielded cables or wires that are part of a larger harness.
- Circles: Can represent a variety of components, depending on what's inside them. They can be bulbs, connectors, or even microchips.
- Rectangles: Commonly represent components like relays, switches, or modules.
- Ground Symbol (Often a series of downward-pointing lines): Indicates a connection to the vehicle's chassis, which provides a ground for the electrical circuit.
- Connectors (Often represented by small squares or rectangles with lines leading to them): Show where wires connect to other components or harnesses.
- Fuses (Zigzag line inside a rectangle): Protect the electrical circuit from overcurrent.
- Resistors (Zigzag line): Limit the flow of current in a circuit.
Color Coding: Car manufacturers use a consistent color-coding system for wires. Common colors include red (power), black (ground), yellow (accessory), and various colors for speaker wires (e.g., white, gray, green, purple, often with a stripe). The diagram will typically list the color code next to each wire.
Wire Gauges: The diagram might indicate the wire gauge (e.g., 16 AWG, 18 AWG). The gauge specifies the wire's thickness; thicker wires can handle more current. Using the correct gauge is crucial for safety and performance.
How It Works: Following the Current
Think of the wiring diagram as a map showing the flow of electrical current through the audio system. It starts with the power source (the battery), which sends current through the power wire to the radio. When you turn the ignition on, the accessory wire activates the radio. The radio then processes the audio signal and sends it to the speakers through the speaker wires. The ground wire completes the circuit, allowing the current to return to the battery.
If you're installing an amplifier, the radio's remote turn-on wire signals the amplifier to power on. The amplifier then amplifies the audio signal and sends it to the speakers. All these components are interconnected through the wiring harness, which ensures that all the wires are properly connected.
Real-World Use – Basic Troubleshooting Tips
Here are some basic troubleshooting tips using the wiring diagram:
- No Power to Radio: Check the fuse for the radio. Consult the wiring diagram to locate the correct fuse. If the fuse is blown, replace it with one of the same amperage. If it blows again immediately, there's likely a short circuit. Use a multimeter to check for voltage at the radio's power wire. If there's no voltage, trace the wire back to the fuse box, checking for breaks or loose connections along the way.
- No Sound from Speakers: Check the speaker wires for loose connections or damage. Use a multimeter to test the speaker wires for continuity. If there's no continuity, the wire is broken. Ensure the speaker wires are connected to the correct terminals on the speakers.
- Distorted Sound: This could be caused by a blown speaker or a problem with the amplifier. Disconnect the speaker and test it with another audio source. If the speaker still sounds distorted, it needs to be replaced.
- Ground Loop Noise: This is a humming or buzzing sound that's caused by a difference in ground potential between the radio and other components. Try grounding the radio and amplifier to the same point on the chassis.
Safety – A Word of Caution
Working with car electronics can be dangerous. Always disconnect the negative terminal of the battery before working on any electrical components. This prevents accidental shorts and electric shock. Be especially cautious when working with the power wire, as it's directly connected to the battery and can deliver a significant shock. Never work on the electrical system when the engine is running. If you're not comfortable working with car electronics, it's best to consult a professional.
Airbags: Be extremely careful when working near airbags. Accidental deployment can cause serious injury. Consult your vehicle's service manual for instructions on how to disable the airbags before working in their vicinity.
We understand the importance of having the right resources at your fingertips. To help you further, we have a comprehensive collection of car radio wiring diagrams available for download. This collection covers a wide range of makes and models, ensuring you have the specific diagram you need for your project.
Remember, a car radio wiring diagram is your best friend when tackling audio system modifications or repairs. Understanding the symbols, wire colors, and circuit flow will empower you to work safely and effectively, achieving the sound system of your dreams.