Carburetor Briggs And Stratton Parts Diagram
Whether you're wrestling with a sputtering lawnmower, tuning up a go-kart, or simply expanding your mechanical knowledge, understanding the carburetor on a Briggs & Stratton engine is crucial. This article provides a detailed breakdown of a typical Briggs & Stratton carburetor parts diagram, equipping you with the knowledge to diagnose issues, perform repairs, and fine-tune your engine for optimal performance. We'll cover the essential components, their functions, diagram symbols, and troubleshooting tips. And remember, we have a downloadable diagram available for you to reference!
Purpose of a Briggs & Stratton Carburetor Parts Diagram
A carburetor parts diagram is more than just a pretty picture; it's your roadmap for navigating the intricate workings of the carburetor. Its primary purposes include:
- Repair and Maintenance: Identifying and ordering replacement parts is impossible without knowing the correct names and locations of components. The diagram provides a visual reference, ensuring you select the right jets, gaskets, and needles.
- Troubleshooting: When your engine is acting up, the diagram can help you pinpoint the source of the problem. By understanding the function of each part, you can systematically isolate the cause of the issue.
- Understanding Engine Operation: Even if you're not currently facing a problem, studying the diagram can deepen your understanding of how a carburetor mixes air and fuel to create a combustible mixture. This knowledge is invaluable for engine tuning and modification.
- Assembly and Disassembly: When cleaning or rebuilding a carburetor, a diagram helps you keep track of the order in which parts are removed and reinstalled. This prevents errors that could lead to engine malfunction.
Key Specs and Main Parts
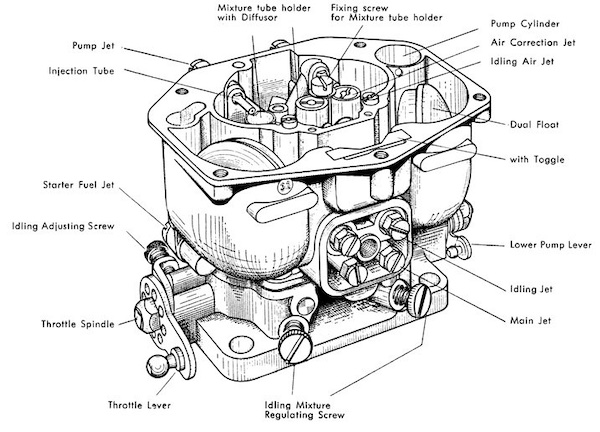
While Briggs & Stratton offers numerous carburetor variations, the core components and their functions remain consistent. Here's a look at some of the most critical parts you'll find on a typical diagram:
- Carburetor Body: The main housing that holds all the other components. It's typically made of cast aluminum or a similar lightweight material.
- Float Bowl: A reservoir at the bottom of the carburetor that stores fuel. Its level is controlled by a float and needle valve assembly.
- Float: A small, buoyant component (often plastic or brass) inside the float bowl. As the fuel level rises, the float rises too, eventually shutting off the fuel supply.
- Needle Valve (or Float Needle): A small, tapered needle that regulates the flow of fuel into the float bowl. It's connected to the float and seals against the valve seat when the float reaches its set height.
- Main Jet: A calibrated orifice that controls the amount of fuel delivered to the engine at higher throttle settings. Its size is crucial for proper air-fuel mixture.
- Idle Jet (or Slow Jet): A smaller jet that supplies fuel at idle and low throttle settings.
- Throttle Plate: A butterfly valve located in the carburetor bore that controls the amount of air entering the engine. It's connected to the throttle linkage.
- Choke Plate: Another butterfly valve located upstream of the throttle plate. When closed (choked), it restricts airflow, creating a richer fuel mixture for starting a cold engine.
- Emulsion Tube: A tube with small holes that mixes air with fuel drawn from the main jet, creating a finer spray for better combustion.
- Gaskets and Seals: These are critical for preventing air leaks, which can significantly affect engine performance. Common materials include paper, rubber, and cork.
Key Specs: These will vary depending on the engine model. Important specifications include:
- Carburetor Throat Size: The diameter of the carburetor bore, affecting airflow capacity.
- Jet Sizes (Main and Idle): Precisely calibrated to deliver the correct fuel flow. Often specified in thousandths of an inch.
- Float Height Setting: The distance the float should be from the carburetor body when the needle valve is closed. Crucial for proper fuel level.
Symbols in a Carburetor Diagram
Understanding the symbols used in a carburetor diagram is essential for accurate interpretation. Here’s a breakdown of common symbols:
- Solid Lines: Typically represent physical connections between parts or the path of fuel flow. Thicker lines may indicate larger passages or components.
- Dashed Lines: Often indicate linkages or control cables (e.g., choke or throttle linkage). They may also represent vacuum lines.
- Arrows: Show the direction of fuel or air flow.
- Circles/Ovals: Indicate openings or orifices, such as jets or air bleeds.
- Shaded Areas: Usually represent gaskets or seals.
- Cutaway Views: These illustrate the internal construction of a component, showing the internal passages and mechanisms.
- Exploded Views: Show how the carburetor is assembled, with parts separated to reveal their relative positions.
Pay close attention to note calls. These are numbers or letters on the diagram that correspond to specific descriptions in a legend or accompanying text. They often provide critical details about part numbers, torque specifications, or installation instructions.
How It Works
The carburetor's function is to precisely mix air and fuel in the correct ratio to create a combustible mixture for the engine. Here's a simplified explanation of the process:
- Air Intake: Air enters the carburetor through the air cleaner and passes through the carburetor bore.
- Venturi Effect: The carburetor bore narrows in a section called the venturi. As air flows through the venturi, its velocity increases, and its pressure decreases.
- Fuel Delivery: The low pressure in the venturi draws fuel from the float bowl, through the jets and emulsion tube, and into the airflow.
- Atomization: The fuel is atomized into fine droplets as it mixes with the air.
- Throttle Control: The throttle plate regulates the amount of air-fuel mixture entering the engine, controlling engine speed and power.
- Idle Circuit: At idle, when the throttle plate is nearly closed, a separate idle circuit provides a small amount of fuel to keep the engine running smoothly.
Real-World Use: Basic Troubleshooting
Here are some common carburetor-related issues and how the parts diagram can aid in troubleshooting:
- Engine won't start (especially when cold): This could be a choke issue. Check the choke plate and linkage to ensure it's closing properly. The diagram will show you the choke mechanism and how it's connected.
- Engine runs rough or stalls at idle: Likely an issue with the idle jet or idle mixture screw. The diagram will pinpoint the location of these components.
- Engine lacks power at high speed: Could be a clogged main jet. The diagram will show you where the main jet is located for cleaning or replacement.
- Fuel leaking from carburetor: May indicate a stuck float needle or a damaged float. The diagram will help you locate and inspect these parts.
- Black smoke from exhaust: Indicates a rich fuel mixture (too much fuel). Could be caused by a faulty float, a clogged air filter, or an improperly adjusted main jet.
When troubleshooting, always start with the basics: clean air filter, fresh fuel, and a properly functioning spark plug. Then, use the diagram to systematically inspect the carburetor components.
Safety Considerations
Working on carburetors involves handling flammable fuels. Exercise extreme caution to prevent fires or explosions.
- Work in a well-ventilated area.
- Keep open flames and sparks away.
- Disconnect the spark plug wire before working on the carburetor.
- Be careful when handling fuel lines; fuel can spray out under pressure.
- Properly dispose of fuel-soaked rags.
The main jet and needle valve are particularly sensitive components. Avoid using excessive force when tightening or loosening them, as they can be easily damaged. Also, gaskets are essential for sealing the carburetor, and any damaged or missing gaskets will cause air leaks that adversely affect the engine. Ensure you replace any worn or damaged gaskets during reassembly.
By carefully studying the Briggs & Stratton carburetor parts diagram and following these guidelines, you'll be well-equipped to diagnose, repair, and maintain your small engine for years to come. Remember to consult your specific engine's service manual for detailed instructions and torque specifications.
Ready to dive deeper? We have a detailed Briggs & Stratton carburetor parts diagram available for you to download. It's a valuable resource you can keep handy for all your carburetor projects.