Ceiling Lights For Living Room Without Wiring
Let's talk about a situation that pops up more often than you might think: wanting to add ceiling lights to a living room without the hassle and expense of running new electrical wiring. It's a common desire, whether you're renting, want to avoid tearing up drywall, or simply prefer a less intrusive solution. This article dives into how you can achieve that, focusing on practical, DIY-friendly methods and the underlying principles involved.
Purpose
Why are we even discussing this? Well, understanding how to install ceiling lights without traditional wiring has several benefits:
- Renovation & Upgrades: Allows you to add ambient or task lighting without extensive electrical work.
- Rental Friendly: Provides lighting solutions that can be easily removed without damaging the property, vital for renters.
- Cost Savings: Avoids the expense of hiring an electrician and purchasing wiring materials.
- Flexibility: Lets you experiment with different lighting configurations before committing to permanent wiring.
- Troubleshooting: Understanding these systems can help you diagnose issues with existing hardwired lights, even if you ultimately call in a professional.
Key Specs and Main Parts
The heart of a wireless ceiling light system lies in its ability to deliver power and control without physical wires running to your existing electrical grid. Here are the main components we'll be dealing with:
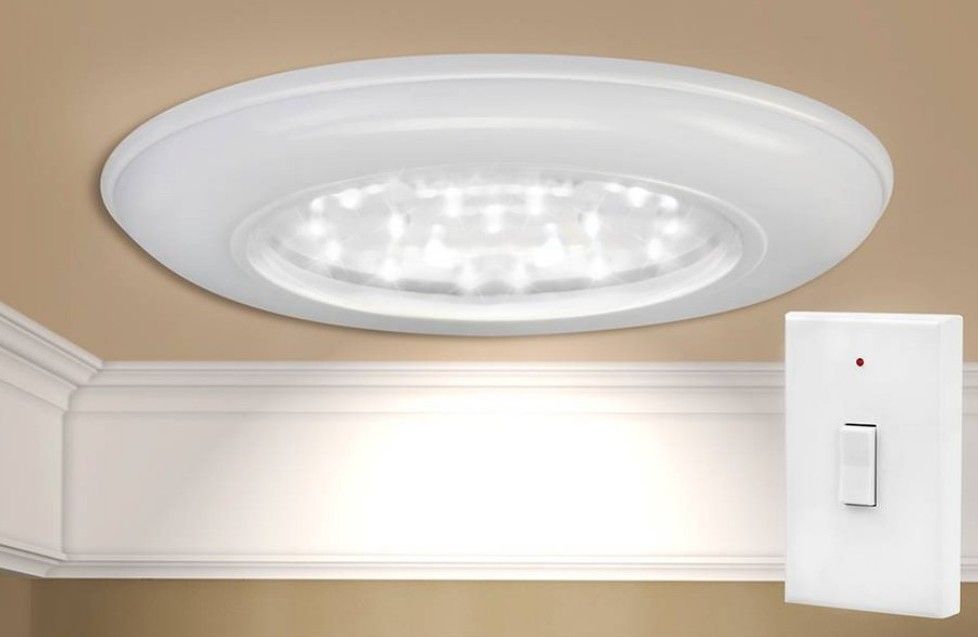
- Battery-Powered LED Fixtures: These are your actual light sources. They're typically LED-based for energy efficiency and long lifespan. Specifications to consider include:
- Lumen Output: (Brightness) Measured in lumens, indicating the total amount of visible light emitted. Higher lumens equal brighter light. Consider around 800-1600 lumens for general living room lighting.
- Color Temperature: Measured in Kelvin (K), this dictates the color of the light. Warmer temperatures (2700K - 3000K) are yellowish and create a cozy atmosphere, while cooler temperatures (4000K - 5000K) are whiter and better for task lighting.
- Battery Type & Capacity: Consider battery life and ease of replacement or recharging. Lithium-ion batteries are common. Battery capacity is measured in mAh (milliampere-hours) – higher mAh generally means longer run time.
- Beam Angle: The spread of the light. A wider beam angle is better for general illumination, while a narrower angle is good for spotlights.
- Wireless Receiver/Control Module: This unit receives signals from the remote or wall switch and controls the light fixture. It might be built into the fixture itself or a separate unit. The crucial spec here is compatibility – it needs to work with your chosen remote/switch.
- Wireless Remote or Wall Switch: These are used to turn the lights on/off and often control dimming and color temperature. They typically use radio frequency (RF) or Bluetooth to communicate with the receiver.
- Adhesive Mounting Plates or Hooks: These allow you to mount the light fixture to the ceiling without drilling or running wires. They are incredibly simple and can save you time.
- Power Source (for Remotes/Switches): This is usually a small battery (CR2032, AAA, etc.) in the remote or switch.
How It Works
The basic principle is replacing the wired connection with a wireless one. The light fixture has its own independent power source (the battery). The remote or wall switch sends a signal (RF or Bluetooth) to the receiver. The receiver interprets the signal and controls the light fixture – turning it on/off, dimming it, or changing the color temperature.
Think of it like this: Your car's key fob doesn't physically connect to the car to unlock the doors. It sends a radio signal that the car's receiver picks up and acts upon. The wireless ceiling light system operates on a similar principle.
Symbols
While we're not dealing with traditional wiring diagrams, understanding basic electrical symbols can still be helpful when dealing with battery types and voltage.
- + and -: Indicate positive and negative terminals of a battery. Always respect polarity when replacing batteries.
- V: Represents voltage. Make sure the battery voltage matches the requirements of the remote or light fixture.
- LED Symbol: A diode with arrows pointing away, signifying light emission.
- Ground Symbol (though not applicable here): A series of horizontal lines decreasing in size, usually a three pronged set of decreasing lines.
Since our "diagram" is more conceptual, think of it as a block diagram:
[Remote/Switch] --(Wireless Signal)--> [Receiver] --(Power from Battery)--> [LED Fixture]
Real-World Use – Basic Troubleshooting Tips
Even with a simple system, things can go wrong. Here are a few troubleshooting tips:
- Light Doesn't Turn On:
- Check the battery in the remote/switch.
- Check the battery in the light fixture. Are they properly seated? Are they discharged?
- Is the receiver properly paired with the remote/switch? Some systems require pairing or synchronization. Consult the manufacturer's instructions.
- Are there any obstructions blocking the wireless signal?
- If applicable, try resetting the light fixture or the remote.
- Light is Dim or Flickering:
- The battery is likely low. Replace it.
- If dimming is enabled, ensure it's set to the desired brightness level.
- Range Issues:
- Some wireless systems have limited range. Ensure the remote/switch is within the specified range of the receiver.
- Interference from other electronic devices can affect range. Try moving the remote/switch or the light fixture to a different location.
Safety
While this method avoids the dangers of working with mains electricity, there are still safety precautions to consider:
- Battery Handling: Do not puncture, crush, or incinerate batteries. Dispose of them properly at designated recycling centers.
- Weight Limits: Ensure that the adhesive mounting plates or hooks are rated to support the weight of the light fixture. Overloading them can lead to the fixture falling.
- Heat Dissipation: While LEDs generate minimal heat, avoid covering the fixture completely, as this could trap heat and reduce battery life.
- Moisture: These systems are generally not suitable for damp or wet locations (bathrooms, outdoors) unless specifically designed and rated for such environments.
- Inspect: Regularly inspect the mounting hardware to ensure it's secure.
The most crucial aspect here is not attempting to tap into existing electrical wiring without proper training and knowledge. That's where the real dangers lie. This article focuses on avoiding that altogether.
By understanding the components, how they interact, and the basic troubleshooting steps, you can confidently add ceiling lights to your living room without the need for traditional wiring. It's a convenient, cost-effective, and renter-friendly solution that opens up new possibilities for lighting design.
We have the detailed system diagram available as a downloadable PDF. If you're interested in a deeper dive into specific system architectures or want more detailed troubleshooting information, please contact us at [Your Contact Information].