
Chevy 350 Ignition Coil Wiring Diagram
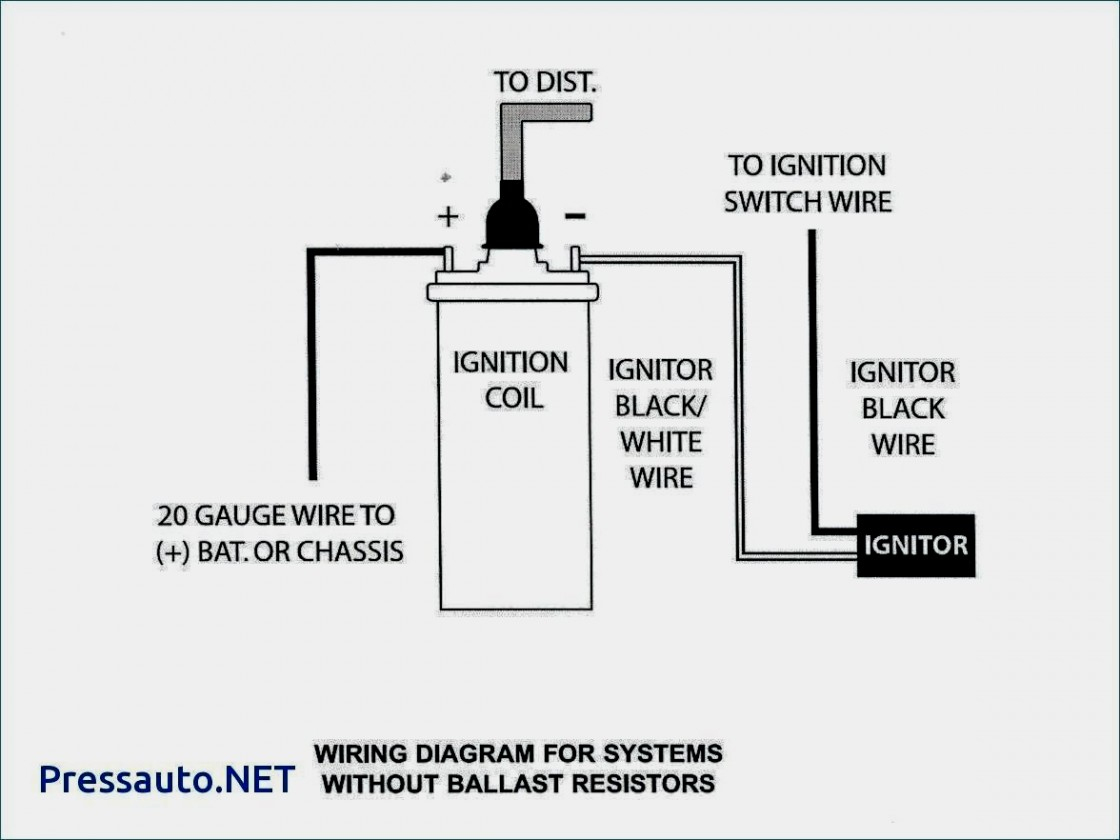
Let's dive into the world of Chevy 350 ignition coil wiring. Understanding the wiring diagram is crucial whether you're tackling a restoration, troubleshooting a no-start condition, or even considering performance modifications. We’ll break down everything you need to know to confidently navigate the ignition system of this iconic engine.
Purpose of the Ignition Coil Wiring Diagram
The ignition coil wiring diagram serves as a roadmap for the electrical components of the ignition system. Why is it important? Well, think of it as the key to several automotive endeavors:
- Diagnosis and Repair: When your Chevy 350 is experiencing ignition problems – misfires, rough running, or a complete failure to start – the wiring diagram helps you pinpoint the source of the problem. It allows you to trace circuits, test for voltage, and identify broken or shorted wires.
- Restoration Projects: Restoring a classic Chevy 350 often involves replacing wiring harnesses. The diagram ensures you connect everything correctly, maintaining the original functionality and safety of the ignition system.
- Performance Upgrades: If you're upgrading your ignition system with aftermarket coils or distributors, understanding the existing wiring is essential for proper integration and compatibility. You need to know where to tap into the system and how to connect the new components.
- General Learning: Even if you're not currently experiencing problems, understanding the diagram gives you a deeper understanding of how your engine works, improving your overall automotive knowledge.
Key Specs and Main Parts
Before we dive into the specifics of the diagram, let's identify the key components involved in the Chevy 350 ignition circuit. Keep in mind that the diagram may slightly vary depending on the year and model of your Chevy 350.
- Battery: Provides the initial electrical power to the system. Typically 12V DC.
- Ignition Switch: Controls the flow of power to the ignition system. Turning the key to the "start" or "run" position completes the circuit.
- Ballast Resistor (or Resistor Wire): Reduces the voltage to the ignition coil during normal running. This protects the coil from overheating and premature failure. This component may be a separate resistor or a length of resistance wire integrated into the harness. Older systems often used a ballast resistor while newer systems might use the resistance wire.
- Ignition Coil: A step-up transformer that converts the low-voltage (12V) from the battery into a high-voltage (20,000-40,000V) required to create a spark at the spark plugs.
- Distributor: Contains the points (in older systems) or an electronic module (in newer systems) that controls the timing of the spark. It also distributes the high-voltage spark to the correct spark plug at the correct time.
- Spark Plugs: Create the spark that ignites the air-fuel mixture in the engine cylinders.
- Wiring Harness: A bundle of wires that connects all the components together.
Symbols in the Wiring Diagram
Wiring diagrams use standard symbols to represent different components. Familiarizing yourself with these symbols is crucial for understanding the diagram:
- Solid Lines: Represent wires. The thickness of the line doesn't usually indicate wire gauge.
- Dashed Lines: Often indicate shielding or a connection to ground.
- Circles: Can represent various components like connectors or sensors.
- Rectangles: Often used for relays or electronic control modules.
- Zigzag Lines: Commonly used to represent resistors, including the ballast resistor.
- Coil Symbol: Represents the ignition coil itself. Usually shown as a series of loops.
- Ground Symbol: Indicates a connection to the vehicle's chassis, providing a return path for the current. Typically resembles an upside-down triangle or a series of decreasing horizontal lines.
- Color Codes: Wires are usually color-coded (e.g., Red for power, Black for ground). The diagram will typically have a legend explaining these color codes.
Understanding the color codes is critical. For example, a red wire with a white stripe might indicate a switched power source for a specific component.
How It Works: The Ignition Circuit
The Chevy 350 ignition circuit can be broken down into a few key stages:
- Power Supply: When you turn the ignition key to the "run" or "start" position, power is supplied from the battery to the ignition switch.
- Voltage Reduction (Ballast Resistor): The voltage is then reduced by the ballast resistor or resistance wire before reaching the ignition coil. This protects the coil from overheating, especially during extended periods of operation. Why not just run lower voltage all the time? Starting the engine requires a stronger spark, so the ballast resistor is often bypassed during the cranking phase to provide full battery voltage to the coil.
- Voltage Transformation (Ignition Coil): The ignition coil then steps up the voltage from 12V (or reduced voltage from the ballast resistor) to the thousands of volts necessary to create a spark. This process relies on the principle of electromagnetic induction. The coil consists of two windings: a primary winding and a secondary winding. When current flows through the primary winding, it creates a magnetic field. When the current flow is interrupted (by the points or electronic module), the magnetic field collapses, inducing a high-voltage surge in the secondary winding.
- Spark Distribution (Distributor): The high-voltage electricity is then sent to the distributor. The distributor’s rotor spins and directs the high voltage to the correct spark plug based on the engine's firing order.
- Spark Ignition (Spark Plugs): The high-voltage electricity jumps the gap at the spark plug, creating a spark that ignites the air-fuel mixture in the cylinder, initiating the combustion process.
Real-World Use: Basic Troubleshooting Tips
Let's say your Chevy 350 won't start. Here's how the wiring diagram can help:
- No Spark at Spark Plugs: Use a spark tester to confirm no spark. Then, use the wiring diagram to trace the circuit backwards from the spark plug to the coil.
- Check Voltage at Coil: Use a multimeter to check for voltage at the coil's primary terminals. If there's no voltage, trace back to the ignition switch and battery, checking for blown fuses or broken wires along the way.
- Check Resistance of Ballast Resistor: Use a multimeter to check the resistance of the ballast resistor (if equipped). An open resistor will prevent voltage from reaching the coil.
- Inspect Wiring Connections: Visually inspect all wiring connections for corrosion, looseness, or damage. Clean and tighten any suspect connections.
- Test the Ignition Module: If your engine has an electronic ignition module, you may need a specialized tester to diagnose it. The wiring diagram will help you locate the module and identify the correct test points.
Safety Considerations
Working with the ignition system involves high voltage, so safety is paramount:
- Disconnect the Battery: Always disconnect the negative battery cable before working on the ignition system to prevent accidental shocks or short circuits.
- High Voltage: Be extremely careful when working around the ignition coil and spark plug wires. The high voltage can cause serious injury or even death. Avoid touching these components while the engine is running or being cranked.
- Fuel Vapors: Be aware of the potential for fuel vapors when working on the ignition system. Work in a well-ventilated area and avoid smoking or open flames.
- Capacitor Discharge: Some older ignition systems have capacitors that can store a charge even after the battery is disconnected. Be sure to discharge any capacitors before handling them.
Important Note: Always consult your specific vehicle's repair manual for detailed instructions and safety precautions before working on the ignition system.
We have a detailed Chevy 350 ignition coil wiring diagram available for download. This diagram will be invaluable for troubleshooting and repairing your engine. You can download the file here.
By understanding the components, the wiring diagram, and some basic troubleshooting techniques, you'll be well-equipped to tackle common ignition problems on your Chevy 350.