Chevy 350 Power Steering Pump Bracket Diagram
Alright, let's dive into the Chevy 350 power steering pump bracket diagram. If you're wrenching on a small block Chevy, whether it's for a restoration, a performance upgrade, or just plain old maintenance, understanding this system is crucial. This isn't just about bolting something on; it's about ensuring proper alignment, belt tension, and, most importantly, reliable steering. Trust me, the last thing you want is your power steering failing at the worst possible moment.
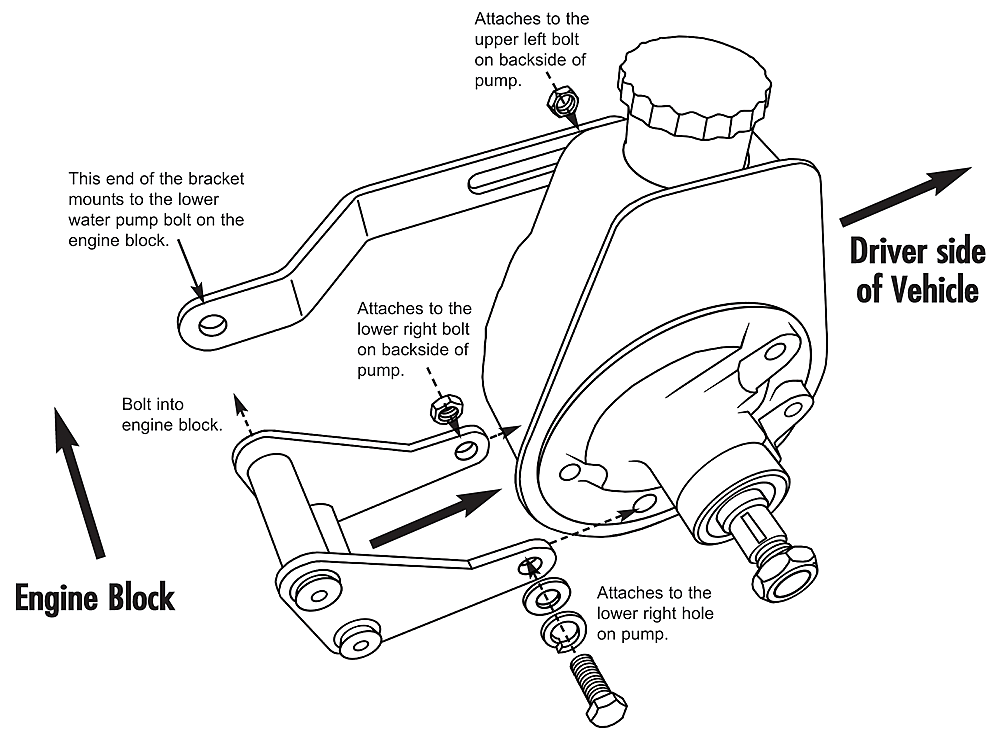
Purpose of Understanding the Diagram
Why bother with a diagram? Simple: accuracy and safety. Whether you're replacing a worn-out bracket, swapping to a different power steering pump, or even just trying to figure out why your belt keeps squealing, the diagram serves as your roadmap. It ensures you have the correct components, installed in the correct order, with the proper torque. It's also invaluable for diagnosing issues. Seeing how everything is supposed to fit together can instantly highlight what's out of whack. Moreover, if you plan to enhance the performance of your Chevy 350 engine, a thorough understanding of how each component, including the power steering system, fits in the grand scheme is critical. It helps prevent compatibility issues and ensures smooth integration. It’s about preventing catastrophic failures that can lead to hefty repair bills or, worse, dangerous driving conditions.
Key Specs and Main Parts
The Chevy 350, despite its widespread use, had variations in power steering bracket designs depending on the year, model, and accessories. Knowing the specific year and application of your engine is crucial. Here's a breakdown of the typical components involved:
- Power Steering Pump: This is the heart of the system, providing the hydraulic pressure that assists your steering. Pumps can vary based on flow rate and reservoir style.
- Mounting Bracket(s): These are the metal pieces that secure the power steering pump to the engine block or cylinder head. These can be single-piece or multi-piece designs. They’re usually made of steel or aluminum.
- Adjustment Bracket: This bracket allows you to adjust the tension of the power steering belt. It usually pivots around a bolt and has a slot for adjustment.
- Fasteners (Bolts, Washers, Nuts): Torque specifications are critical for these. Too loose, and the pump can vibrate; too tight, and you risk damaging the bracket or engine block.
- Belt: The V-belt or serpentine belt transfers power from the crankshaft pulley to the power steering pump.
- Pulley: Attached to the power steering pump, this receives the belt's power.
- Hoses (Pressure and Return): These hoses carry hydraulic fluid between the pump and the steering gear.
Key Specs:
- Torque Specs: These are *crucial*. Always consult a repair manual for the specific torque values for each bolt. Under-torquing can lead to vibration and loosening, while over-torquing can strip threads or damage the bracket. Common values range from 25-35 ft-lbs for the main bracket bolts, but *always verify*.
- Belt Tension: Too loose, and the belt will slip and squeal. Too tight, and it will put excessive stress on the pump bearings. A good rule of thumb is to aim for about 1/4" to 1/2" of deflection in the belt at its longest span.
- Bolt Sizes and Thread Pitch: Using the wrong bolts can damage the threads in the engine block or bracket. A thread gauge and caliper are your friends here.
Symbols and Diagram Interpretation
A good diagram uses standardized symbols to represent components and connections. Here’s a simplified guide:
- Solid Lines: Typically represent physical connections (e.g., the bracket itself).
- Dashed Lines: Might indicate hidden components or the path of the belt.
- Arrows: Show the direction of belt rotation or fluid flow.
- Circles or Ovals: Often represent bolt holes or mounting points.
- Numbers: Usually correspond to a parts list, indicating the specific name or part number of each component.
- Colors: Some diagrams use colors to differentiate between components or systems. For instance, blue might represent hydraulic lines.
- Icons: Could represent specific types of fasteners (e.g., a bolt head icon).
Understanding the *orientation* in the diagram is also key. Most diagrams will show the engine from a specific viewpoint (e.g., front, side). This helps you visualize how the components fit together in the engine bay.
How It Works: The Power Steering System
The system's purpose is to reduce the effort needed to steer your vehicle. The power steering pump, driven by the engine via the belt, draws hydraulic fluid from the reservoir and pressurizes it. This high-pressure fluid is then delivered to the power steering gear (or rack and pinion) via a pressure hose. Inside the gear, the fluid assists the driver's steering input, making it easier to turn the wheels. A return hose then carries the fluid back to the reservoir, completing the cycle.
The brackets play a crucial role by securely mounting the pump and ensuring proper belt alignment. Misalignment can lead to belt slippage, premature wear, and even pump failure. The adjustment bracket allows you to maintain the correct belt tension, which is essential for optimal performance. A correctly tensioned belt will effectively transfer the engine's power to the pump without causing excessive wear on the pump's bearings or the belt itself.
Real-World Use and Basic Troubleshooting
Here are a few common issues you might encounter:
- Squealing Belt: Often caused by a loose belt. Try tightening the adjustment bracket. If the belt is old or cracked, replace it.
- No Power Steering: Could be a low fluid level, a failing pump, or a broken belt. Check the fluid level first. If it's low, top it off and look for leaks. If the belt is broken, replace it and inspect the pulleys for damage. If the fluid level is good and the belt is intact, the pump may be failing.
- Leaking Fluid: Inspect the hoses and pump seals for leaks. Replace any damaged components.
- Vibration: Could be due to loose brackets or a failing pump. Tighten the bracket bolts to the specified torque. If the vibration persists, the pump may need to be replaced.
When troubleshooting, always start with the simplest solutions first. Check the fluid level, belt tension, and visible connections before moving on to more complex diagnostic procedures. Listen carefully for unusual noises, such as squealing, grinding, or whining, as these can provide valuable clues about the source of the problem.
Safety First
Hydraulic fluid is under high pressure in this system. Never disconnect hoses or fittings while the engine is running. Always relieve the pressure by turning off the engine and allowing it to cool down. Power steering fluid can also be harmful if ingested or if it comes into contact with your skin. Wear gloves and eye protection when working with the system. Also, be mindful of rotating parts like the belt and pulleys. Keep your hands and tools clear of these components while the engine is running.
The pulley is particularly dangerous. If your hands or tools get caught in the belt, severe injuries may result. If there is a need to run the engine, remove the belt, make the repair and then put the belt back on.
Working on the power steering system requires patience and attention to detail. By understanding the components, their function, and the proper installation procedures, you can ensure the reliable and safe operation of your Chevy 350's power steering system. Remember to always consult a repair manual for specific torque values and procedures for your vehicle.
We have the Chevy 350 power steering pump bracket diagram file ready for you to download. This visual aid will significantly assist you in understanding the components and their correct placement during your repair or modification projects.