
Chevy Colorado Serpentine Belt Diagram
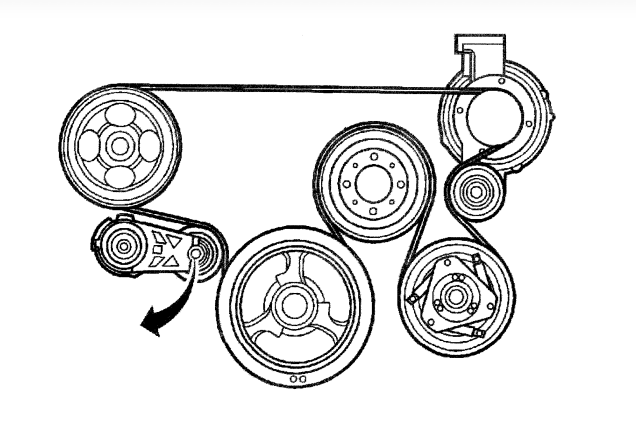
The serpentine belt, also known as the accessory drive belt, is a vital component in your Chevy Colorado's engine. It's responsible for powering numerous essential systems, and understanding its routing is crucial for maintenance, troubleshooting, and even certain performance modifications. This article provides a comprehensive breakdown of the Colorado's serpentine belt diagram, empowering you to confidently tackle related repairs and enhancements.
Purpose of the Serpentine Belt Diagram
The serpentine belt diagram isn't just a pretty picture; it's an indispensable tool for several reasons:
- Replacement: The most common use is to ensure the correct routing when replacing a worn or broken serpentine belt. Installing the belt incorrectly can lead to serious engine damage and system failures.
- Troubleshooting: A quick reference to the diagram can help diagnose issues related to belt slippage, noise, or component failure. By visually tracing the belt's path, you can isolate potential problems.
- Maintenance: The diagram aids in inspecting the belt for wear and tear, verifying proper tension, and confirming alignment of pulleys.
- Modification: When adding or modifying accessories, such as a supercharger or high-output alternator, the diagram is essential for planning belt routing and ensuring compatibility.
- Learning: Studying the diagram provides a deeper understanding of your engine's accessory drive system and its overall operation.
Key Specs and Main Parts
The specific serpentine belt diagram will vary slightly depending on your Colorado's engine and model year. However, the core components and principles remain the same. Here's a breakdown of the essential parts and considerations:
Engine Variants
The Chevy Colorado has been offered with several engine options, each having its own specific serpentine belt arrangement. Common engines include:
- 2.5L Inline-4: Generally a simpler routing compared to the V6.
- 3.6L V6: A more complex routing, often with more accessories.
- 2.8L Duramax Diesel: Distinct routing specific to the diesel engine's components.
Always consult the diagram specific to your exact engine and model year. This information is usually found in your owner's manual, a service manual, or online databases.
Main Components Driven by the Serpentine Belt
- Crankshaft Pulley (Harmonic Balancer): This pulley is directly connected to the crankshaft and provides the rotational power to drive the belt.
- Alternator: Generates electrical power for the vehicle.
- Power Steering Pump: Provides hydraulic pressure to assist steering.
- Air Conditioning Compressor: Compresses refrigerant for the air conditioning system.
- Water Pump: Circulates coolant throughout the engine to regulate temperature. (Note: some Colorado models might have an electrically driven water pump).
- Tensioner Pulley: Maintains proper tension on the belt. This is crucial for optimal performance and preventing slippage. A failing tensioner can cause belt noise, premature wear, and even component damage.
- Idler Pulley(s): Guide the belt and provide necessary wrap around other pulleys. They don't drive any accessories.
Belt Length: The serpentine belt's length is critical. Using the wrong size can result in improper tension, slippage, and potential damage to the belt and driven components. Refer to your vehicle's specifications for the correct belt length.
Understanding Serpentine Belt Diagram Symbols
Serpentine belt diagrams use a variety of symbols to convey information efficiently. Here's a breakdown of common symbols:
- Solid Lines: Represent the path of the belt. Heavier lines may indicate the *front* of the belt.
- Dashed Lines: Often indicate the *back* of the belt, showing how it wraps around pulleys.
- Arrows: Indicate the direction of belt rotation. Pay close attention to these!
- Pulley Symbols: Represent the different pulleys. They may be labeled with abbreviations (e.g., ALT for alternator, P/S for power steering).
- Tensioner Symbol: A distinct symbol, often with an arrow indicating the direction of its movement.
Some diagrams might use colors to differentiate between the belt's front and back, or to highlight specific sections of the routing. A legend is always provided to explain the symbols used in a specific diagram.
How It Works
The serpentine belt system operates on a simple principle: rotational force from the engine's crankshaft is transferred via the belt to power various accessories. The crankshaft pulley drives the belt, which in turn rotates the pulleys of the alternator, power steering pump, A/C compressor, and water pump. The tensioner pulley maintains constant tension on the belt, ensuring optimal grip and preventing slippage.
Belt Tension: Proper belt tension is crucial. Too loose, and the belt will slip, leading to reduced performance of the accessories and potential overheating (due to a poorly driven water pump). Too tight, and it can overload the bearings in the accessories, leading to premature failure.
Belt Wrap: The amount of belt contact (wrap) around each pulley is important for efficient power transfer. Idler pulleys are strategically placed to increase the wrap angle on certain pulleys, especially those requiring significant power.
Real-World Use: Basic Troubleshooting Tips
Knowing the serpentine belt diagram can help diagnose several common issues:
- Squealing Noise: Often indicates belt slippage, usually due to a worn belt, loose tensioner, or contaminated pulleys. Visually inspect the belt for cracks, glazing, or debris. Check the tensioner for smooth operation and proper tension.
- Belt Wear: Examine the belt for cracks, fraying, missing chunks, or glazing. These are all signs of wear and necessitate replacement. Use the diagram to ensure the new belt is routed correctly.
- Accessory Failure: If an accessory (e.g., alternator, power steering pump) stops working, check if the belt is properly driving its pulley. A broken or slipped belt could be the cause.
- Visual Inspection: Regularly inspect the belt's condition. Look for anything that deviates from its original appearance.
Troubleshooting Tip: If you're unsure about the correct belt routing, take a picture *before* removing the old belt. This provides a valuable reference point.
Safety Precautions
Working on the serpentine belt system involves inherent risks:
- Engine Off: Always ensure the engine is completely off and the key is removed from the ignition before working on the serpentine belt system. Accidental engine start can cause severe injury.
- Hot Engine: Allow the engine to cool down completely before working on the belt system. Exhaust manifolds and other engine components can be extremely hot and cause burns.
- Moving Parts: Keep your hands and clothing clear of the belt and pulleys while the engine is running. Contact with moving parts can result in serious injury.
- Eye Protection: Wear safety glasses to protect your eyes from debris.
- Tensioner Release: Be cautious when releasing the belt tensioner. It can snap back with considerable force. Use the correct tools and techniques to release the tension slowly and safely.
High-Risk Components: The tensioner pulley and the area around the crankshaft pulley are particularly risky due to their moving parts and potential for trapping fingers.
We have the file, and you can download the serpentine belt diagram for your Chevy Colorado, specific to its year and engine configuration, to assist you in your repairs and maintenance. This resource will provide a visual guide and detailed instructions for proper belt routing and tensioning.