
Chevy Express Van Vacuum Hose Diagram
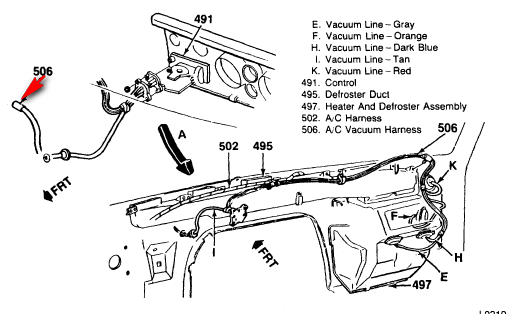
Alright, let's dive into the vacuum hose system on your Chevy Express Van. This network of hoses might seem insignificant, but it's crucial for various engine and accessory functions. Understanding the vacuum hose diagram is essential for proper maintenance, troubleshooting, and even performance modifications. Consider this your comprehensive guide.
Purpose: Why Bother with the Vacuum Hose Diagram?
Think of the vacuum hose system as the nervous system of your engine's supporting functions. It utilizes manifold vacuum – the negative pressure created within the intake manifold during engine operation – to actuate everything from power brakes and climate control to emission control devices. A leak in this system can manifest in a multitude of issues, including:
- Poor engine performance (rough idle, hesitation, stalling)
- Reduced fuel economy
- Faulty climate control (inoperative vents)
- Brake problems (hard brake pedal)
- Check engine light illumination (due to incorrect air/fuel mixture or emissions issues)
- Failed emissions tests
Having access to and understanding the vacuum hose diagram allows you to:
- Accurately diagnose vacuum leaks.
- Replace damaged or deteriorated hoses.
- Ensure proper routing of hoses after engine repairs or modifications.
- Understand the interaction of various engine components.
Key Specs and Main Parts of the Chevy Express Van Vacuum System
While the specifics vary depending on the model year, engine size (4.3L V6, 5.3L V8, 6.0L V8, etc.), and options package, certain components are common to most Chevy Express Van vacuum systems:
- Intake Manifold: The source of the vacuum. The amount of vacuum depends on engine load.
- Vacuum Reservoir (Canister): A holding tank that stores vacuum to ensure consistent operation of vacuum-operated accessories, even under heavy engine load when vacuum is low.
- Vacuum Hoses: Specialized rubber or silicone hoses designed to withstand vacuum pressure. Different sizes and materials may be used for different applications.
- Check Valves: One-way valves that prevent vacuum from bleeding back into the manifold. They ensure that vacuum is maintained in specific parts of the system.
- PCV Valve (Positive Crankcase Ventilation Valve): This valve uses manifold vacuum to draw crankcase gases into the intake manifold for combustion, reducing emissions.
- EGR Valve (Exhaust Gas Recirculation Valve): Uses vacuum to open and allow exhaust gases to be recirculated back into the intake manifold, reducing NOx emissions. (Note: EGR systems may vary by year and engine).
- EVAP System Components: (Evaporative Emission Control System) These include components like the purge valve, which uses vacuum to draw fuel vapors from the charcoal canister into the intake manifold.
- Brake Booster: Uses vacuum to assist the driver in applying the brakes, making it easier to stop the vehicle.
- HVAC Controls: Vacuum actuators control the blend doors and mode doors within the HVAC system, directing airflow to different vents.
Vacuum Hose Materials: Most vacuum hoses are made of reinforced rubber, but silicone hoses are a popular upgrade for their durability and resistance to heat and ozone. Silicone hoses are less prone to cracking and dry-rotting.
Understanding Vacuum Hose Diagram Symbols
Vacuum hose diagrams aren't always intuitive. Here's a breakdown of common symbols you'll encounter:
- Solid Lines: Typically represent vacuum hoses. The thickness may indicate hose diameter, but this isn't always consistent.
- Dashed Lines: May indicate a signal line or a control line within a system. Sometimes used for wiring, so cross-reference with other diagrams.
- Arrows: Indicate the direction of airflow (vacuum).
- Circles or Rectangles: Represent components like valves, reservoirs, or actuators.
- Color Coding: Some diagrams use color coding to differentiate between different systems or hose types. Refer to the diagram's legend for specific color meanings.
Important Note: Diagram conventions can vary between manufacturers and even between different years of the same model. Always refer to the specific diagram for your Chevy Express Van.
How It Works: A Simplified Explanation
The engine's intake manifold is the heart of the vacuum system. When the engine is running, the pistons create a vacuum within the intake manifold. This vacuum is then distributed through a network of hoses to various components.
For example, the brake booster uses manifold vacuum to multiply the force you apply to the brake pedal. The PCV valve uses vacuum to draw crankcase gases back into the engine for combustion. The HVAC system uses vacuum to actuate doors that control airflow inside the cabin. The EVAP system uses vacuum to purge fuel vapors from the charcoal canister, preventing them from being released into the atmosphere.
The system relies on pressure differentials. A vacuum is essentially a lower pressure than atmospheric pressure. Components are designed to react to this pressure difference, causing them to move or operate.
Real-World Use: Basic Troubleshooting Tips
If you suspect a vacuum leak, here are a few basic troubleshooting steps:
- Visual Inspection: Carefully inspect all vacuum hoses for cracks, splits, or loose connections. Pay close attention to areas near heat sources or where hoses are bent sharply.
- Audible Check: Listen for hissing sounds, which can indicate a vacuum leak. A mechanic's stethoscope can help you pinpoint the source of the noise.
- Smoke Test: This is a more advanced technique that involves introducing smoke into the vacuum system. The smoke will escape from any leaks, making them easy to identify.
- Carburetor Cleaner Test (Use with Caution): Briefly spray carburetor cleaner (or starter fluid) near suspected leak areas. If the engine's idle speed changes, it indicates a leak. Be extremely cautious as carburetor cleaner is flammable and can damage paint. Avoid spraying near hot engine components.
- Vacuum Gauge Test: Connect a vacuum gauge to a known vacuum source (e.g., the intake manifold). A reading that is lower than expected can indicate a vacuum leak.
When replacing vacuum hoses, always use hoses of the correct size and type. Generic vacuum hose can collapse under vacuum, leading to problems. Always refer to your specific diagram and replace hoses with those that have the same inner diameter and material.
Safety Considerations
While working on the vacuum system is generally safe, be aware of a few potential hazards:
- Hot Engine Components: Avoid touching hot exhaust manifolds or other engine parts while working on the vacuum system.
- Fuel Lines: Be careful not to damage fuel lines or other fuel system components.
- Electrical Components: Be mindful of electrical wiring and connectors. Disconnect the negative battery cable before working on any electrical components.
- Sharp Edges: Watch out for sharp edges on engine components or tools.
- Carburetor Cleaner: As previously mentioned, carburetor cleaner is flammable. Use it sparingly and in a well-ventilated area.
The brake booster is a critical safety component. If you suspect a problem with the brake booster or its vacuum supply, have it inspected by a qualified mechanic immediately.
Finally, remember that diagnosing vacuum problems can be complex. If you're not comfortable performing these tasks yourself, seek the help of a professional mechanic.
We have a comprehensive Chevy Express Van vacuum hose diagram available for download. This diagram will provide you with detailed information about the vacuum hose routing on your specific vehicle.