Chevy Malibu Serpentine Belt Diagram
The serpentine belt in your Chevy Malibu is a critical component, responsible for powering various engine accessories. Understanding its routing, tension, and condition is crucial for maintaining your car's reliability and preventing inconvenient breakdowns. This article will provide a detailed breakdown of the Malibu's serpentine belt diagram, equipping you with the knowledge to diagnose issues, perform replacements, and ensure optimal performance.
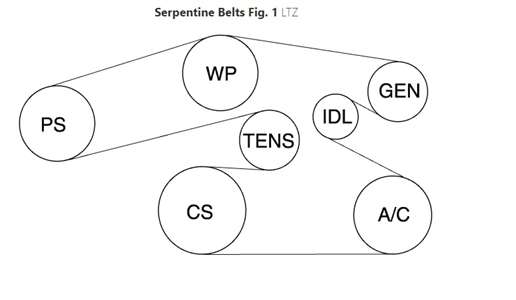
Purpose of the Serpentine Belt Diagram
The serpentine belt diagram serves as a visual guide to the routing of the belt around various pulleys in your engine bay. It's indispensable for several reasons:
- Belt Replacement: A correct diagram is essential when replacing a worn or damaged serpentine belt. Installing the belt incorrectly can lead to accessory failure, belt slippage, and even engine damage.
- Troubleshooting: When diagnosing accessory problems like a non-functioning air conditioner or power steering, the diagram helps you trace the belt's path and identify potential issues, such as a seized pulley or a worn tensioner.
- Understanding System Layout: Familiarizing yourself with the diagram improves your overall understanding of the engine's accessory drive system.
- General Maintenance: The diagram can be used when performing routine maintenance, helping you to check the belt's condition and identify any misalignment or wear.
Key Specs and Main Parts of the Serpentine Belt System
Before diving into the diagram, let's review the key components:
- Serpentine Belt: A single, continuous belt made of reinforced rubber, transmitting power from the crankshaft to the various accessories.
- Crankshaft Pulley: The driving pulley connected directly to the engine's crankshaft. It's the source of power for the entire system.
- Alternator Pulley: Driven by the serpentine belt, the alternator generates electrical power for the car.
- Water Pump Pulley: The water pump circulates coolant throughout the engine, preventing overheating.
- Power Steering Pump Pulley: Powers the power steering system, making steering easier.
- Air Conditioning Compressor Pulley: Powers the air conditioning compressor, providing cooling.
- Tensioner Pulley: A spring-loaded or hydraulic mechanism that maintains proper tension on the serpentine belt. Proper tension is crucial for preventing slippage and premature wear.
- Idler Pulley: A smooth pulley that guides the belt around the engine, optimizing its routing and preventing interference.
Specifics for Chevy Malibu (example): While variations exist based on the engine (e.g., 2.4L Ecotec, 2.0L Turbo, 3.6L V6), the basic components remain the same. Belt length and pulley placement will differ. Typical belt lengths range from 80 to 95 inches. Always verify the correct belt length for your specific Malibu year and engine with your local parts store.
Symbols and Diagram Interpretation
The serpentine belt diagram utilizes various symbols to represent different components and belt routing.
- Solid Lines: Represent the path of the *outer* surface of the serpentine belt. This is the surface that contacts the pulleys.
- Dotted Lines: Sometimes used to indicate the belt's path *behind* other components or through tight spaces. They show how the belt weaves through the engine bay.
- Arrows: Indicate the direction of belt rotation. Understanding the rotation helps visualize how each accessory is driven.
- Pulley Icons: Simple circles or stylized drawings represent the pulleys. Labels adjacent to the icons identify each component (e.g., ALT for alternator, P/S for power steering, A/C for air conditioning).
- Tensioner Indicator: The tensioner pulley is often depicted with an arrow showing the direction of its spring-loaded movement. This arrow indicates the direction the tensioner moves to *increase* belt tension.
- Diagram Orientation: Pay attention to the diagram's orientation relative to your engine bay. Some diagrams are viewed from the front of the car, while others are from the top.
Color Coding (less common but possible): Some diagrams may use color coding to differentiate sections of the belt or specific components. A key will always be provided if color is used.
How It Works: Power Transmission
The serpentine belt system operates on a simple principle: power transmission through friction. The crankshaft pulley, driven by the engine's rotational force, turns the serpentine belt. The belt, in turn, wraps around and drives the pulleys of the accessories. The tensioner pulley maintains the necessary friction between the belt and the pulleys, preventing slippage. Without proper tension, accessories will not function efficiently, leading to problems such as weak air conditioning, poor power steering, or a charging system failure. The routing is designed to provide sufficient "wrap" around each pulley to maximize grip. More critical components such as the alternator and the water pump often have a greater degree of wrap to ensure they keep spinning under all operating conditions.
Real-World Use: Basic Troubleshooting Tips
Using the serpentine belt diagram, you can perform basic troubleshooting. Here are a few scenarios:
- Squealing Noise: A squealing noise, especially when starting the engine or turning the steering wheel, often indicates a loose serpentine belt. Use the diagram to locate the tensioner and check its condition. The tensioner should maintain consistent pressure on the belt. If the tensioner is weak or seized, it needs to be replaced.
- Accessory Failure: If an accessory stops working (e.g., no air conditioning), verify that the serpentine belt is properly routed and tensioned. Check that the belt is making good contact with the A/C compressor pulley and that the pulley isn't seized. Use the diagram to confirm the correct routing.
- Belt Wear: Regularly inspect the serpentine belt for cracks, fraying, or missing chunks. Follow the diagram to visually inspect the entire length of the belt. Replace the belt if any significant wear is observed. A failing belt can strand you.
- Misalignment: Visually inspect the pulleys to ensure they are aligned. Misalignment can cause premature belt wear and accessory failure. Use a straight edge to check if the pulleys are parallel.
Common Problems: The most common issue is a worn or failing tensioner. When the tensioner fails to maintain proper tension, the belt slips, causing noise and accessory malfunctions. Another common problem is oil contamination on the belt, usually from leaking valve cover gaskets or other engine seals. Oil degrades the rubber and causes the belt to slip and fail prematurely.
Safety Precautions
Working on the serpentine belt system involves inherent risks. Always take the following precautions:
- Disconnect the Battery: Before working on any part of the engine, disconnect the negative battery cable to prevent accidental electrical shocks.
- Engine Coolant: Be careful working around the water pump. The system is pressurized.
- Hot Engine: Never work on the serpentine belt system when the engine is hot. Allow the engine to cool completely before starting any repairs.
- Moving Parts: The serpentine belt system contains numerous moving parts. Keep your hands, clothing, and tools clear of the belt and pulleys when the engine is running. Serious injury can result from contact with a rotating serpentine belt.
- Eye Protection: Wear safety glasses to protect your eyes from debris.
- Consult a Professional: If you are unsure about any aspect of the repair, consult a qualified mechanic.
Specific Hazards: The alternator is a high-voltage component. Ensure the battery is disconnected before working near it. The tensioner pulley spring is under significant tension. Use caution when removing or installing the tensioner to prevent injury.
Important Note on Belt Installation
After installing a new serpentine belt, it is good practice to double-check its routing against the diagram. Start the engine and briefly observe the belt's operation, listening for any unusual noises and ensuring that all accessories are functioning correctly. It's also a good idea to re-tension the belt after a short break-in period (e.g., 100 miles) as new belts can stretch slightly.
This guide provides a comprehensive overview of the Chevy Malibu's serpentine belt system and how to interpret the diagram. By understanding the components, routing, and troubleshooting techniques, you can confidently maintain your car's reliability and prevent costly repairs.
We have a high-resolution version of the serpentine belt diagram available for download. It includes detailed views and engine-specific variations to ensure you have the right information for your Chevy Malibu. Contact us to get a link.