Chevy Silverado Radio Wiring Diagram
Understanding your Chevy Silverado's radio wiring diagram is crucial for a variety of reasons, ranging from simple radio replacement to more complex modifications involving the audio system. Whether you're tackling a repair, upgrading your head unit, installing new speakers, or simply trying to diagnose an audio issue, having a clear understanding of the wiring is paramount. This article will break down the key aspects of a Silverado radio wiring diagram, offering you a comprehensive guide to navigate its complexities.
Purpose of the Radio Wiring Diagram
The radio wiring diagram serves as a roadmap for your Silverado's audio system. It details every wire, connector, and component, showing you precisely how they interconnect. This is invaluable for:
- Radio Replacement: Matching the wires from your new head unit to the correct wires in your Silverado's harness is essential for a proper install.
- Speaker Upgrades: Understanding speaker wiring allows you to correctly connect aftermarket speakers, amplifiers, and subwoofers.
- Troubleshooting Audio Problems: When your radio isn't working correctly, the diagram helps you trace the signal path and identify potential faults.
- Installing Aftermarket Accessories: Connecting accessories like backup cameras, satellite radio, or Bluetooth adapters requires knowledge of the wiring.
- Preventing Electrical Damage: Incorrect wiring can lead to short circuits and blown fuses, potentially damaging your vehicle's electrical system. A diagram helps you avoid these costly mistakes.
- Learning and Customization: For those interested in automotive electronics, understanding the wiring diagram is a great way to learn about how the audio system functions and how to customize it.
Key Specs and Main Parts of the Silverado Radio Wiring
The complexity of a Silverado radio wiring system varies depending on the year, trim level, and optional features your truck is equipped with. However, some core components and wiring aspects remain consistent. Familiarizing yourself with these is key to interpreting the wiring diagram.
Main Parts:
- Head Unit (Radio): The central control unit for the audio system. It processes audio signals, controls volume, and displays information.
- Speakers: Convert electrical signals into audible sound. Silverado's typically have front, rear, and sometimes center channel speakers.
- Amplifier (if equipped): Boosts the audio signal from the head unit before sending it to the speakers. Found in premium audio systems.
- Wiring Harness: A bundle of wires connecting the head unit to the vehicle's electrical system and speakers. Contains various wires for power, ground, audio signals, and control functions.
- Antenna: Receives radio signals.
- OnStar Module (if equipped): Connects to the radio system and provides communication and navigation features.
- Steering Wheel Controls (if equipped): Allow you to control the radio functions from the steering wheel.
Key Specs:
- Voltage: Typically 12V DC (Direct Current).
- Wire Gauge: The thickness of the wires, usually specified in American Wire Gauge (AWG). Lower numbers indicate thicker wires. Thicker wires are used for power and ground, while thinner wires are used for audio signals.
- Impedance: The resistance of the speakers to the flow of alternating current (AC), measured in ohms (Ω). Most car speakers are 4 ohms. Mismatching impedance can damage the amplifier or speakers.
- Power Handling: The maximum power (in watts) that the speakers can handle without damage.
Understanding Wiring Diagram Symbols
Radio wiring diagrams use specific symbols to represent different components and connections. Mastering these symbols is essential for deciphering the diagram.
Lines:
- Solid Lines: Represent wires.
- Dashed Lines: May represent shielded cables or ground connections.
- Arrows: Indicate the direction of current flow or signal direction.
Colors:
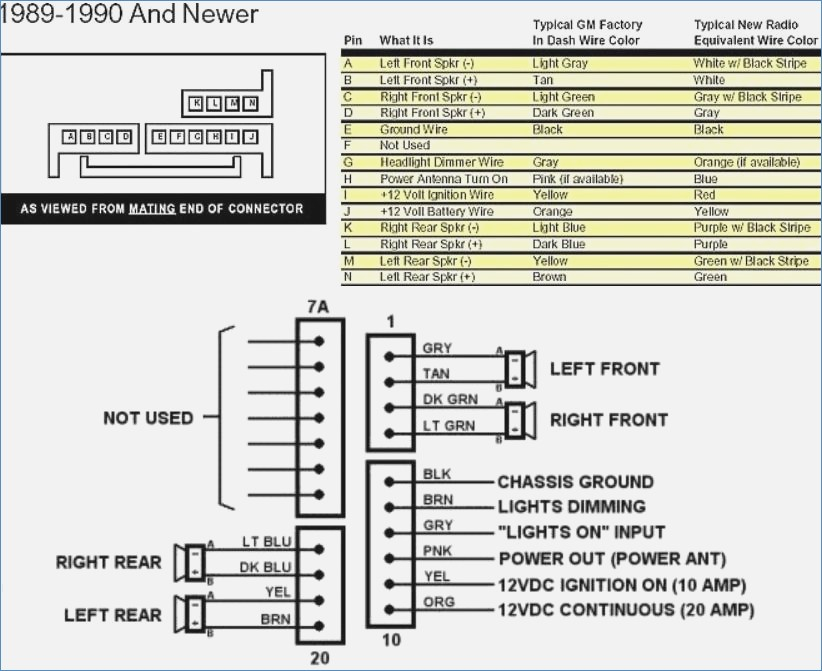
Each wire is color-coded to help identify its function. Common color codes include:
- Red: Typically indicates a constant 12V power source.
- Yellow: Usually indicates a switched 12V power source (only on when the ignition is on).
- Black: Indicates ground.
- White: Often used for speaker wires.
- Other colors, such as blue, green, and gray, represent specific functions or speaker channels. Consult the specific diagram for your Silverado to decode these.
Icons:
- Ground Symbol: Represented by three horizontal lines descending in size, indicating a connection to the vehicle's chassis for grounding.
- Fuse Symbol: A zigzag line enclosed in a rectangle, indicating a fuse.
- Connector Symbol: A square or circle with pins inside, representing a connector where multiple wires join.
- Speaker Symbol: A circle with a cross inside, representing a speaker.
- Resistor Symbol: A zigzag line, representing a resistor.
Important: Always refer to the specific wiring diagram for your Silverado's year and trim level, as wiring can vary significantly between models.
How It Works: The Audio Signal Flow
The basic flow of audio signals in a Silverado's radio system is as follows:
- Input: The audio source (radio, CD, USB, Bluetooth) provides the initial audio signal.
- Processing: The head unit processes the signal, adjusting volume, tone, and balance.
- Amplification: If equipped with an amplifier, the signal is boosted to increase its power.
- Output: The amplified signal is sent to the speakers.
- Sound Production: The speakers convert the electrical signal into sound waves.
The wiring diagram shows how each of these steps is interconnected, allowing you to trace the signal path and identify potential points of failure.
Real-World Use: Basic Troubleshooting Tips
Using the wiring diagram can significantly improve your troubleshooting efforts. Here are a few basic tips:
- No Power: Check the fuses related to the radio. Use the wiring diagram to identify the correct fuse locations. If a fuse is blown, replace it with one of the same amperage.
- No Sound from Speakers: Verify speaker connections at the head unit and the speaker itself. Check for any damaged wires. Use a multimeter to test for continuity between the head unit and the speaker.
- Distorted Sound: Could be caused by a blown speaker, a faulty amplifier, or incorrect wiring. Inspect speakers for damage and test the amplifier. Double-check speaker impedance to make sure it matches the amplifier's specifications.
- Intermittent Sound: Could be caused by loose connections or damaged wires. Carefully inspect all connections and wiring, looking for corrosion or breaks.
Safety Considerations
Working with automotive electrical systems involves certain risks. Always take the following precautions:
- Disconnect the Battery: Before working on any electrical component, disconnect the negative terminal of the battery to prevent accidental short circuits and electrical shock.
- Use Proper Tools: Use insulated tools to avoid electrical shock.
- Work in a Well-Lit Area: Ensure you have adequate lighting to clearly see what you're doing.
- Be Aware of Airbag Systems: Avoid tampering with airbag wiring, as this can trigger the airbags. Consult a professional if you need to work near airbag components.
- Identify High-Risk Components: The wiring diagram will help you identify potentially risky components such as the amplifier, which may carry high voltage. Treat these components with extra caution.
- Double Check Your Work: Before reconnecting the battery, double-check all connections to ensure they are secure and correct.
Modifying your Silverado's audio system can be a rewarding experience. By understanding the radio wiring diagram and following safe practices, you can confidently tackle a wide range of projects and enjoy enhanced audio performance.
We have the detailed Chevy Silverado radio wiring diagram file available for you. This diagram will be invaluable as you undertake your audio system projects. Download it now and take your Silverado's audio to the next level!