
Chevy Silverado Tailgate Parts Diagram
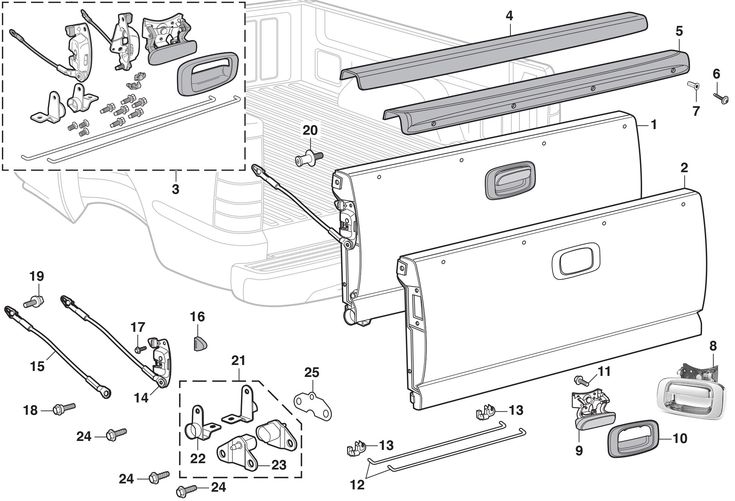
Alright, let's dive deep into the Chevy Silverado tailgate. Whether you're dealing with a busted latch, planning a custom mod, or just want a solid understanding of how it all ticks, a parts diagram is your best friend. We're going to break down a typical Silverado tailgate parts diagram, focusing on a late-model (2014-2018) example but touching on common variations. This guide will equip you with the knowledge to confidently tackle repairs and upgrades. Plus, you can download a detailed diagram we have available, perfect for taking with you into the garage.
Why You Need a Tailgate Parts Diagram
The primary purpose of a tailgate parts diagram is simple: understanding. It acts as a visual roadmap, showing you the exact location and relationships of every component within the tailgate assembly. This is crucial for:
- Repairs: Identifying the exact part you need to replace, avoiding ordering the wrong component.
- Maintenance: Understanding how parts interact can help you diagnose potential problems before they escalate.
- Modifications: Planning custom upgrades, such as adding a powered tailgate assist or modifying the locking mechanism, requires a thorough understanding of the existing structure.
- Learning: Simply expanding your automotive knowledge – knowing how things work under the skin of your Silverado.
Key Specs and Main Parts
A typical Silverado tailgate (2014-2018, for instance) consists of several key components. The complexity can vary based on trim level (e.g., models with EZ Lift or powered tailgates have additional parts).
Main Structural Elements:
- Tailgate Shell: The outer skin, providing the overall shape and protection. Usually made of stamped steel or aluminum.
- Inner Panel: Reinforces the shell and provides mounting points for other components.
- Hinges: Connect the tailgate to the truck bed, allowing it to pivot open and closed. These are heavy-duty and critical for smooth operation.
- Support Cables/Arms: (Often steel cables with plastic coating) limit the tailgate's travel when opened, preventing it from slamming down. Some models use dampened torsion bars for a smoother, controlled descent.
Locking and Latching Mechanism:
- Tailgate Latch Assembly: The heart of the system, responsible for securing the tailgate in the closed position. Consists of latches, strikers, and linkages.
- Handle: Activates the latch mechanism. May be manual or electric (in powered tailgates).
- Lock Cylinder: Allows you to lock and unlock the tailgate. Often linked to the vehicle's central locking system.
- Strikers: The metal loops on the truck bed that the latches engage with.
- Actuator (Powered Tailgates): An electric motor that controls the opening and closing of the tailgate.
Other Important Parts:
- Emblems/Badging: Cosmetic elements.
- Tailgate Handle Bezel: Surrounds the tailgate handle.
- Wiring Harness (Powered Tailgates and Tailgate Cameras): Provides electrical connections.
- Tailgate Dampener (EZ Lift Tailgates): A gas strut that slows the descent of the tailgate.
Understanding Diagram Symbols
Parts diagrams use a standardized set of symbols to represent components and their relationships. Here's a breakdown of common symbols you'll encounter:
- Solid Lines: Represent physical connections between parts.
- Dashed Lines: Indicate hidden components or parts located behind others. They can also indicate potential movement.
- Arrows: Show the direction of force or movement (e.g., how the latch moves when the handle is activated).
- Numbers/Callouts: Each part is assigned a unique number, which corresponds to a parts list accompanying the diagram. This is how you identify the specific part you need to order.
- Exploded Views: The diagram is often an "exploded" view, meaning the parts are shown slightly separated to reveal their individual locations and how they fit together.
The parts list will provide critical specs like part numbers, descriptions (e.g., "Tailgate Latch Cable"), and sometimes torque specifications for fasteners. Color-coding is rare in most basic diagrams but might be used in electrical schematics to represent wire colors.
How the Tailgate Works (Basic Overview)
In a standard, non-powered tailgate, the operation is relatively simple:
- You pull the tailgate handle.
- This activates a series of linkages (rods or cables) connected to the latch mechanisms on either side of the tailgate.
- These linkages pull the latches away from the strikers on the truck bed.
- The tailgate is then free to pivot downwards on its hinges.
- The support cables (or arms) prevent the tailgate from opening too far.
Powered tailgates add an actuator to this process. When you press the button (either on the key fob, inside the cab, or on the tailgate itself), the actuator motor drives the linkages to release the latches. Some systems also include a dampening mechanism for a soft, controlled opening and closing.
Real-World Use: Basic Troubleshooting Tips
Using the parts diagram, you can tackle common tailgate problems:
- Tailgate won't open: Check the linkages for damage or disconnection. A broken or stretched cable is a common culprit. Look at the diagram to see the cable path and connection points.
- Tailgate won't close/latch: Inspect the latches and strikers for damage or misalignment. The diagram will show you the correct positioning of these components. Sometimes, adjusting the strikers is all it takes.
- Tailgate slams down: Examine the support cables or dampening system (if equipped) for wear or damage. Replace them as needed.
- Powered tailgate not working: Check the wiring harness for loose connections or damage. Use a multimeter to test for power at the actuator. The diagram helps locate these components.
Always refer to the parts diagram to ensure you're targeting the correct components. Don't just start randomly replacing parts; diagnose the problem first.
Safety Considerations
Working on a tailgate can present some hazards:
- Springs/Torsion Bars: Some tailgates, especially those with assist mechanisms, contain springs or torsion bars under significant tension. These can cause serious injury if released improperly. Refer to the service manual for specific procedures on safely disarming these components.
- Weight: Tailgates can be heavy. Get assistance when removing or installing the tailgate to avoid back injuries.
- Electrical Components (Powered Tailgates): Disconnect the battery before working on any electrical components to prevent short circuits or electric shock.
- Sharp Edges: Be aware of sharp edges on the tailgate shell and internal components. Wear gloves to protect your hands.
Always use the correct tools for the job and follow proper safety procedures. When in doubt, consult a qualified mechanic.
With a solid understanding of the Silverado tailgate parts diagram, you're well-equipped to tackle a range of repairs and upgrades. Remember to always prioritize safety and double-check your work. Remember, we have a high-resolution diagram available for download that you can use during your project.