
Chevy Transmission Cooler Lines Diagram
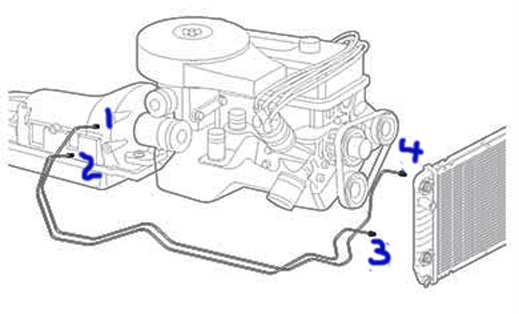
Alright folks, let's talk about something that's critical to the longevity of your Chevy transmission: the transmission cooler lines. Understanding the transmission cooler lines diagram isn't just about tracing lines; it's about safeguarding your transmission from premature wear and costly repairs. This knowledge is invaluable whether you're diagnosing a leak, upgrading your cooling system, or simply deepening your understanding of your vehicle's inner workings. We'll break down the diagram piece by piece, covering the key components, how they function, and how to troubleshoot common issues. And the best part? We've got the complete diagram available for download to help you out.
Purpose of Understanding the Transmission Cooler Lines Diagram
So, why should you bother learning about this diagram? Here's a breakdown:
- Repairs and Maintenance: Identifying the source of a transmission fluid leak is crucial. The diagram allows you to pinpoint exactly which line or fitting is failing.
- Performance Upgrades: If you're towing heavy loads or pushing your Chevy hard, upgrading the transmission cooler is a wise investment. The diagram helps you understand the stock setup and plan your upgrade.
- Diagnosis: Understanding the flow of transmission fluid through the cooling system can aid in diagnosing transmission problems, such as overheating.
- General Knowledge: As an experienced DIYer or modder, expanding your knowledge of vehicle systems is always beneficial.
Key Specs and Main Parts
Let's dive into the anatomy of a typical Chevy transmission cooler line system. While specific configurations may vary depending on the model and year, the fundamental components remain consistent:
- Transmission Fittings: These are where the cooler lines connect directly to the transmission. They're typically located on the side of the transmission case.
- Cooler Lines (Supply & Return): These are the lines that transport the transmission fluid to and from the cooler. The supply line carries hot fluid to the cooler, and the return line brings cooled fluid back to the transmission.
- Transmission Cooler: This is a heat exchanger, usually located in front of the radiator, that dissipates heat from the transmission fluid. Some vehicles may have integrated coolers inside the radiator end tank.
- Quick Disconnect Fittings: These fittings allow for easy connection and disconnection of the cooler lines. While convenient, they can sometimes be a source of leaks.
- Hoses (Rubber or Braided): In some cases, sections of the cooler lines may be flexible hoses, typically used to accommodate engine movement.
- Mounting Brackets and Clamps: These secure the cooler lines to the vehicle's frame and body, preventing them from rubbing against other components.
Important Specifications: Pay close attention to the size and type of fittings used. Using the wrong size can lead to leaks or even damage the transmission. Torque specifications for the fittings are also critical to prevent over-tightening and stripping threads.
Symbols on the Diagram
Deciphering the diagram is key to understanding the system. Here's a rundown of common symbols:
- Solid Lines: Typically represent rigid metal cooler lines.
- Dashed Lines: Indicate flexible hoses.
- Arrows: Show the direction of fluid flow.
- Color Coding: While not always present, color coding can differentiate between the supply and return lines. For example, red might indicate the supply line, and blue the return line. Refer to the diagram's legend for specific color meanings.
- Component Icons: The transmission cooler itself will usually be depicted as a rectangular or square shape with fins, representing the heat exchange core. Fittings will be shown as small circles or squares where lines connect.
- Abbreviations: Look out for abbreviations such as "TRANS" (transmission), "COOL" (cooler), "SUP" (supply), and "RET" (return).
Understanding Flow Direction: The arrows on the diagram are crucial. Incorrectly connecting the cooler lines can severely damage your transmission.
How It Works
The transmission generates a significant amount of heat due to friction from the moving parts. Excessive heat can break down the transmission fluid, leading to reduced lubrication and ultimately, transmission failure. The transmission cooler system is designed to mitigate this risk.
- Hot transmission fluid is pumped from the transmission, via the supply line, to the transmission cooler.
- The cooler dissipates heat from the fluid, typically by passing it through a finned core where air can flow across it.
- The cooled fluid then returns to the transmission, via the return line, where it continues to lubricate and cool the internal components.
Some vehicles use a combination of an air-to-fluid cooler (mounted in front of the radiator) and a fluid-to-fluid cooler (integrated into the radiator). In these systems, the fluid first passes through the radiator cooler and then to the air-to-fluid cooler for additional cooling.
Real-World Use – Basic Troubleshooting Tips
Here's how you can use the transmission cooler lines diagram to troubleshoot common problems:
- Leak Detection: If you notice transmission fluid leaking, use the diagram to trace the lines and identify the source. Check the fittings, hoses, and cooler itself for signs of damage.
- Overheating: If your transmission is overheating, ensure the cooler lines are not kinked or blocked. Check the cooler for debris that might be restricting airflow. You can also use the diagram to verify that the lines are connected correctly.
- Fluid Contamination: If you suspect your transmission fluid is contaminated, inspect the cooler lines for signs of damage that could have allowed contaminants to enter the system.
- Line Replacement: The diagram will help you accurately route the new lines and connect them to the correct fittings. Always use the correct type and size of cooler lines for your vehicle.
Pro Tip: When replacing cooler lines, consider using stainless steel braided lines for improved durability and resistance to corrosion.
Safety – Highlight Risky Components
Working with transmission cooler lines involves a few safety considerations:
- Hot Fluid: Transmission fluid can be extremely hot, especially after driving. Allow the vehicle to cool down completely before working on the cooler lines.
- High Pressure: While the pressure in the cooler lines is not as high as in the fuel system, there is still some pressure present. Relieve the pressure by loosening the filler cap before disconnecting any lines.
- Flammability: Transmission fluid is flammable. Keep open flames and sources of ignition away from the work area.
- Eye Protection: Always wear safety glasses when working on the cooler lines to protect your eyes from splashes of fluid.
- Environmental Concerns: Dispose of used transmission fluid properly. It's considered hazardous waste.
Specific areas of high risk include the quick disconnect fittings. These can sometimes be difficult to remove and can spray fluid if not handled carefully. Always use the correct tools and techniques when disconnecting these fittings.
By understanding the transmission cooler lines diagram and following proper safety procedures, you can effectively diagnose and repair problems, ensuring the longevity of your Chevy's transmission. Remember to consult your vehicle's service manual for specific instructions and torque specifications. Happy wrenching!
Ready to get started? You can download the complete Chevy Transmission Cooler Lines Diagram right here. (Link to download)